
Domino DesignerでXPageを開いた際に開くのが遅い時の対応
Xpagesの設計をDesignerで開いた際に遅い件
Notes/Dominoエンジニア XPages担当の米原です
設計をDesigerで開いた際におそい~と思ったことはないでしょうか??
設計が少ない場合はそうでもないのですが、
より複雑になった場合、カスタムコントロールの数が多くなっていきだんだん遅くなりますよね。
回避策としまして
- 冗長な処理をなくす
- DBを分ける
- PCのスペックを上げる。メモリ増幅 ^^;
などが考えられます。
ここでは取り上げる方法は、Desigerで設計を開いた際により早く開くことができるのと、
やりようによっては設計が見やすくもそうでなくもなります。
今回は1つのカスタムコントロールに5個のカスタムコントロールをセットしているもので試してみます。
これくらいなら特に遅くもならないのですが、実運用しているものでしたら、カスタムコントールの中に
カスタムコントロールはいっぱい入っているケースがあり、特にリピートコントロールは遅く成る要員の一つです
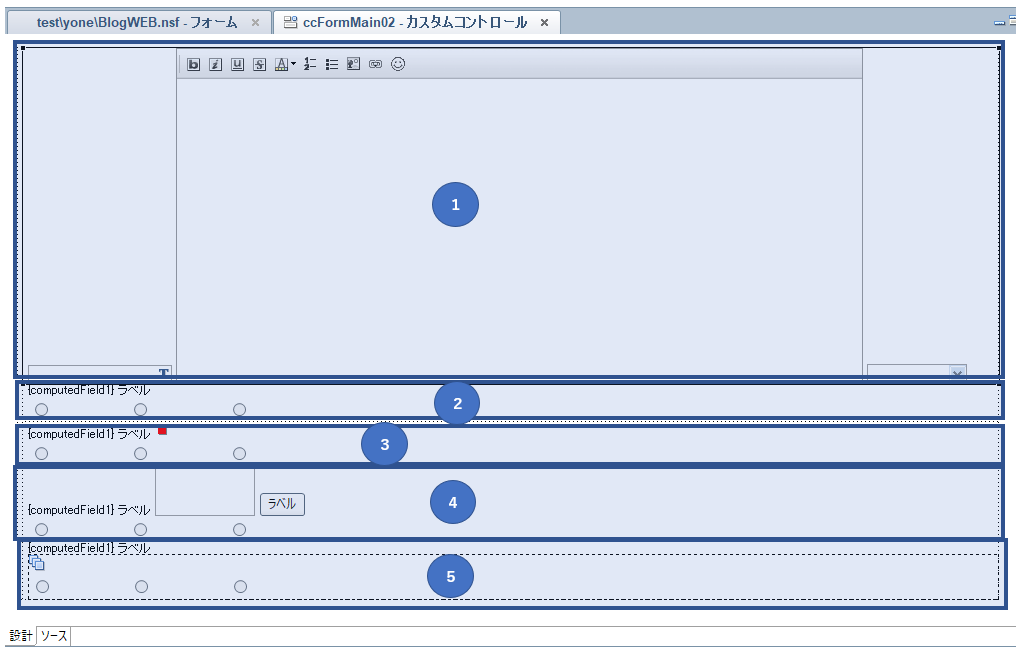
上図ではどのようなコントロールが配置されているとかがすぐわかるのでいいのはいいのですが
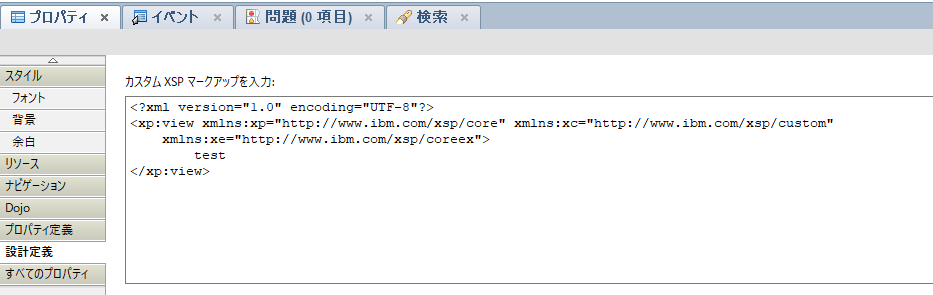
①のカスタムコントロールを開きまして、プロパティの設計定義を開きます。
そこに、XSPの形式で入力します。テスト的に下図のように設定します。
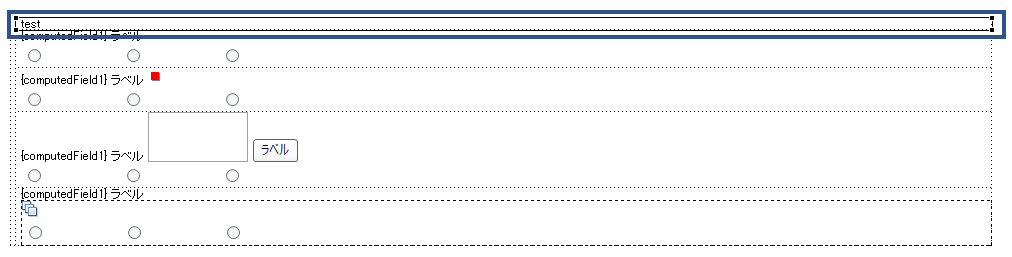
設定後に再度ccFormMain02を確認すると
test と表示されます。
ん、、、、見にくい
コメントは少し装飾しました。うんいい感じです
マークアップ式はこんな感じです↓
<?xml version="1.0" encoding="UTF-8"?>
<xp:view xmlns:xp="http://www.ibm.com/xsp/core" xmlns:xc="http://www.ibm.com/xsp/custom"
    xmlns:xe="http://www.ibm.com/xsp/coreex">
	<div style="border: 2px solid #A9A9A9; padding: 3px; margin: 5px;">
		<h1>添付用のリッチテキスト</h1>
		<div>
			フォームA,Bで使用予定
		</div>
	</div>
</xp:view>
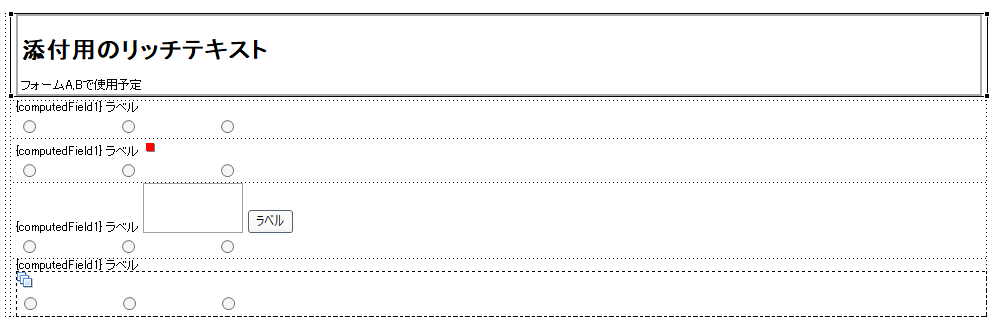
こんなふうに全て記入すると。。。
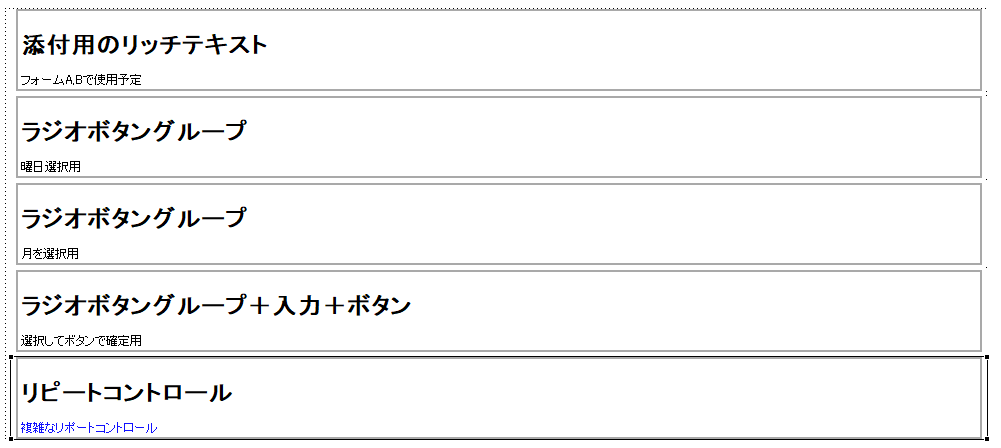
見やすくなりましたね、マークアップ箇所は基本のHTMLで記入するだけなのでお好みいに合わせて
カスタマイズできます。
ということで、見やすくなりました。めでたしめでたし!
あれれちょっと待った~表示が変わっただけなのでは、、、、
と思いきや、これで設計を開くときには今回のマークアップの設計定義を読み込むので
設計は格段に速く開くことが可能になります。
さすがに今回のサンプル的なのでは速さは体感できませんが、カスタムコントロールが増えて
複雑化してきたら結構ストレスがたまる位に起動が遅く成りますのでその際には体感できるかと思います。
それでは今回はここまでとします。


On-Premise Domino Data Access from XPages on Bluemix
Hybrid XPages appplication on Bluemix
XPages on Bluemix has been released as GA on May,2016, and developers can get the environment to develop XPages application easily on the cloud.
XPages code are compiled by "XPages runtime" for XPages on Bluemix. ![]()
This "XPages runtime" is just for runtime environment and should not store any data like Notes Document. Therefore XPages developer usually bind the service called "XPages No SQL Database" as the data store.
In fact, this "XPages No SQL Database" is just NSF file and you can store the data and create the view, form, etc.
However this "XPages No SQL Database" service is part of "Bluemix Labs Catalog" so far and according to IBM Japan, this service should not been used as the production environment.
By this blog post, I tried to use on-premise Domino as the data store for XPages on Bluemix.
Of cause it does not need to be on-premise domino, for example domino on SoftLayer is same meaning. This approach just try to access to outside of bluemix as the data store. It seams to be called as Hybrid XPages Application on bluemix.
BluemixのXPagesSet up the domino server to be used from runtime
![]() To run Hybrid XPages application, you need to configure your on-premise domino.
To run Hybrid XPages application, you need to configure your on-premise domino.
If you've already used "XPages No SQL Database" service, you maybe can ealiry imagine this, "/O=Bluemix" is used as Organization on bluemix. so xpages on bluemix cannot access to the on-premise domino without cross-certificate.
So as the first step, you need to create the new server id and then, when you deploy the application to the XPages runtime container of bluemix, you also attach the server id so that XPages on bluemix can communicate the on-premise servers through uploaded server id information.
Premise
- Installed Domino Designer, Administrator
- Installed Domino Designer 9.0.1FP6 or OpenNTF.org XPages Extension Library verson 15 or above
- Bluemix settings are configured by Domino Designer preference
- Already created XPages runtime application on Bluemix, and downloaded nsf and manifest file on your local
*Sorry, the screenshot are all in Japanese. I hope you still can understand where and what I explain.
Step 1: Create Server ID for Bluemix
- Launch Domino Administrator, then click "Configuration" tab
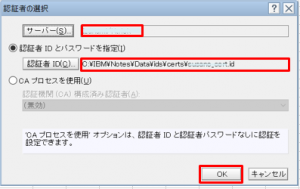
- From Tools pane, click "Registration" -> "Server".
- In the dialog, specify cert id and click [OK]
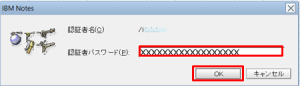
- Enter password for Cert ID[OK]
- If you don't need to change, then just Click Continue.
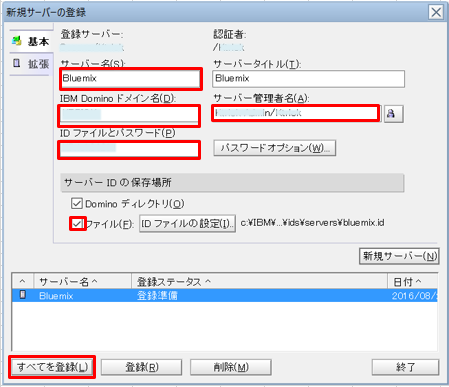
- Enter server information for bluemix. Click [Register All] to complete the process.
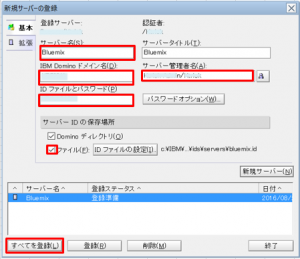 Server password is optional and usually you might not put password for server. but I added password since I give this server id to the bluemix. Also I recommend to output the server id as file by checking the checkbox.

OK, nothing special, just server id has been registered. the Different thing is you don't need to install domino server by this server id since you only have to pass this server id to the bluemix Xpages runtime.
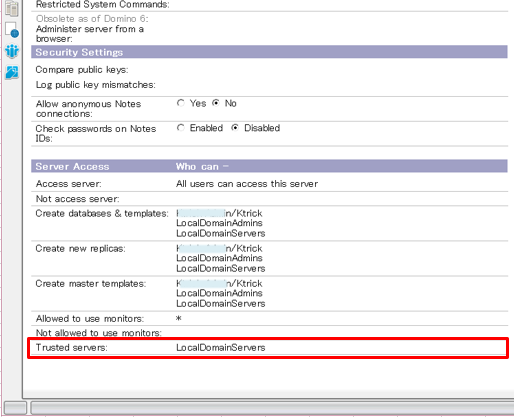
*Warning 1: Please confirm the server name is contained in "LocalDomainServers" group.
*Warning 2: Please confirm the server which has the access from Bluemix XPages runtime should contains the LocalDomainServers or created server name in Trusted servers field under the server document -> "Security" tab.
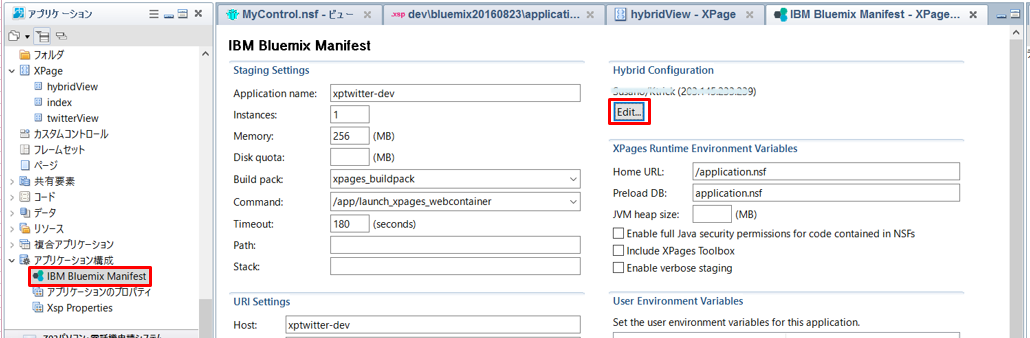
Step2: Configure IBM Bluemix Manifest
- Open Domino Designer and then open Xpages application NSF which is created from Bluemix and downloaded.
- Open "Application property" -> "IBM Bluemix Manifest"
- On the right-top corner, Click Edit button in "Hybrid Configuration" section.

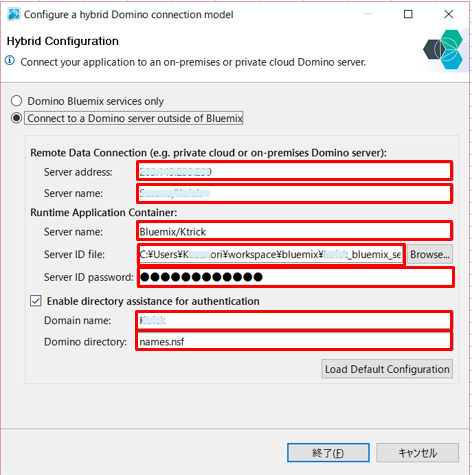
- Enter Hybrid configuration
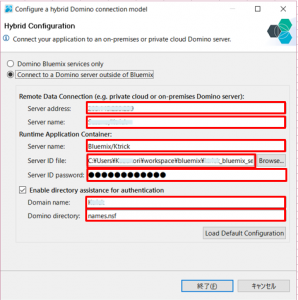
- Remote Server Address ( APP_REMOTE_DATA_SERVER_ADDRESS)
: on-premise Domino IP addressのIP. - Remote Server Name (APP_REMOTE_DATA_SERVER_NAME)
: on-premise Domino server name(i.e. App01/ZetaDataBank)。 - Runtime Server Name (APP_RUNTIME_SERVER_NAME)
: Server name created above(i.e. bluemix/ZetaDataBank)。 - Runtime Server ID File (APP_RUNTIME_SERVER_IDFILE)
: Server id file created above - Runtime Server ID Password (APP_RUNTIME_SERVER_PASSWORD)
: Server id password if you specified. - Directory Assistance Enabled (APP_DA_ENABLED)
: Specify directory assistance enabled or not - Directory Assistance Domain (APP_DA_DOMAIN)
: domain name(i.e. ZetaDataBank)。 - Directory Assistance Address Book (APP_DA_ADDRESS_BOOK)
: Directory NSF which is necessary for authentication of hybrid environment (i.e. “names.nsf”)。
- Remote Server Address ( APP_REMOTE_DATA_SERVER_ADDRESS)
That's all.
I created one sample xpage below:
[xml highlight="5"]
<?xml version="1.0" encoding="UTF-8"?>
<xp:view xmlns:xp="http://www.ibm.com/xsp/core">
<xp:this.data>
<xp:dominoView var="view1"
databaseName="App01/ZetaDataBank!!MyControl.nsf"
viewName="AllContacts">
</xp:dominoView>
</xp:this.data>
<xp:viewPanel value="#{view1}" id="viewPanel1">
<xp:this.facets>
<xp:pager partialRefresh="true" layout="Previous Group Next"
xp:key="headerPager" id="pager1">
</xp:pager>
</xp:this.facets>
<xp:viewColumn columnName="Id" id="viewColumn1">
<xp:this.facets>
<xp:viewColumnHeader value="Id" xp:key="header"
id="viewColumnHeader1">
</xp:viewColumnHeader>
</xp:this.facets>
</xp:viewColumn>
<xp:viewColumn columnName="FirstName" id="viewColumn2">
<xp:this.facets>
<xp:viewColumnHeader value="First name" xp:key="header"
id="viewColumnHeader2">
</xp:viewColumnHeader>
</xp:this.facets>
</xp:viewColumn>
<xp:viewColumn columnName="LastName" id="viewColumn3">
<xp:this.facets>
<xp:viewColumnHeader value="Last name" xp:key="header"
id="viewColumnHeader3">
</xp:viewColumnHeader>
</xp:this.facets>
</xp:viewColumn>
<xp:viewColumn columnName="EMail" id="viewColumn4">
<xp:this.facets>
<xp:viewColumnHeader value="E mail" xp:key="header"
id="viewColumnHeader4">
</xp:viewColumnHeader>
</xp:this.facets>
</xp:viewColumn>
<xp:viewColumn columnName="City" id="viewColumn5">
<xp:this.facets>
<xp:viewColumnHeader value="City" xp:key="header"
id="viewColumnHeader5">
</xp:viewColumnHeader>
</xp:this.facets>
</xp:viewColumn>
<xp:viewColumn columnName="State" id="viewColumn6">
<xp:this.facets>
<xp:viewColumnHeader value="State" xp:key="header"
id="viewColumnHeader6">
</xp:viewColumnHeader>
</xp:this.facets>
</xp:viewColumn>
<xp:viewColumn columnName="Created" id="viewColumn7">
<xp:this.facets>
<xp:viewColumnHeader value="Created" xp:key="header"
id="viewColumnHeader7">
</xp:viewColumnHeader>
</xp:this.facets>
</xp:viewColumn>
<xp:viewColumn columnName="$10" id="viewColumn8">
<xp:this.facets>
<xp:viewColumnHeader value="Name" xp:key="header"
id="viewColumnHeader8">
</xp:viewColumnHeader>
</xp:this.facets>
</xp:viewColumn>
</xp:viewPanel>
</xp:view>
[/xml]
I specified on-premise domino view in this sample. (Line 5)
Deploy to the bluemix through Domino designer.
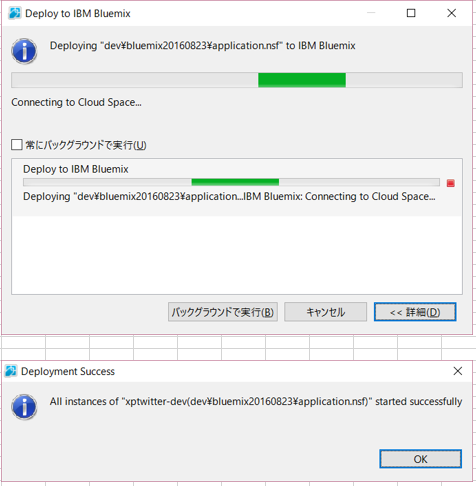
Bluemix service is going to reboot automatically. After wait for a while, access to the Xpage URL you created, and then if you get the on-premise data in the view, Success!
How to invoke function from string by XPages SSJS
What's the case you want to invoke the function from string?
There are many situations you want to invoke the function from string of function name. One of case is for example, you might want to switch the functions from the parameter value of HTML Get/Post method.
The example below is client-side javascript(CSJS) when it's triggered from the URL like "http://mydomain.com/ApplyFuncXAgent.xsp?func=callMe". Then switch the flow by the query parameter value of "func".
[code lang="javascript" highlight=""]
var strFunc = location.search.split('func=')[1];
switch(location.search.split('func=')[1]){
case "func1": func1(); break;
case "func2": func2(); break;
case "callMe": callMe(); break;
default: break;
}
[/code]
If you want to simplify the code above, you can write the code like below:
[code lang="javascript" highlight="2"]
var strFunc = location.search.split('func=')[1];
var funcObj = window[strFunc];
if (typeof funcObj === "function") funcObj();
[/code]
In this case, window object is used to retrieve the function object, then call the target function. However Server-side Javascript(SSJS) does not have the window object like CSJS. Therefore you need to tweak this code a little.
(1) Use "this" instead of "window"
[code lang="javascript" highlight=""]
var funcObj = this[strFunc];
[/code]
(2) Use eval()
[code lang="javascript" highlight=""]
eval(strFunc+"()");
[/code]
Both (1),(2) can get the same result.
To pass the parameters, Use call() or apply()
Now we could call the function from string of function name. Then if you want to pass the parameters as well when call the funcion, you can use call() or apply() functions. Actually this way is pretty same as CSJS.
For example, when I call the HTTP Get request like "http://mydomain.com/ApplyFuncXAgent.xsp?func=callMe&args=aa,bb". (I added [args=aa,bb] as the function argument's values.) , the SSJS code becomes like below:
[code lang="javascript" highlight="3"]
var argsAry = @Explode(args, ",");
var funcObj = this[func];
return funcObj.call(this, argsAry[0], argsAry[1]);
[/code]
The code above is the example of using call(). If you want to use apply(), then instead of passing the arguments separated by comma, pass the Array to the second argument of apply(). Below is the sample code:
[code lang="javascript" highlight="3"]
var argsAry = @Explode(args, ",");
var funcObj = this[func];
return funcObj.apply(this, argsAry);
[/code]
Sample code of using XAgent
In my situation, I needed to get the JSON data from the many notes views as the asynchronous connection. (Passing the JSON data for Kendo UI Grid data.) So I decided to use the XAgent to return the JSON data, however I didn't want to create XAgent XPages as many as notes views. So the sample code below calls the function from the Get parameter value of function name and returns the JSON data by the specified function.
HTTP request is like this -> "http://mydomain.com/hoge.nsf/ApplyFuncXAgent.xsp?func=testFunc&args=aa,bb"
[code lang="xml" highlight="15,16,18"]
<?xml version="1.0" encoding="UTF-8"?>
<xp:view xmlns:xp="http://www.ibm.com/xsp/core" rendered="false">
<xp:this.resources>
<xp:script src="/xpCommon.jss" clientSide="false"></xp:script>
</xp:this.resources>
<xp:this.afterRenderResponse><![CDATA[#{javascript:var externalContext = facesContext.getExternalContext();
var writer = facesContext.getResponseWriter();
var response = externalContext.getResponse();
// Set context type etc
response.setContentType("application/json");
response.setHeader("Cache-Control", "no-cache");
// read parameters
var func = context.getUrlParameter("func");
var args = context.getUrlParameter("args");
var retTxt = callFuncByString(func, args);
writer.write(retTxt);
writer.endDocument();}]]></xp:this.afterRenderResponse>
</xp:view>
[/code]
Below is the sample code of xpCommon.jss which contains the callFuncByString() above.
[code lang="javascript" highlight=""]
function callFuncByString(func, args){
try{
var argsAry = @Explode(args, ",");
var funcObj = this[func];
return funcObj.call(this, argsAry[0], argsAry[1]);
}catch(e){
print(e);
}
}
function testFunc(arg1, arg2){
return "[{\"arg1\":\""+arg1+"\", \"arg2\":\""+arg2+"\"}]";
}
[/code]
The advantage of this logic is avoiding to create many XAgent for notes views. But please remember that dynamically calling the functions from string value sometimes lose the serviceability of code. For example debugging purpose.
*This XAgent is just for example and for the real coding, please pay attention to the security when you use this concept since any SSJS standard functions can be called remotely if you don't add any restriction and it is very dangerous.