
XPagesリッチテキストコントロールのカスタマイズ
XPagesのリッチテキストコントロール カスタマイズ
Notes/Dominoエンジニア XPages担当の米原です。
まだまだ現役でXpagesの開発を行っています!
最近行き詰まったところがありましたで備忘としてブログに残すことにしました。
リッチテキストの入力高さを固定(縦スクロール付き)方法
リッチテキストを画面に配置したのですが、文字を入力して改行していくと、
自動で入力枠が縦に広がり結構縦に長くなり1画面の領域を結構占領してしまいます。
どうにか縦の幅を狭くしたいと思いました。
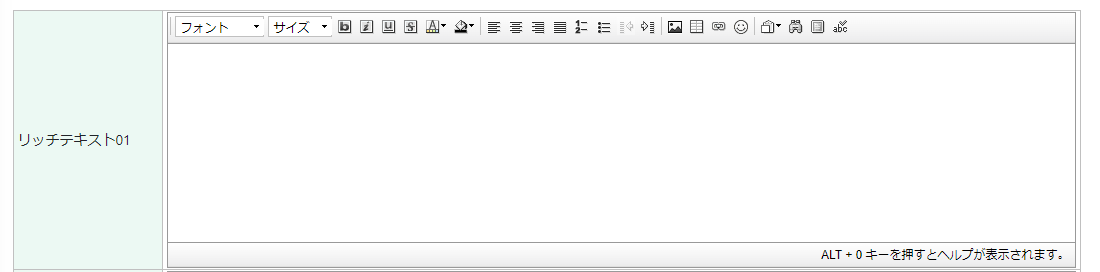
入力をするとどんどん広がって他の項目が見えなくなったりします。
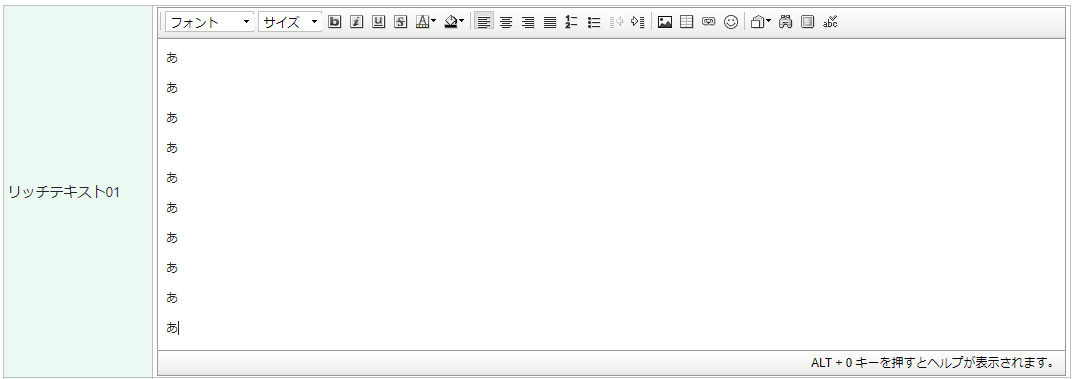

Dojo属性を追加することによりCKEditorのConfig値を変更しました。
autoGrow_maxHeight:縦幅の広がった際の最大値
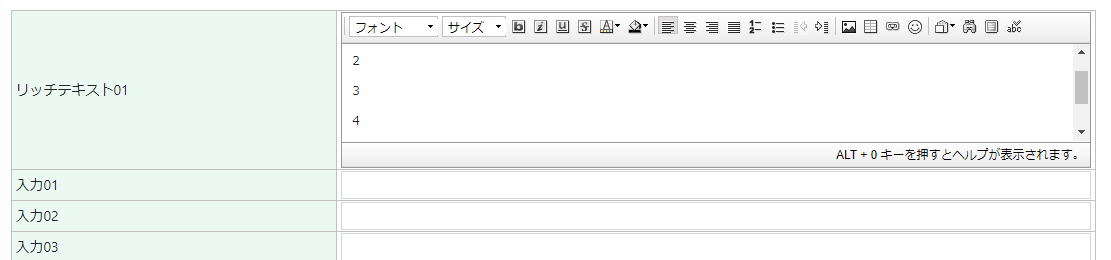
こんな感じで最大枠を指定できます。長くなる場合は縦のスクロールバーが機能します。
ツールバーを消す方法
今回の場合上のツールバーも不要なので消したいと思います。

同じように、今度は nameに toolbar 、valueに [[]] これで上のツールバーは消えます。

この様にしてすっきりしました!
ここで「tootbar」 の「value」 に表示したいアイコンを選択することも可能です。
詳しくはこちらを参照してください↓
https://www.ktrick.com/xpages-richtext-ckeditor-toolbar-customize/
設定値などは、こちらを参考にしました。
https://docs-old.ckeditor.com/ckeditor_api/symbols/CKEDITOR.config.html
また色々と試したいと思います!
On-Premise Domino Data Access from XPages on Bluemix
Hybrid XPages appplication on Bluemix
XPages on Bluemix has been released as GA on May,2016, and developers can get the environment to develop XPages application easily on the cloud.
XPages code are compiled by "XPages runtime" for XPages on Bluemix. ![]()
This "XPages runtime" is just for runtime environment and should not store any data like Notes Document. Therefore XPages developer usually bind the service called "XPages No SQL Database" as the data store.
In fact, this "XPages No SQL Database" is just NSF file and you can store the data and create the view, form, etc.
However this "XPages No SQL Database" service is part of "Bluemix Labs Catalog" so far and according to IBM Japan, this service should not been used as the production environment.
By this blog post, I tried to use on-premise Domino as the data store for XPages on Bluemix.
Of cause it does not need to be on-premise domino, for example domino on SoftLayer is same meaning. This approach just try to access to outside of bluemix as the data store. It seams to be called as Hybrid XPages Application on bluemix.
BluemixのXPagesSet up the domino server to be used from runtime
![]() To run Hybrid XPages application, you need to configure your on-premise domino.
To run Hybrid XPages application, you need to configure your on-premise domino.
If you've already used "XPages No SQL Database" service, you maybe can ealiry imagine this, "/O=Bluemix" is used as Organization on bluemix. so xpages on bluemix cannot access to the on-premise domino without cross-certificate.
So as the first step, you need to create the new server id and then, when you deploy the application to the XPages runtime container of bluemix, you also attach the server id so that XPages on bluemix can communicate the on-premise servers through uploaded server id information.
Premise
- Installed Domino Designer, Administrator
- Installed Domino Designer 9.0.1FP6 or OpenNTF.org XPages Extension Library verson 15 or above
- Bluemix settings are configured by Domino Designer preference
- Already created XPages runtime application on Bluemix, and downloaded nsf and manifest file on your local
*Sorry, the screenshot are all in Japanese. I hope you still can understand where and what I explain.
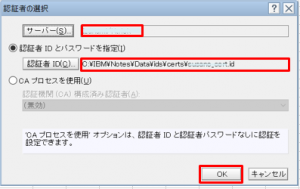
Step 1: Create Server ID for Bluemix
- Launch Domino Administrator, then click "Configuration" tab
- From Tools pane, click "Registration" -> "Server".
- In the dialog, specify cert id and click [OK]

- Enter password for Cert ID[OK]
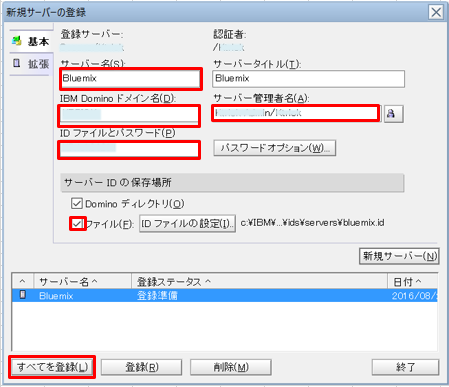
- If you don't need to change, then just Click Continue.
- Enter server information for bluemix. Click [Register All] to complete the process.
Server password is optional and usually you might not put password for server. but I added password since I give this server id to the bluemix. Also I recommend to output the server id as file by checking the checkbox.

OK, nothing special, just server id has been registered. the Different thing is you don't need to install domino server by this server id since you only have to pass this server id to the bluemix Xpages runtime.
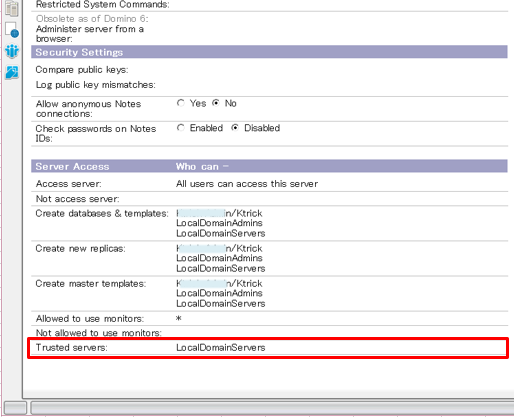
*Warning 1: Please confirm the server name is contained in "LocalDomainServers" group.
*Warning 2: Please confirm the server which has the access from Bluemix XPages runtime should contains the LocalDomainServers or created server name in Trusted servers field under the server document -> "Security" tab.
Step2: Configure IBM Bluemix Manifest
- Open Domino Designer and then open Xpages application NSF which is created from Bluemix and downloaded.
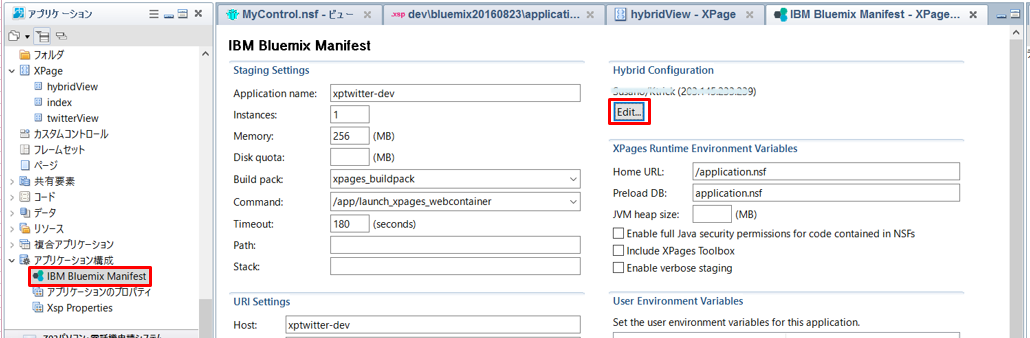
- Open "Application property" -> "IBM Bluemix Manifest"
- On the right-top corner, Click Edit button in "Hybrid Configuration" section.
- Enter Hybrid configuration
- Remote Server Address ( APP_REMOTE_DATA_SERVER_ADDRESS)
: on-premise Domino IP addressのIP. - Remote Server Name (APP_REMOTE_DATA_SERVER_NAME)
: on-premise Domino server name(i.e. App01/ZetaDataBank)。 - Runtime Server Name (APP_RUNTIME_SERVER_NAME)
: Server name created above(i.e. bluemix/ZetaDataBank)。 - Runtime Server ID File (APP_RUNTIME_SERVER_IDFILE)
: Server id file created above - Runtime Server ID Password (APP_RUNTIME_SERVER_PASSWORD)
: Server id password if you specified. - Directory Assistance Enabled (APP_DA_ENABLED)
: Specify directory assistance enabled or not - Directory Assistance Domain (APP_DA_DOMAIN)
: domain name(i.e. ZetaDataBank)。 - Directory Assistance Address Book (APP_DA_ADDRESS_BOOK)
: Directory NSF which is necessary for authentication of hybrid environment (i.e. “names.nsf”)。
- Remote Server Address ( APP_REMOTE_DATA_SERVER_ADDRESS)
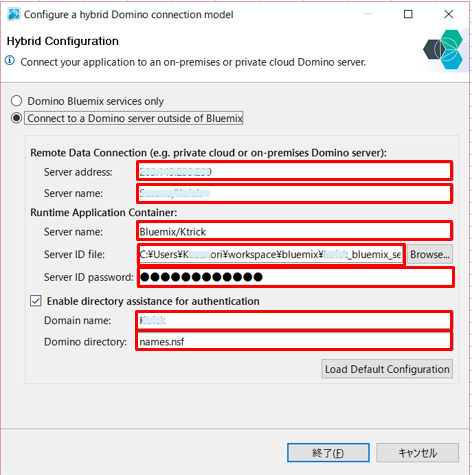
That's all.
I created one sample xpage below:
[xml highlight="5"]
<?xml version="1.0" encoding="UTF-8"?>
<xp:view xmlns:xp="http://www.ibm.com/xsp/core">
<xp:this.data>
<xp:dominoView var="view1"
databaseName="App01/ZetaDataBank!!MyControl.nsf"
viewName="AllContacts">
</xp:dominoView>
</xp:this.data>
<xp:viewPanel value="#{view1}" id="viewPanel1">
<xp:this.facets>
<xp:pager partialRefresh="true" layout="Previous Group Next"
xp:key="headerPager" id="pager1">
</xp:pager>
</xp:this.facets>
<xp:viewColumn columnName="Id" id="viewColumn1">
<xp:this.facets>
<xp:viewColumnHeader value="Id" xp:key="header"
id="viewColumnHeader1">
</xp:viewColumnHeader>
</xp:this.facets>
</xp:viewColumn>
<xp:viewColumn columnName="FirstName" id="viewColumn2">
<xp:this.facets>
<xp:viewColumnHeader value="First name" xp:key="header"
id="viewColumnHeader2">
</xp:viewColumnHeader>
</xp:this.facets>
</xp:viewColumn>
<xp:viewColumn columnName="LastName" id="viewColumn3">
<xp:this.facets>
<xp:viewColumnHeader value="Last name" xp:key="header"
id="viewColumnHeader3">
</xp:viewColumnHeader>
</xp:this.facets>
</xp:viewColumn>
<xp:viewColumn columnName="EMail" id="viewColumn4">
<xp:this.facets>
<xp:viewColumnHeader value="E mail" xp:key="header"
id="viewColumnHeader4">
</xp:viewColumnHeader>
</xp:this.facets>
</xp:viewColumn>
<xp:viewColumn columnName="City" id="viewColumn5">
<xp:this.facets>
<xp:viewColumnHeader value="City" xp:key="header"
id="viewColumnHeader5">
</xp:viewColumnHeader>
</xp:this.facets>
</xp:viewColumn>
<xp:viewColumn columnName="State" id="viewColumn6">
<xp:this.facets>
<xp:viewColumnHeader value="State" xp:key="header"
id="viewColumnHeader6">
</xp:viewColumnHeader>
</xp:this.facets>
</xp:viewColumn>
<xp:viewColumn columnName="Created" id="viewColumn7">
<xp:this.facets>
<xp:viewColumnHeader value="Created" xp:key="header"
id="viewColumnHeader7">
</xp:viewColumnHeader>
</xp:this.facets>
</xp:viewColumn>
<xp:viewColumn columnName="$10" id="viewColumn8">
<xp:this.facets>
<xp:viewColumnHeader value="Name" xp:key="header"
id="viewColumnHeader8">
</xp:viewColumnHeader>
</xp:this.facets>
</xp:viewColumn>
</xp:viewPanel>
</xp:view>
[/xml]
I specified on-premise domino view in this sample. (Line 5)
Deploy to the bluemix through Domino designer.
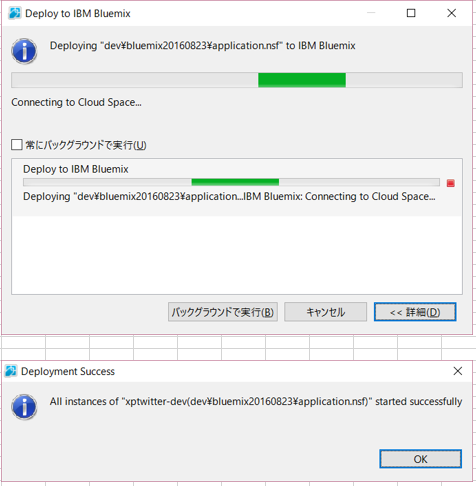
Bluemix service is going to reboot automatically. After wait for a while, access to the Xpage URL you created, and then if you get the on-premise data in the view, Success!

How to change the XPages radio button design by CSS
How to apply the CSS design to the radio button in general
If you want to change the radio button or checkbox design by css, usually you need to prepare the HTML source code like below:
[code lang="html" highlight=""]
<p>
<input type="radio" id="radio">
<label for="radio">ラジオボタン</label>
</p>
[/code]
The most important point in above HTML is having the "input" and "label" tag as sibling hierarchy. Based on this html, CSS should be specified as following:
[code lang="css" highlight=""]
input[type="radio"]{
opacity: 0;
}
[/code]
First of all, hiding the original radio design by setting opacity 0.
In the next step, you can design the button as you like by using label tag like below.
[code lang="css" highlight=""]
input[type="radio"]+label:before{
display: inline-block;
content: "";
background-color: lightpink;
color: crimson;
border-style: solid;
border-width: 0.1875em;
width: 0.625em;
height: 0.625em;
margin-top: 0.25em;
margin-right: 0.25em;
border-radius: 0.5em;
}
input[type="radio"]:checked+label:before{
border-style: double;
border-width: 0.5em;
width: 0;
height: 0;
}
[/code]
The css above is the one example of customizing the radio button. The HTML and CSS would be like the image below:
![]()
The imporatnt point of this CSS is the selector of ”input[type="radio"]+label:before”.
The "+label" means to specify the label tag which is sibling of selected input tag (type is radio). By doing this, customizing the design of selected button.
You might wonder why you need to use label tag instead of using input tag directly. The reason why doing this is because input tag cannot use ":before" and input tag itself needs to be hidden. Therefore label tag is needed to customize the design for radio butto/checkbox.
Actually the explanation above is nothing related with XPages. So you will be able to find many design example if you google for the radio button design.
Now I would like to write the article for how to change the XPages radio button design by using only CSS.
Understand the HTML hierarchy of XPages radio button (radio button group)
To apply the similar design to the XPages radio button, first of all, we need to understand the HTML source code which XPages generates for radio button or radio button group control.
Below example is for radio button group control.
[code lang="xml" highlight=""]
<xp:radioGroup id="radioGroup1">
<xp:selectItem itemLabel="Radio A" itemValue="A"></xp:selectItem>
<xp:selectItem itemLabel="Radio B" itemValue="B"></xp:selectItem>
</xp:radioGroup>
[/code]
Then, HTML source code is like below. (Domino 9.0.1)
[code lang="html" highlight="5,8,11,14"]
<fieldset id="view:_id1:radioGroup1" class="xspRadioButton">
<table role="presentation" class="xspRadioButton">
<tr>
<td>
<label for="view:_id1:radioGroup1:0">
<input type="radio" id="view:_id1:radioGroup1:0" name="view:_id1:radioGroup1" value="A">
Radio A
</label>
</td>
<td>
<label for="view:_id1:radioGroup1:1">
<input type="radio" id="view:_id1:radioGroup1:1" name="view:_id1:radioGroup1" value="B">
Radio B
</label>
</td>
</tr>
</table>
</fieldset>
[/code]
As you can see, label tag has the input tag as a child. In fact, this html structure makes much harder to customize the design for radio button / checkbox.
No way to inform the checked status of radio button to the label tag
In the first example of CSS above, there is selector of "input[type="radio"]:checked+label:before". This means "when radio button has been checked, change the sibling label design!". However as the XPages' HTML structure, you cannot use the selector like first example because generally CSS cannot specify the PARENT element by CHILD element status. ( in this case, input:checked cannot inform the status to the label tag)
(It is actually possible if you use the Javascript like jQuery though...)
Never give up! Applying the design only by CSS!
As I explained, XPages cannot use the example CSS above. So I needed to find the other way to apply the custom design.
Using "box-shadow"
After spending a lot of try and error, the CSS for XPages radio button control became like below:
[code lang="css" highlight=""]
fieldset table td label{
cursor : pointer;
position : relative;
padding-left : 5px;
margin-right : 20px;
overflow : hidden;
height : 20px;
padding-left : 22px;
padding-top : 8px;
display : inline-block;
}
fieldset table td label:before {
position : absolute;
width : 15px;
height : 15px;
border : 2px solid lightpink;
border-radius : 50%;
left : 0px;
top : 4px;
content : '';
z-index : 3;
}
fieldset table td label:after {
content : '';
position : absolute;
width : 11px;
height : 11px;
border-radius : 100%;
left : 4px;
top : 8px;
background-color : crimson;
z-index : 1;
}
fieldset table td label input[type="radio"] {
-moz-appearance: none;
-webkit-appearance: none;
position : absolute;
z-index : 2;
width : 20px;
height : 20px;
left : -23px;
top : 1px;
margin : 0px;
box-shadow : 20px -1px #fff;
}
fieldset table td label input[type="radio"]:checked {
box-shadow : none;
}
fieldset table td label input[type="radio"]:focus {
opacity : 0.2;
box-shadow : 20px -1px #fff;
}
[/code]
In this CSS, "label:before" specifies the outline of radio button, and "label:after" specifies the checked radio design. The point of this CSS is masking the checked radio design by using "box-shadow" for checked and unchecked status.
I know this CSS is more complicated. However you don't need to apply any javascript or any other html attribute value, and control 100% by just using CSS.
By the way, this CSS does not work on IE8 or less since "box-shadow" is part of CSS3 and IE8 does not support it.
Deep dive more
For more advanced CSS style, for example, you can use the image for radio button design.
The XPages source code below applies the three different type of images and express checked status by using opacity.
[code lang="xml" highlight=""]
<?xml version="1.0" encoding="UTF-8"?>
<xp:view xmlns:xp="http://www.ibm.com/xsp/core">
<style>
fieldset {border:none;}
fieldset table{
border:none;
width:30%;
padding:10px;
}
fieldset table td {width:50px;}
fieldset table td label{
position : relative;
width : 30px;
height : 30px;
overflow : hidden;
cursor : pointer;
}
fieldset table td label:before {
content : '';
display : block;
width : 30px;
height : 30px;
border-radius : 100%;
position : absolute;
z-index : 1;
}
fieldset table td:nth-child(1) label:before{background:url(./yes.png)
no-repeat;}
fieldset table td:nth-child(2) label:before{background:url(./no.png)
no-repeat;}
fieldset table td:nth-child(3) label:before{background:url(./maybe.png)
no-repeat;}
fieldset table td label input[type="radio"] {
-moz-appearance: none;
-webkit-appearance: none;
margin : 0px;
position : absolute;
z-index : 2;
left : -30px;
width : 0px;
height : 0px;
display : block;
box-shadow : 30px 0px 0 30px #fff;
opacity : 0.7;
}
fieldset table td label input[type="radio"]:checked {
box-shadow : none;
opacity : 1;
}
fieldset table td label input[type="radio"]:focus {
opacity : 0.0;
}
fieldset table td label input[type="radio"]:hover {
box-shadow : 30px 0px 0 30px #fff;
opacity : 0.5;
}
</style>
<xp:radioGroup id="yesno">
<xp:selectItem itemLabel="" itemValue="1">
</xp:selectItem>
<xp:selectItem itemLabel="" itemValue="0">
</xp:selectItem>
<xp:selectItem itemLabel="" itemValue="2">
</xp:selectItem>
</xp:radioGroup>
</xp:view>
[/code]
The image below is the result. When you click the icon image, the image color is displayed clearly and unchecked radio image turns to subtle color.

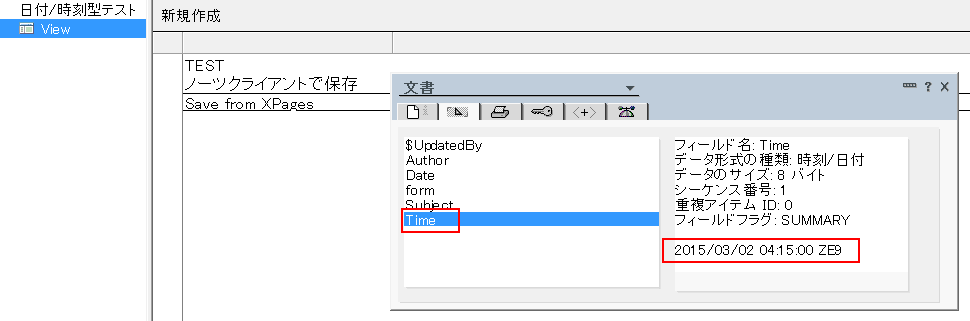
How to set 'date only' or 'time only' values in fields through XPages
XPages always save date and time in a field
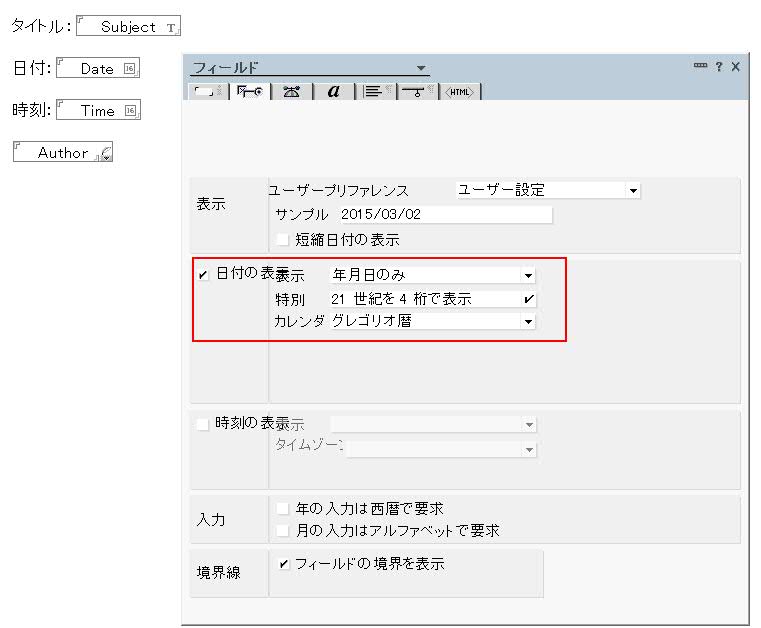
When a form has the fields with "date only" or "time only", then the stored data format are different between Notes Client and XPages.
For example, I prepared the field with "date only" named "Date" as following (sorry, screenshots are all Japanese) :
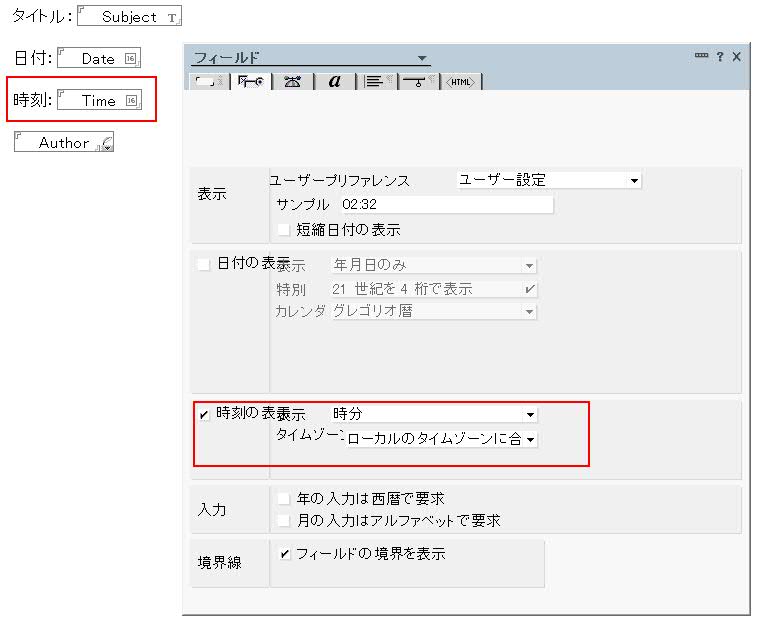
And also field with "time only" named "Time":
Now I saved a new document with this form from Notes Client (9.0.1 FP3), then I got following fields' data.
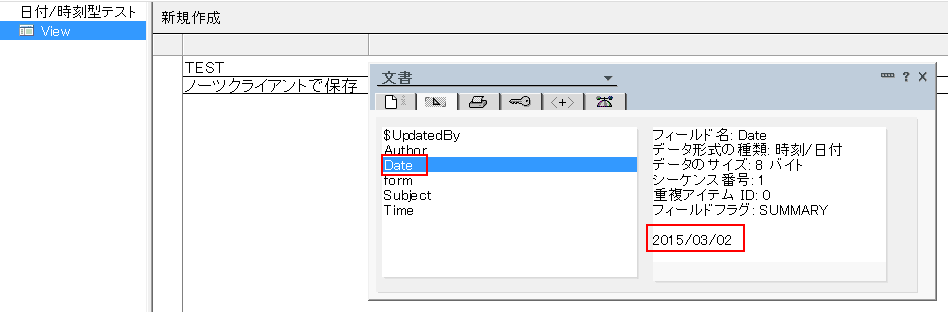
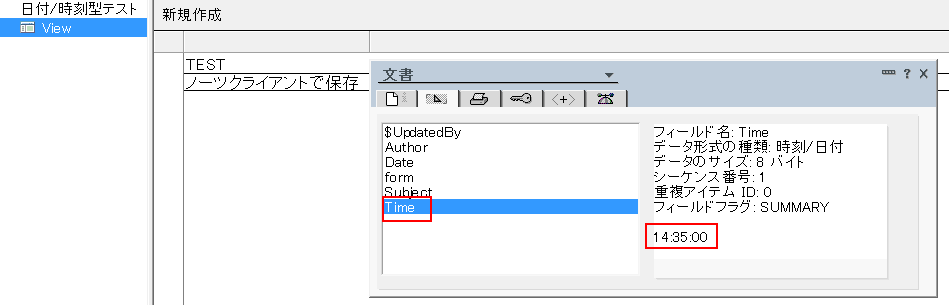
As you see, "Date" field has "2015/03/02", and Time field has"14:35:00"
As the next, I created the simple XPage to save a new document with same form and fields so that I can compare the data between Notes Client and XPages.
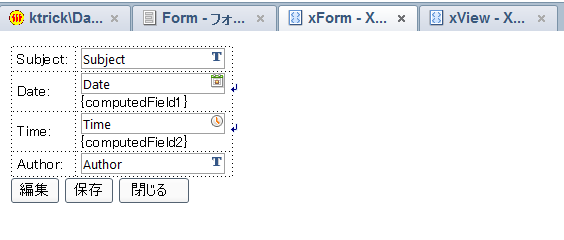
Below is the source code for Date field and Time field in XPages.
Date Field
[code lang="xml" highlight=""]
<xp:inputText value="#{document1.Date}" id="date1">
<xp:dateTimeHelper id="dateTimeHelper1"></xp:dateTimeHelper>
<xp:this.converter>
<xp:convertDateTime type="date" dateStyle="short">
</xp:convertDateTime>
</xp:this.converter>
</xp:inputText>
[/code]
Time Field
[code lang="xml" highlight=""]
<xp:inputText id="time1" value="#{document1.Time}">
<xp:dateTimeHelper id="dateTimeHelper2"></xp:dateTimeHelper>
<xp:this.converter>
<xp:convertDateTime type="time" timeStyle="short"
timeZone="Japan">
</xp:convertDateTime>
</xp:this.converter>
</xp:inputText>
[/code]
Each inputText specify date, time to the Type attribute of convertDateTime.
After saving a new document from this XPage, below is the screenshot of stored field data:
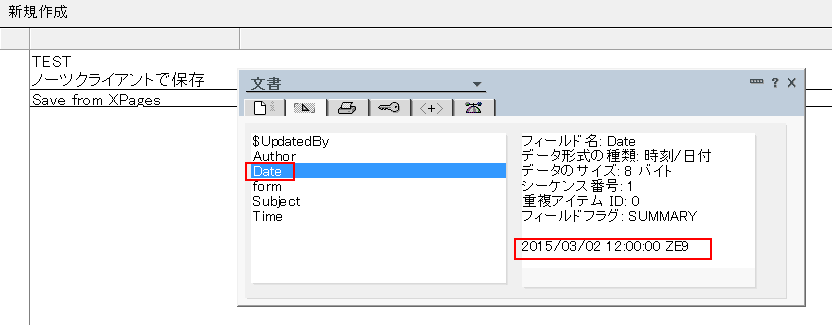
So both of fields have "yyyy/MM/dd hh:mm:dd ZZ" format.
Why you need to save "date only" or "time only" data from XPages?
I just don't post this blog to argue which format is proper way and why XPages behaves differently.
In the real world, I think you or your customers already have the NSF apps and you may want to improve them as the web application by XPages. In that case, especially you decide to keep using the NSF from both Notes Client and XPages, then I recommend to adjust the field format to Notes Client one instead of XPages one so that all existing documents are supported both Notes Client and XPages without changing data.
Use setAnyTime()、setAnyDate() of NotesDateTime class
Maybe there are a lot of way to achieve what I want below. But one of easy way is using NotesDateTime class of SSJS.
[code lang="xml" highlight="6,8"]
<xp:this.data>
<xp:dominoDocument var="document1" formName="Form"
computeWithForm="both">
<xp:this.postSaveDocument><![CDATA[#{javascript:
var dt:NotesDateTime = document1.getItemValueDateTime("Date");
dt.setAnyTime();
var tm:NotesDateTime = document1.getItemValueDateTime("Time");
tm.setAnyDate();
var notesDoc:NotesDocument = document1.getDocument();
notesDoc.replaceItemValue("Date", dt);
notesDoc.replaceItemValue("Time", tm);
notesDoc.save();
dt.recycle();
tm.recycle();
notesDoc.recycle();
}]]></xp:this.postSaveDocument>
</xp:dominoDocument>
</xp:this.data>
[/code]
The SSJS above converts the DateTime field format by using setAnyTime()、setAnyDate() in PostSaveDocument event after saving the XSP document .

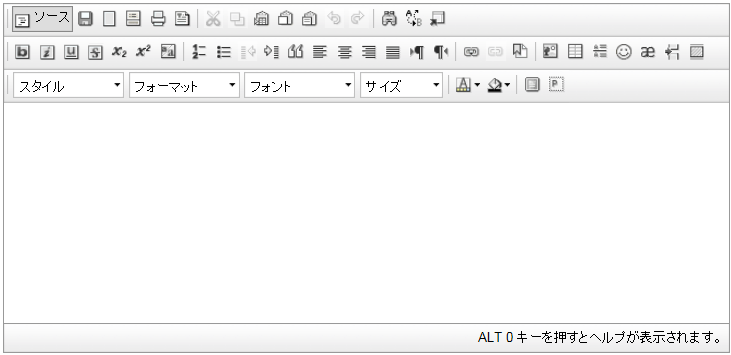
XPagesリッチテキスト CKEditorツールバーをカスタマイズ
XPages リッチテキスト コントロール
XPagesのリッチテキストコントロールはDomino 8.5.2からCKEditorが採用されるようになりました。
デフォルトでのリッチテキスト コントロールは以下の様なレイアウトになります。
デフォルトでは文字の修飾など基本的なことしか出来ないようになっています。
今回はこのCKEditorをカスタマイズする方法をご紹介します。
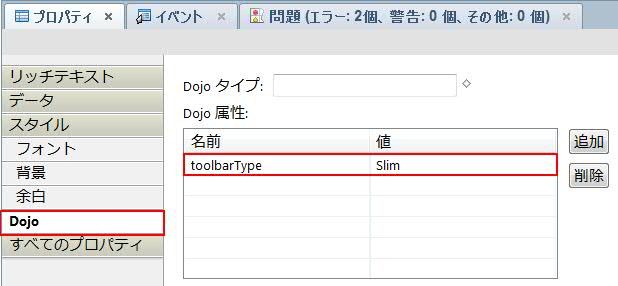
toolbarTypeを指定してカスタマイズ
以下の用にDojo属性を追加し、名前を「toolbarType」にし値を指定します。
値には
- Slim
- Medium
- Large
を指定することができます。
それぞれのレイアウト


Javascriptを使ってフルカスタマイズ
dojo属性に「toolbar」を作り、ツールバーの項目をJavascriptの配列で指定することでリッチテキストコントロールのツールバーをフルカスタマイズすることが可能になります。
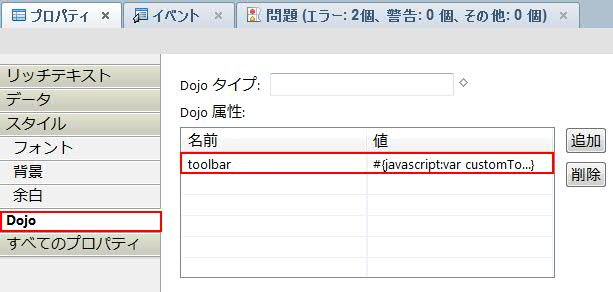
値の部分にサーバーサイドJavascriptでツールバーの項目を以下のようにセットします。
[code lang="js"]
var customToolbar="[['Bold', 'Italic', '-', 'NumberedList', 'BulletedList', '-', 'Link', 'Unlink','-','About']]";
return customToolbar;
[/code]
全てのツールバーの項目を表示させたい場合、
[code lang="js"]
var customToolbar="[['Source','-','Save','NewPage','DocProps','Preview','Print','-','Templates'],"
+"['Cut','Copy','Paste','PasteText','PasteFromWord','-','Undo','Redo'],"
+"['Find','Replace','-','SelectAll','-','SpellChecker', 'Scayt'],"
+"['Form', 'Checkbox', 'Radio', 'TextField', 'Textarea', 'Select', 'Button', 'ImageButton', 'HiddenField'],"
+"'/',"
+"['Bold','Italic','Underline','Strike','Subscript','Superscript','-','RemoveFormat'],"
+"['NumberedList','BulletedList','-','Outdent','Indent','-','Blockquote','CreateDiv','-','JustifyLeft','JustifyCenter','JustifyRight','JustifyBlock','-','BidiLtr','BidiRtl'],"
+"['Link','Unlink','Anchor'],"
+"['Image','Flash','Table','HorizontalRule','Smiley','SpecialChar','PageBreak','Iframe'],"
+"'/',"
+"['Styles','Format','Font','FontSize'],"
+"['TextColor','BGColor'],"
+"['Maximize', 'ShowBlocks','-','About']]";
return customToolbar;
[/code]
のようになります。
このように、フルカスタマイズすることで、今までになかったHTMLソースコードでの編集等も可能になります。
CKEditor 3.X Developer's Guide も参考にしてください。

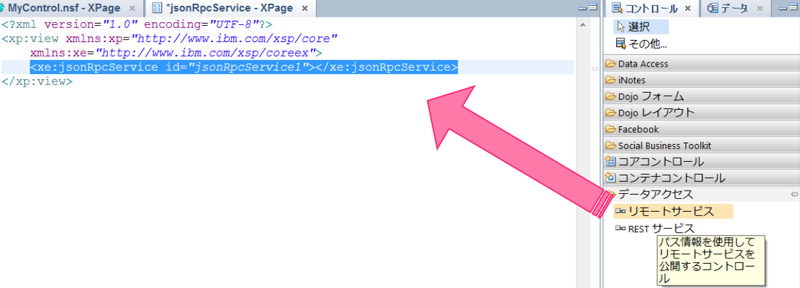
【XPages】 xe:jsonRpcService の使い方と考察
xe:jsonRpcServiceってなにやつ?
今回はExtension Libraryに搭載されている xe:jsonRpcServiceに関して日本語で解説がほとんど見当たらなかったのでブログに書いてみます。
xe:jsonRpcServiceはDomino Designerの右コントロールの「データアクセス」 →「リモートサービス」をXPagesにドラッグしてやることで作成することが出来るコントロールです。
とても軽量、シンプルな通信プロトコル JSON-RPC
でも使い道がいまいちよく分からないDomino技術者の方も多いと思います。そしてよく分かっていない内の1人だった自分が今回、jsonRpcServiceについて調べてみました。
まず、jsonRpcServiceはRPCの名が入っている通り、クライアントとサーバー間でリモート処理を実行したりするんだろう、と推測できます(RPC=リモートプロシージャコールの略)。
そしてJSON-RPCはそれ自体が新しい規格であり、そのデータの受け渡しにJSONを利用したプロトコル(現行バージョンは2.0)ということです。
実際にはJSON-RPCでは以下の様なデータがやり取りされます。
[code lang="js"]
--> {"jsonrpc": "2.0", "method": "subtract", "params": [42, 23], "id": 1}
<-- {"jsonrpc": "2.0", "result": 19, "id": 1}
[/code]
とてもシンプルで軽量なプロトコルというのも納得ですね。
XPagesのjsonRpcServiceコントロールも同様に、できる限り軽量な構成になるようにデザインされており、クライアント・サーバー間で呼び出されたデータのみを送信し、返信されたデータのみを受信するといった軽量な処理が行えるコントロール、ということです。
ただ正直なところ、XPagesには部分更新イベントという便利な機能があるので、結果だけを見ると同等な実装が出来てしまうと思います。ではなぜjsonRpcServiceが必要になるのか?恐らくリモート処理がとても軽量に作られているということが一番の特徴だと思います。
例えば、株価の値を刻一刻と自動更新するようなアプリケーションを作りたいといった場合、XPagesの部分更新イベントを一分おきに発生させるというのはちょっと大掛かりな気がするのでもっと軽量な処理で実装したい、といったケースで役に立つのではないでしょうか。
実際に使ってみた
jsonRpcService を使ったとってもシンプルなサンプルはこんな感じです。
[code lang="xml"]
<?xml version="1.0" encoding="UTF-8"?>
<xp:view xmlns:xp="http://www.ibm.com/xsp/core"
xmlns:xe="http://www.ibm.com/xsp/coreex">
<xe:jsonRpcService id="jsonRpcService1" serviceName="service">
<xe:this.methods>
<xe:remoteMethod name="getUserName">
<xe:this.script><![CDATA[return @UserName();]]></xe:this.script>
</xe:remoteMethod>
</xe:this.methods>
</xe:jsonRpcService>
<xp:br></xp:br>
<xp:button value="リモート処理" id="button1">
<xp:eventHandler event="onclick" submit="false">
<xp:this.script><![CDATA[var deferred = service.getUserName();
deferred.addCallback(
function(result) {
alert(result);
}
);]]></xp:this.script>
</xp:eventHandler>
</xp:button>
</xp:view>
[/code]
6~10行目でJSON-RPCの関数を定義しています。ここではgetUserName()。処理内容はサーバーサイドJavascriptで記述できます。
そして13行目にボタンを配置してonclickイベントでクライアントJavascriptを書いていますが、service.getUserName();とすることでJSON-RPCのリモート関数を呼び出しを行っています。
このようにxe:jsonRpcServiceでリモート関数を定義すると自動でクライアントJavascipt関数が用意されているというところが肝ですね。
上記のサンプルでは関数の引数は使っていませんが、もちろん引数を持たせることも可能です。
引数を持たせて足し算の計算をさせたサンプルがこちらです。
[code lang="xml" highlight="7,9,10,18"]
<?xml version="1.0" encoding="UTF-8"?>
<xp:view xmlns:xp="http://www.ibm.com/xsp/core"
xmlns:xe="http://www.ibm.com/xsp/coreex">
<xe:jsonRpcService id="jsonRpcService1" serviceName="service">
<xe:this.methods>
<xe:remoteMethod name="add" script="return arg1 + arg2">
<xe:this.arguments>
<xe:remoteMethodArg name="arg1"></xe:remoteMethodArg>
<xe:remoteMethodArg name="arg2"></xe:remoteMethodArg>
</xe:this.arguments>
</xe:remoteMethod>
</xe:this.methods>
</xe:jsonRpcService>
<xp:br></xp:br>
<xp:button value="足し算" id="button1">
<xp:eventHandler event="onclick" submit="false">
<xp:this.script><![CDATA[var deferred = service.add(24,32);
deferred.addCallback(
function(result) {
alert(result);
}
);]]></xp:this.script>
</xp:eventHandler>
</xp:button>
</xp:view>
[/code]
ハイライトしている7,9,10,18行目を見て頂くとわかると思います。
どれだけ軽量なの?
それでは、実際にjsonRpcServiceがどれほど軽量か上記のコードをFirefox Firebugを使って確認してみます。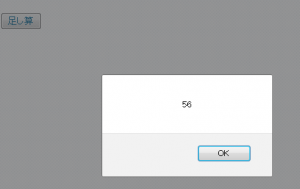
上記のXPagesをFirefoxで読込み、Firebugを起動、「Net」のタブを開いておきます。そして「足し算」ボタンを押した時に追加される通信データを確認します。
以下の画像がその時のFirebugの表示結果です。
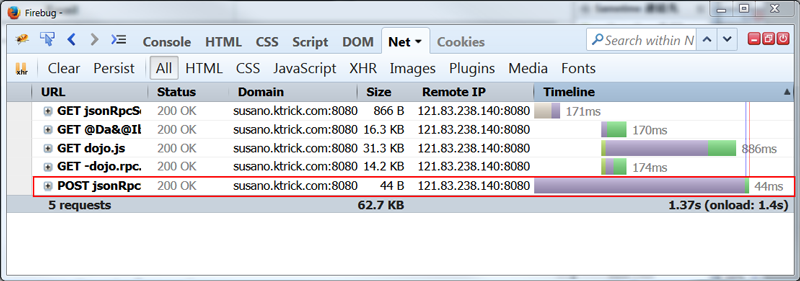
おぉ、データサイズわずか44バイト!! 軽っ!
実際にどのようなデータがやりとりされたのかもFirebugで確認してみます。
まずはPostデータ
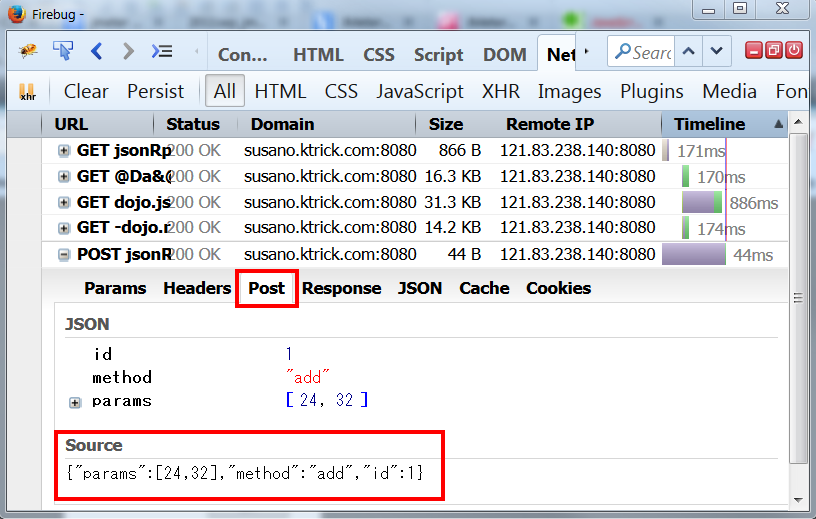
[code lang="js"]
{"params":[24,32],"method":"add","id":1}
[/code]
ふむふむ、「"jsonrpc": "2.0"」 というようなプロトコル情報も省略されており本当に必要な情報のみがPostされています。
つぎにResponseデータ。
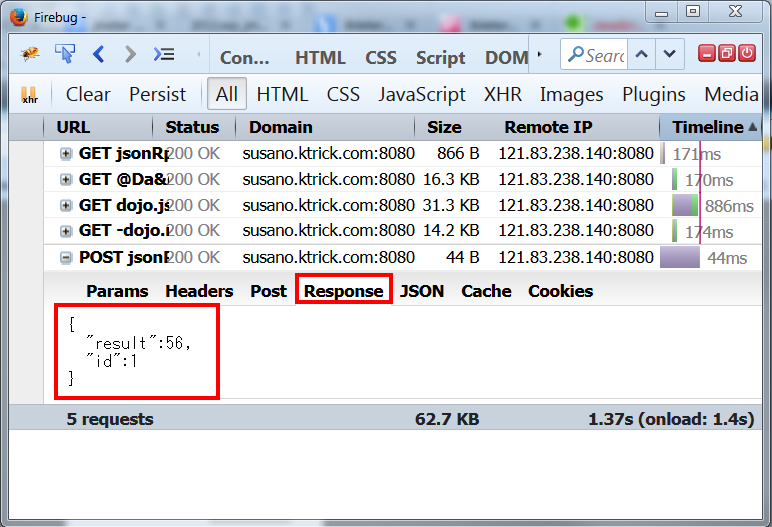
[code lang="js"]
{"result":56,"id":1 }
[/code]
やはり必要な結果のみがResponseデータとして返ってきています。
ちなみに同等の処理をXPages 部分更新で行いましたが、Postデータ、Responseデータ共にこれほど軽量な処理をさせることは出来ませんでした。また、XPagesの部分更新では”計算結果フィールド”のみを部分更新させるといった場合でも<span>タグ付きで値が返ってきたりと、クライアント側でのデータ再加工を行いたいというような場合、値だけを返すjsonRpcServiceのほうがプログラミングが楽になりそうです。
jsonRpcServiceを利用する時の注意点
以下のサンプルコードをみてください。
[code lang="xml" highlight="9,10,20"]
<?xml version="1.0" encoding="UTF-8"?>
<xp:view xmlns:xp="http://www.ibm.com/xsp/core" xmlns:xe="http://www.ibm.com/xsp/coreex">
<xp:this.data>
<xp:dominoDocument var="document1" formName="Test"></xp:dominoDocument>
</xp:this.data>
<xe:jsonRpcService id="jsonRpcService1" serviceName="service">
<xe:this.methods>
<xe:remoteMethod name="saveDoc">
<xe:this.script><![CDATA[print(">> " + getComponent("inputText1").getValue());
document1.save();
return true;]]></xe:this.script>
</xe:remoteMethod>
</xe:this.methods>
</xe:jsonRpcService>
<xp:br></xp:br>
<xp:inputText id="inputText1" defaultValue="testValue" value="#{document1.testField}"></xp:inputText>
<xp:br></xp:br>
<xp:button value="Save" id="button1">
<xp:eventHandler event="onclick" submit="false">
<xp:this.script><![CDATA[var deferred = service.saveDoc();
deferred.addCallback(
function(result) {
alert(result);
}
);]]></xp:this.script>
</xp:eventHandler>
</xp:button>
</xp:view>
[/code]
上記のコードはこちらのStackoverflow で質問と一緒に公開されたコードです。
ハイライトされた9,10,20行目を見て頂くと、このコードの作成者はjsonRpcServiceのリモート関数を使ってXPagesで読み込んでいる文書を保存、返り値にTrueを返す、という処理を行いたいのだろうと推測できます。
ただ、このコードは意図した動きをしません。
今回の記事をここまで呼んで頂いた方々にはすでに察しが付いていると思いますが、jsonRpcSerivceはあくまでJSONによってデータをやり取りしていますので、9行目のgetComponent("inputText1").getValue() というのは解決が出来ない情報になってしまいます。
同様にXPages上に存在するdocument1というデータソースも取り扱うことができません。引き渡したいデータがあれば、xe:remoteMethodArg 引数を使って明示的にJSONデータに含めないといけないということです。
このように、jsonRpcServiceはXPagesで読み込んでいるデータソース文書を保存したりする処理には向いていないように思います。(出来ないことはないはずです)
jsonRpcServiceはデータの読み出し専用が得策?
このstackoverflowの回答者も言っていることですが、上記の理由からjsonRpcServiceはデータの読み出し専用として利用することが最良であるかもしれません。
以下、jsonRpcServiceを利用したらいいかもしれないシチュエーションとして
- 会社の株価を定期的に自動更新するようなプログラム
- 新しいユーザーを登録する際にすでに同じユーザー名、Emailがないかどうかを問い合わせるプログラム
- サーバーからのレスポンスデータをクライアントサイドJavascriptで操作、加工したい場合
などに適していると思われます。
いかがでしたでしょうか?
jsonRpcSerivceの特徴を把握してXPages開発の選択肢の1つとして覚えておいてもらえればと思います。
XPagesでIEの互換表示ではなくIE8に強制表示する方法
 日頃から”IEはこの世界から消えてなくなれ” と考えている私ですが、仕事ではやはりIEでのサポートが必須である場合がほとんどで、時に開発者として「IEさえなければ、IEさえなければ・・・」などとブツクサいいながらIEの下位バーションでテストを行っていたりします。
そんなIEですが、IE8ぐらいになってくるとかなりJavascriptやCSSのサポートが幾分マシになってきます。 しかしIE8から次に厄介な問題としてIEの互換表示という機能があります。
IE8で動作するように開発したページなのに、クライアントから「なんかレイアウトが崩れているんですけど・・・」なんて電話が、、、よくよく調べてみるとIE8互換表示モード(IE7)でブラウジングしていたのが原因だった、なんてケースです。 (消えてなくなれIE! )
IE8が出た当時は下位互換への救済措置だったりしたわけですが、IE11の今のご時世では混乱を招くもとになっているばかり。
前置きが長くなりましたが、今回の本題、
XPagesでIE8互換表示ではなくIE8に強制表示する方法
まず、状況の整理をすると、IE8で表示できるように開発したページであってもIE8互換表示で表示されることがあります。
[list_marked]
[/list_marked]
というような場合です。 また嵌りやすいのがIE8はデフォルトで、”互換表示でイントラネットサイトを表示する”にチェックが入っているという点です。
こういった場合、一般的にWEB開発者は
[list_marked]
[/list_marked]
という方法でIE8互換表示ではなくIE8に強制表示させるようです。
ここではXPagesをつかってHTTPレスポンスヘッダ-を直接操作する方法を書いてみます。
以下のコードをXPageのbeforeRenderResponse イベントに記載します。
var exContext = facesContext.getExternalContext();
var resp = exContext.getResponse();
resp.setHeader("X-UA-Compatible", "IE=8");
こうすることで描画をIE8で強制的に表示することが可能になります。

また、特定のIEのバージョンに限って制御を行いたい場合、以下のように context.getUserAgent() を使って制御文を書くことが出来ます。
if (context.getUserAgent().isIE(8, 8)) {
  var exContext = facesContext.getExternalContext();
  var resp = exContext.getResponse();
  resp.setHeader("X-UA-Compatible", "IE=8");
}
ここでは、「IE8の場合からなず互換表示ではないIE8で動作させる」としています。
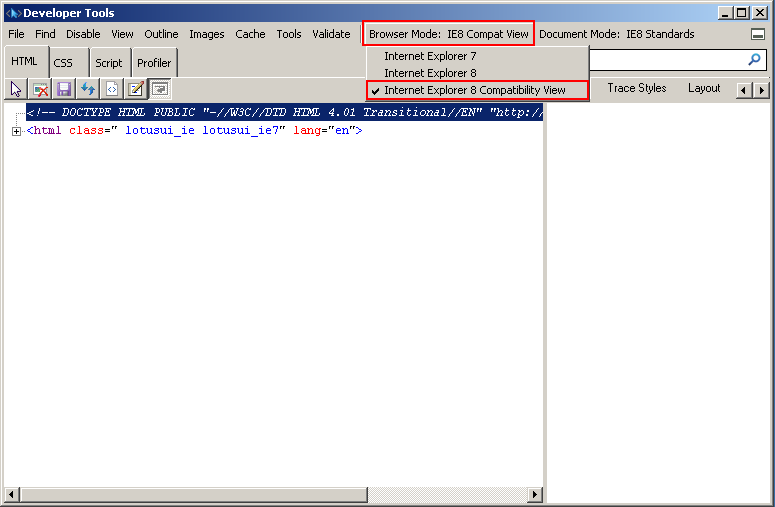
なお、IE8でどのモードで描画しているのか確かめるためにはF12を押して開発者ツールを立ち上げて確認できます。
IE互換表示の対応で苦戦している人は是非上のコードを試してみてください。
XPagesでJSONをパースしよう、 fromJson関数の使い方
今更聞けないJSONって何?
JSON(ジェイソン、JavaScript Object Notation)は軽量なデータ記述言語の1つである。構文はJavaScriptにおけるオブジェクトの表記法をベースとしているが、JSONはJavaScript専用のデータ形式では決してなく、様々なソフトウェアやプログラミング言語間におけるデータの受け渡しに使えるよう設計されている。
引用:Wikipedia
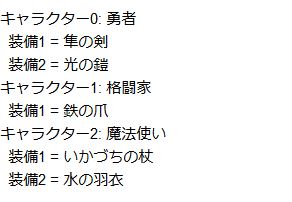
論より証拠。 JSONってこんな形式です。
[
    {
        "勇者": [
            "隼の剣",
            "光の鎧"
        ]
    },
    {
        "格闘家": [
            "鉄の爪"
        ]
    },
    {
        "魔法使い": [
            "いかづちの杖",
            "水の羽衣"
        ]
    }
]
Javascriptのオブジェクトの表記法と配列を組み合わせてとってもシンプルにデータ格納してしまおうということですね。正直、開発者にとってはXMLよりJSONのほうが好きな人のほうがおおいんじゃないでしょうか。
さて、ここから本題です。
XPagesのサーバーサイドJavascriptでJSONをパースするには
SSJSってサーバーで動くJavascriptだよね、だったらJSONもJavascriptのフォーマットだし扱い得意だよね、と当然思う方も多いと思います。
実際、XPagesではJSONをパースさせるのに幾つか方法があるようです。
- eval() 関数を使う。 XPagesの標準関数であるeval()を使ってお手軽にパースすることができます。こちらの例ではビューのカラムに表示させるコンテンツを文書毎にもつJSONのフィールドから一度パースして表示させています。 中々軽量でいいと思います。
- XPagesに標準で実装されているランタイムライブラリ、com.ibm.commons.util.io.json を使う。これはほぼJavaよりのソリューションになりますが、JsonJavaFactory、JsonParser、Iterator 等を使いパースしていきます。 より高度なJSONデータを扱う必要がある場合には適していると思います。例はこちら
- fromJson() 関数を使う。なんとXPagesには標準でfromJson() 関数なるものが存在していました。 これを使えば簡単にSSJSでJSONをあつかえるようになります。
今回は(3)のfromJson() 関数の扱い方について書いてみます。
Domino Designerのヘルプに乗ってない !?
まずこの関数ですが、Domino Designer (バージョン9時点)のヘルプに載ってません。 もう一つJson形式のObjectを文字列に変えるtoJson() 関数も用意されていますが、どちらも載っていません。
Domino DesignerのSSJSの補完機能を見る限り、
fromJson(str:string) any
となり、 strのパラメーターにJSONフォーマットに則した文字列を渡してやると、Javascript Object形式で値が帰ってきます。
Objectから以下のように値を参照できます。
var strJsonSimple:String = '{"name":"apple","color":"red","num":"10"}';
var jsonObjSimple = fromJson(strJsonSimple);
return jsonObjSimple.name;
しかし、この場合(青文字の部分)はObjectに"name"という変数(属性?)があるということを前提にプログラミングされています。
実際は、JSON文字列がObjectになった後、変数もその値もわからないこともあると思います。
その場合、Javascriptでfor-in文による繰り返しで回してやれば値の取得が可能になります。
例として、冒頭で上げたJSONをXPagesでパースして表示しているサンプルを掲載します。 Objectに配列を持つという組み合わされた構造のJSONを以下のようにパースしています。
var strRet:String = "";
var strJson:String = '[{"勇者": ["隼の剣","光の鎧"]},{"格闘家": ["鉄の爪"]},{"魔法使い": ["いかづちの杖","水の羽衣"]}]';
var jsonObj = fromJson(strJson);

for(var char_num in jsonObj){

	var charEntry = jsonObj[char_num];
	for(var char_name in charEntry){
		strRet += "キャラクター"+char_num+": "+ char_name +"
";

	    var charEquipment = charEntry[char_name];
	    var equipments = @Explode(charEquipment, ",");
		for (var k = 0; k < equipments.length; k++){
			strRet += "  装備"+(k+1)+" = "+equipments[k]+"
";
		}

	}
}
return strRet;
計算結果フィールドに入れた結果はこんな感じです。
[XPages] クライアントJavascriptにサーバー側の値を埋め込む方法
前回の続き
前回、Radio Button Groupコントロールで生成されるラジオボタンの値をクライアントJavascriptで取得する方法を説明しました。(記事はこちら) その時に、
var chkRadioMember = dojo.query("input[name$='#{id:radioGroupMember}']");
というように#{id:hogehoge} というクライアントJavascriptではなさそうなソースコードが出てきました。
前回のブログでは、この#{id:hogehoge}というフォーマットで記述されたコードはHTMLがブラウザに表示される前にサーバー側で ’view:_id1:radioGroupMember‘ といった値に動的に変換されることになっています、と解説しました。
今回は、この#{id:hogehoge} の意味を紐解くと共に、ちょっとディープに利用方法を探ってみようと思います。
実は知らない間に使っていた #{} のフォーマット
#{} の形を色々と探してみると、XPagesでは以下のようなパターンが他にも存在するのを確認できました。
#{document1.Firstname}
#{view1}
#{javascript:sessionScope.myName}
#{id:firstname1}
XPagesのソースを覗いた事がある方だったらどれも見た覚えがあるかと思います。
それぞれ役割が違っていて、
#{document1.Firstname}  ← Dominoドキュメントをバインドして、フィールドを表示させた時
#{view1} ← バインドさせたDominoビューを利用する
#{javascript:sessionScope.myName} ← SSJSで計算をさせたい時
#{id:firstname1} ← XPagesのIDからCSJS用のIDに変換した値を取り出したい時
というような用途で使いわけていきます。
もしかしたら、データソースをバインドするような形式はドキュメントやビュー以外にもあるかもしれません。自分の環境では以下のようなデータソースが選択できましたがDocumentとView以外は試していません(汗)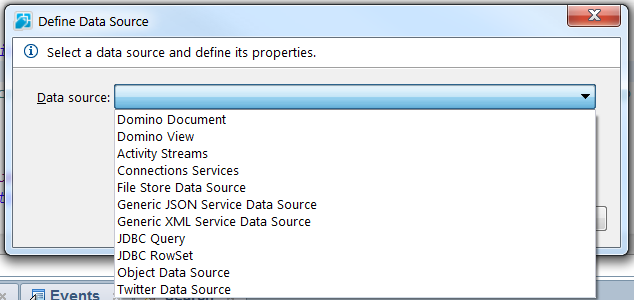
CSJSで使える#{} のフォーマット
#{} はなにかしらサーバーサイドで計算させたい時に利用するものだということは分かったと思います。
ここでは、どれがCSJSのソースコード中に埋め込む形で使えて、どれが使えないか検証してみました。
試したコードは以下の種類です。
 <xp:this.script>
  <![CDATA[
    alert("[SSJS]sessionScope.myName は #{javascript:sessionScope.myName}"); ← 動いた
    alert("[SSJS]document1.Firstname は #{javascript:document1.getItemValueString("Firstname")}"); ← 動いた
    alert("[CSJS]firstname1 は "+dojo.byId("#{id:firstname1}").value); ← 動いた
    alert("[SSJS]document1.Firstname は #{document1.Firstname}"); ← エラーになった
  ]]>
</xp:this.script>
という具合で、#{document1.Firstname} というようなバインドしてあるDominoドキュメントのFirstnameのフィールドを取得する、という記述はCSJSで使えませんでした。
しかし、#{javascript:document1.getItemValueString("Firstname")} を利用すると同じ値が取得できているのがわかると思います。
結論として、CSJSでは
#{id:hogehoge}
#{javascript:hogehoge}
の2つが使えるという結果になりました。
実際、自分がXPagesを見てきて、CSJSに利用されているのは#{id:hogehoge} の記述ばかりです。
#{javascript:hogehoge} もほとんど見ないです。(というか、実際この検証をするまで使えることを知りませんでした)
使えるけど、ソースがグチャグチャになってしまうのでCSJSとSSJSを混ぜこぜで使うのは全くオススメできません。
もしその必要性が出てきてしまったら設計から見なおしたほうがいいのかもしれませんね...
Notes Form内のComboboxでキーワード変更してもOnChangeイベントがトリガーされない
表題の通りなのですが、Domino DesignerでForm内にComboboxフィールドを作成時にキーワード変更してもOnChangeイベントが思い通りにトリガーされない時の対処方法です。
厳密には、キーワード変更後、マウスが別の場所にフォーカスしてから、OnChange()やExiting() イベントが呼ばれるためイベント呼ばれるのが遅いと感じてしまいます。
これに対応するには、フィールドプロパティのアドバンスド オプションタブの一番下、「Run Exiting/OnChange events after value change」というのを選択したらOK。

Comboboxのキーワードを変更した直後に呼ばれるようになります。
これだけ。
「てか、この設定いるの?」と疑問(笑) OnChangeイベントが直後に呼ばれたら困る状況ってあるのかな? 一応Domino 8.5までのAdvanced Application Developerだけど、こんな設定気づきもしなかったです(><)
以下は、IBMのTechnote(英語)から
WorkaroundTo configure the OnChange event to trigger when a new keyword is selected, you can select the option "Run Exiting/OnChange events after value change". This option is located on the Advanced Options tab Beanie tab of the field properties dialog box.
引用元: IBM - OnChange event does not trigger on keyword change in combobox field.
しかし、今回もネタが小さいw もっとトレンドのある記事が書けるように頑張ります。 xPagesか・・・