Control BB-8 by XPages on bluemix and IBM IoT Foundation (2/2)
Continue from previous post
This blog is the part 2 of Control BB-8 by XPages on bluemix and IBM IoT Foundation (1/2).
In the previous post, I explained how to configure Bluetooth device to use by node.js on windows.
- 1. To control BLE on Windows
- 2. Get UUID of Bluetooth
3. Get BB8-Bluemix project from GitHub
Surprisingly there is the project named BB8-Bluemix on the GitHub to manipulate the BB-8 via MQTT(IoT). So please get the project code from following URL.
https://github.com/shamimshossain/bb8-bluemix
As the next step, open command prompt and change directory to project folder, then install by issuing "npm install".I got some dependencies warning messages, but it didn't interfere the BB-8 manipulation, so I just leave it as it is.
![]()
After install is completed, open the spheroDemo.js file and replace the parameter of sphero() function on line 3 by Bluetooth UUID which you got from the previous step. The UUID seems to be more than 20 characters on MAC OS, but it was 12 characters on my windows OS.
[code highlight="3" lang="javascript"]
var mqtt = require('./mqtt-wrapper.js')();
var sphero = require('sphero'),
bb8 = sphero('cxxxxxxxxxx3'); // change BLE address accordingly
bb8.connect(function() {
console.log('**** Start debug info *****');
console.log('Connected to BB-8');
.................
... truncated ...
.................
[/code]
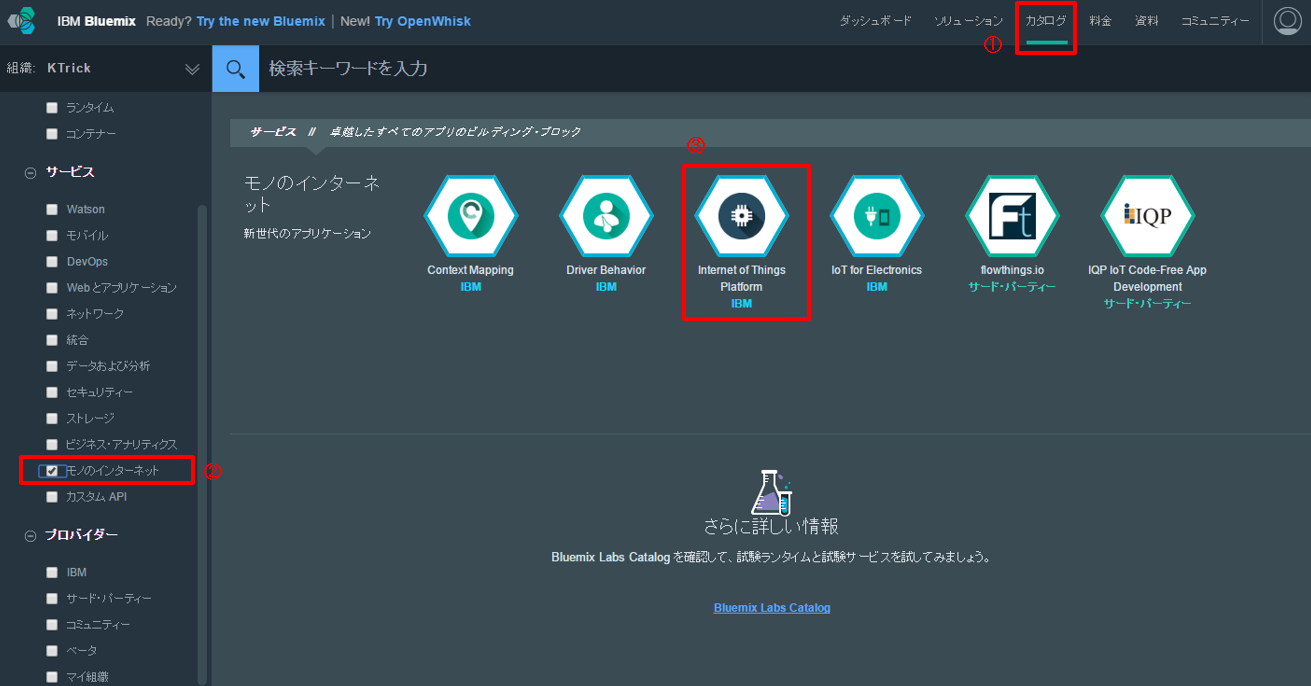
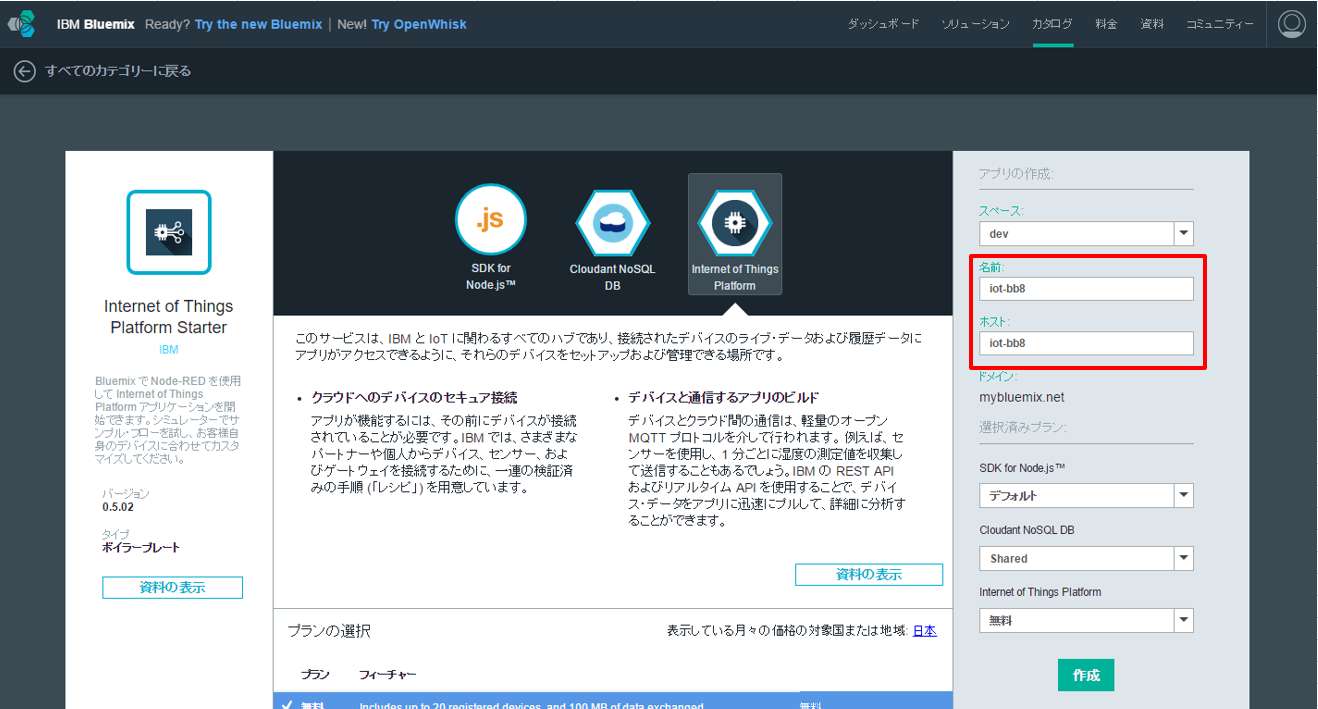
4. Create "Internet of Things Platform Starter" application on Bluemix
- Login to bluemix.net
- Select "Internet of Things Platform Starter" from Catalog.

- Specify your preffered value to the name and host, then click Create button
5. Add device on IoT Foundation
- After staging the application, select "Internet of Things Platform" from the left navigation.
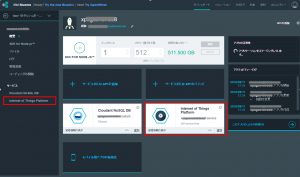
- Click "Launch Dashboard" from device connection.
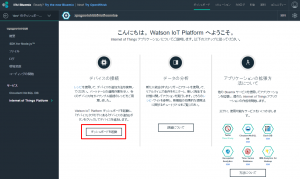
- Click "Add device" after "IBM Watson IoT Platform" page is opened.

- After popup the wizard, select "Create Device Type", then next./li>
- "Create Device Type" ‐ In "general information" Type "sphero" for the device name, then next.
- "Create Device Type" ‐ In "Template definition" just click next.
- "Create Device Type" ‐ In "Send information" just click next.
- "Create Device Type" ‐ In "Metadata(Option)"just click create.
- Select the device type you created above for the "Select Device Type" field, then next.
- In "Device Information" Specify preferred value for "Device ID", then next.
- In "Metadata" just click next.
- In "Security" just click next.
- In "Overview" just click add button.
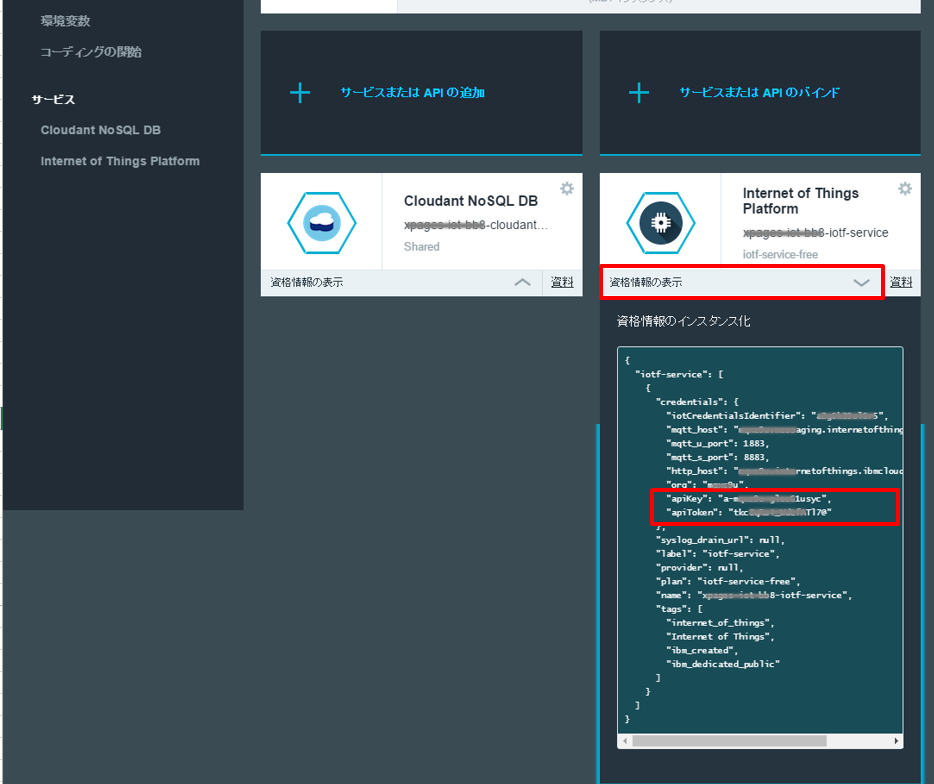
- After displaying the device qualification information, Please copy and keep the values in the red color rectangle.
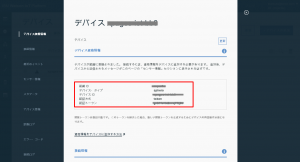
- After all done the above steps, back to dashboard of "Internet of Things Platform Starter" then check apiKey and apiToken by clicking "display
qualification info"

6. Configure properties file of BB8-Bluemix project
Go to BB8-Bluemix project folder and open sphero-config.properties.
Please edit the following lines:
[code highlight="2,4,6,7"]
#Device ID you use when you register with the IoT foundation
deviceid=xxxxxxxxx-xxx
#For controller (device)
authtoken=grxxxxxxxxxxxjDt
#For the app (publisher)
apikey=a-mxxxxu-gloxxxxxxc
apitoken=tkxxxxx4_Wxxxxxxx@
[/code]
- deviceid: Specify the Device ID that you used when registering BB-8 on IBM Watson IoT Platform
- authtoken: Specify the authentication token that you got when registering the BB-8 on IBM Watson IoT Platform
- apikey, apitoken: Specify apikey and apiToken written in "IBM Watson IoT Platform" qualification info
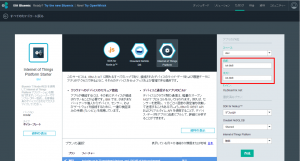
7. Test via Node-Red
Find the Node-Red sample flow form the bottom of the link page bb8-bluemix.
- bb8-bluemix Copy the Node-Red json code.(below is the same sample flow)
[code lang="javascript"]
[{"id":"180c60f4.e7f39f","type":"ibmiot out","z":"5fa8453c.a057bc","authentication":"boundService","apiKey":"","outputType":"cmd","deviceId":"spheroownedbyshamim","deviceType":"sphero","eventCommandType":"run","format":"json","data":"___","name":"IBM IoT App Out","service":"registered","x":756,"y":361,"wires":[]},{"id":"b7792b22.4886d8","type":"inject","z":"5fa8453c.a057bc","name":"Run command","topic":"","payload":"","payloadType":"none","repeat":"","crontab":"","once":false,"x":206,"y":444,"wires":[["f29b07a3.0d64f8"]]},{"id":"f29b07a3.0d64f8","type":"function","z":"5fa8453c.a057bc","name":"Construct RUN command","func":"msg.payload = JSON.stringify({\n d: {\n action : \"#spherorun\"\n }\n});\nreturn msg;","outputs":1,"noerr":0,"x":468,"y":449,"wires":[["180c60f4.e7f39f","d1c575b9.2e3a88"]]},{"id":"d313ea30.2cec18","type":"inject","z":"5fa8453c.a057bc","name":"Change color to RED","topic":"","payload":"","payloadType":"none","repeat":"","crontab":"","once":false,"x":205,"y":297,"wires":[["26e811fe.d917ee"]]},{"id":"26e811fe.d917ee","type":"function","z":"5fa8453c.a057bc","name":"Construct RED command","func":"msg.payload = JSON.stringify({\n d: {\n action : \"#red\"\n }\n});\nreturn msg;","outputs":1,"noerr":0,"x":473,"y":287,"wires":[["180c60f4.e7f39f","d1c575b9.2e3a88"]]},{"id":"61c2c549.9e3d3c","type":"inject","z":"5fa8453c.a057bc","name":"Change color to BLUE","topic":"","payload":"","payloadType":"none","repeat":"","crontab":"","once":false,"x":193,"y":369,"wires":[["18100517.e7effb"]]},{"id":"18100517.e7effb","type":"function","z":"5fa8453c.a057bc","name":"Construct BLUE command","func":"msg.payload = JSON.stringify({\n d: {\n action : \"#blue\"\n }\n});\nreturn msg;","outputs":1,"noerr":0,"x":485,"y":363,"wires":[["180c60f4.e7f39f","d1c575b9.2e3a88"]]},{"id":"d1c575b9.2e3a88","type":"debug","z":"5fa8453c.a057bc","name":"","active":true,"console":"false","complete":"false","x":777,"y":286,"wires":[]}]
[/code] - Launch Node-Red from the application URL of "Internet of Things Platform Starter" that you created in step 4.
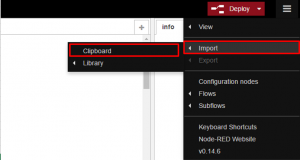
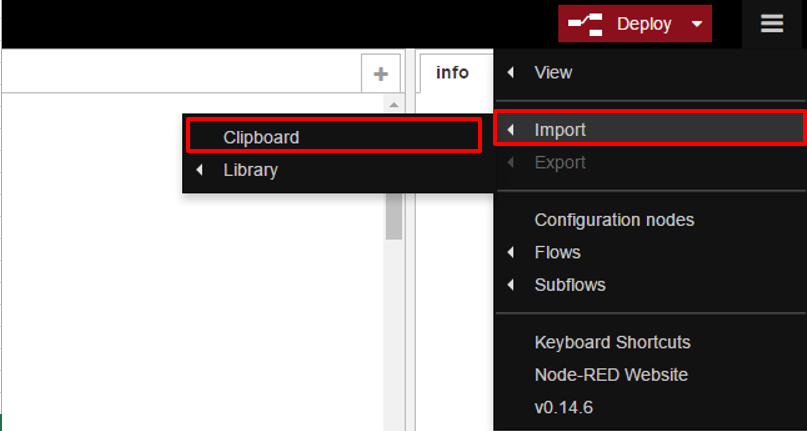
- Paste the Node-Red flow by following the steps in the screenshot.
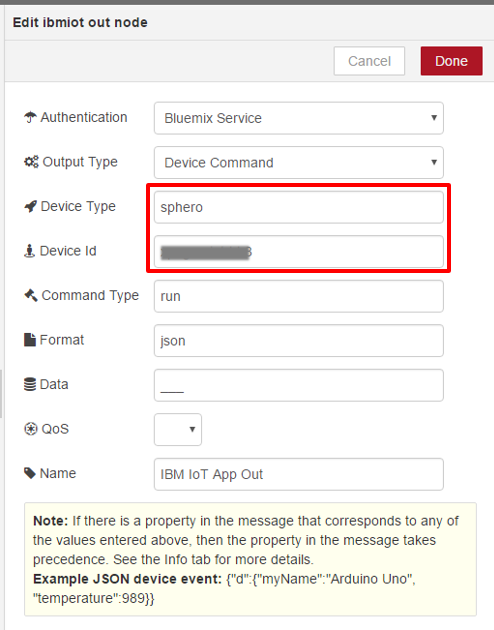
- Configure the "IBM IoT App Out" node by double-click

- Specify Device Type "sphero" which you used in IoT Foundation.
- Specify device Id that you used when registering the device on IoT Foundation - Save Node-Red flow by clicking "Deploy" button.
As the final step, execute spheroDemo.js from command prompt and establish IoT on bluemix connection, then click "Change color to Red/Blue" on Node-Red. If you succeed, you can see BB-8 color is changed.
8. Create XPages on Bluemix application
Finally I can write something about XPages! Please follow the steps to create the BB-8 xpages app.
- Select XPages runtime from Bluemix catalog.
- Specify preferred name and host and then create the new XPages application.
- After staging XPages application, please download starter code. You will be able to find application.nsf
9.Deploy BB-8 Xpages app
Please download the BB-8 xpages application template from the following link:
Download Link: http://ktrick.com/download/xpages-bb8-tpl.zip
Please simply replace the design against your bluemix-xpages application (application.nsf), or copy the design of XPages, scriptLibrary, resources(file), stylesheets from the template.
As the last step, please replace the red rectangle lines of sp_mqtt_bb8.js by your IoT information.
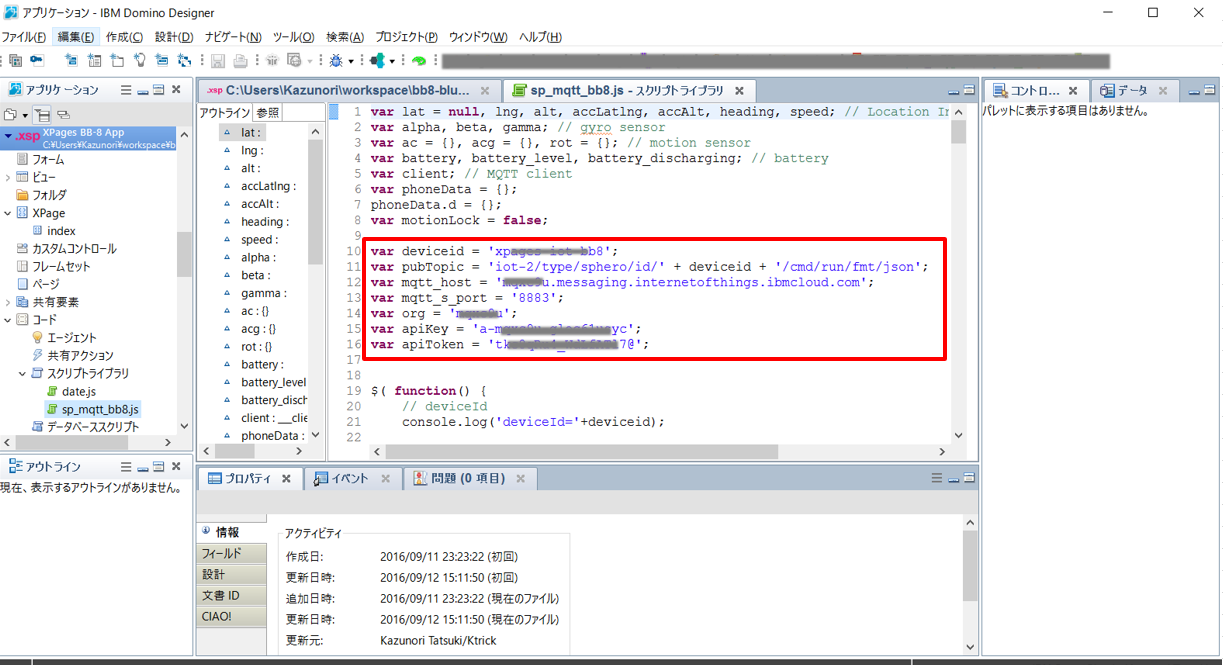
Information is also written in "IBM Watson IoT Platform" qualification info
- deviceid: Device ID
- pubTopic: If device type is not sphero, then replace as you need
- mqtt_host: Specify "mqtt_host" of qualification info
- mqtt_s_port: Specify "mqtt_s_port" of qualification info
- org: Specify "org" of qualification info
- apiKey: Specify "apiKey" of qualification info
- apiToken: Specify "apiToken" of qualification info
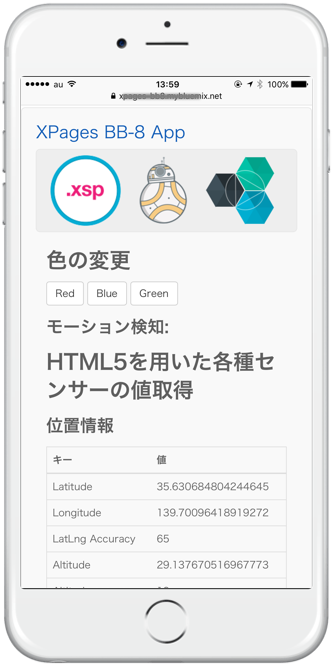
After replacing the design and deploy to the Bluemix, you will be able to see the following top page.
10. Test by XPage app
Step1, Execute spheroDemo.js to establish the connection between BB-8 and IoT Foundation.
Step2, Open the xpages app by your smartphone device.
In this XPAGES app, you can manipulate BB-8 by moving your smartphone like back-forward-right-left. Technically this app is using HTML5+Javascript for motion sensor and paho javascript client to publish MQTT to IoT Foundation.
You can manipulate BB-8 like this movie:
I hope I can explain the inside technology of xpage app in my next blog, and maybe using Paho Java client as further more step. In fact this app does not need to be xpages since client side Javascript does everything. But I hope this helps some other imagination of using XPages, IoT, Bluemix other services.
Control BB-8 by XPages on bluemix and IBM IoT Foundation (1/2)
Control BB-8 by XPages on bluemix and IBM IoT Foundation
I've had the session to contorl the drone by IoT and XPages on 11/18/2015 at the Notes Consortium Partner Solution Seminar event in Japan
This time I succeeded to control the BB-8 droid of Star Wars instead of Drone by XPages and IoT. So I would like to share how I made.
By the way, below is the system diagram of drone(AR-Drone)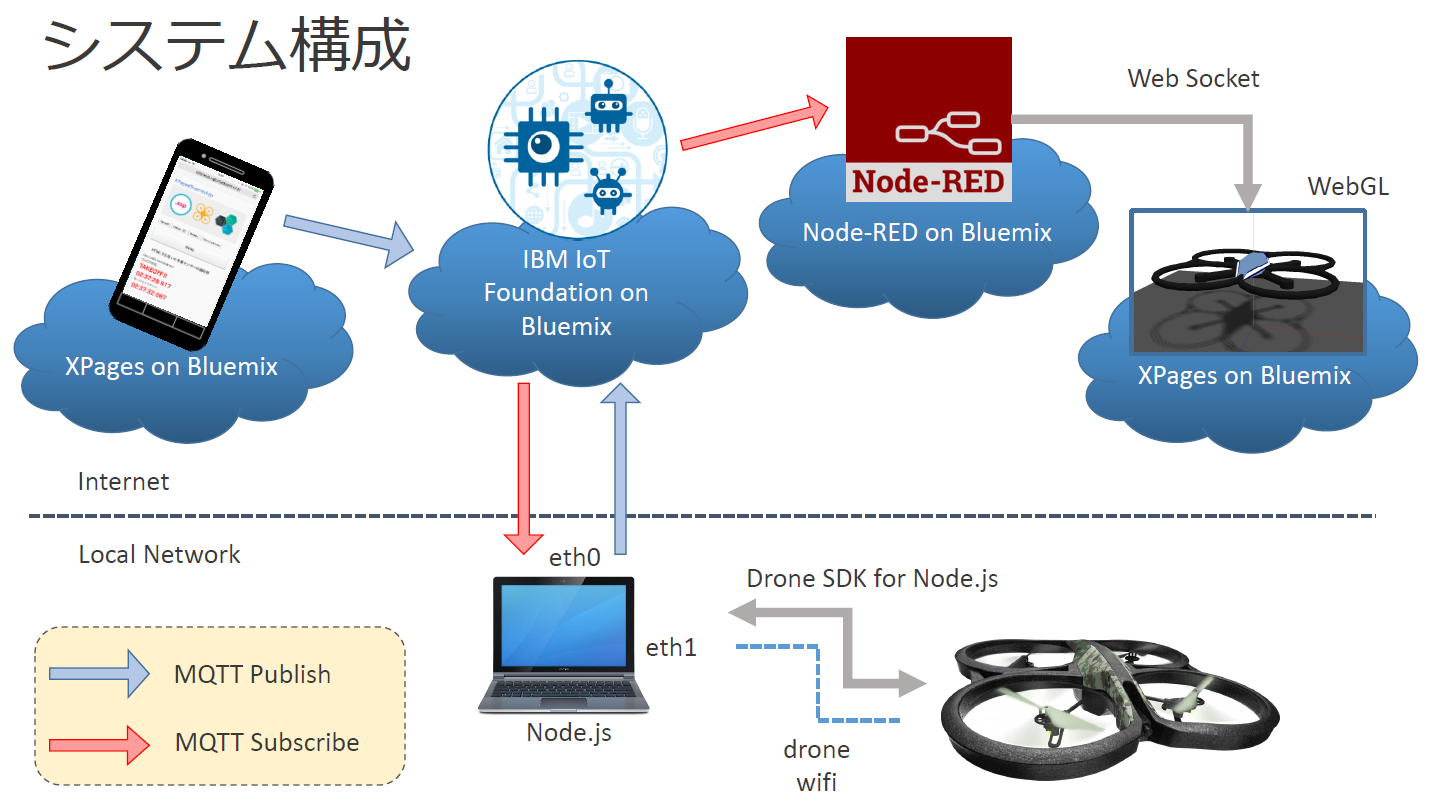
Presentaion slide is below:
Difference between Drone and BB-8
In the drone project, the central device(PC) connected to the drone by the drone Wifi connection so that the device can receive the drone data and publish to IoT on bluemix or vise versa. In the BB-8 project, the most different thing is BB-8 and PC are connected by bluetooth.
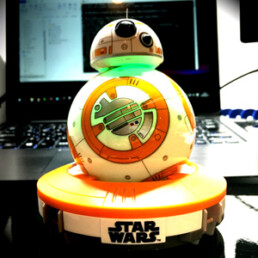
Get BB-8!
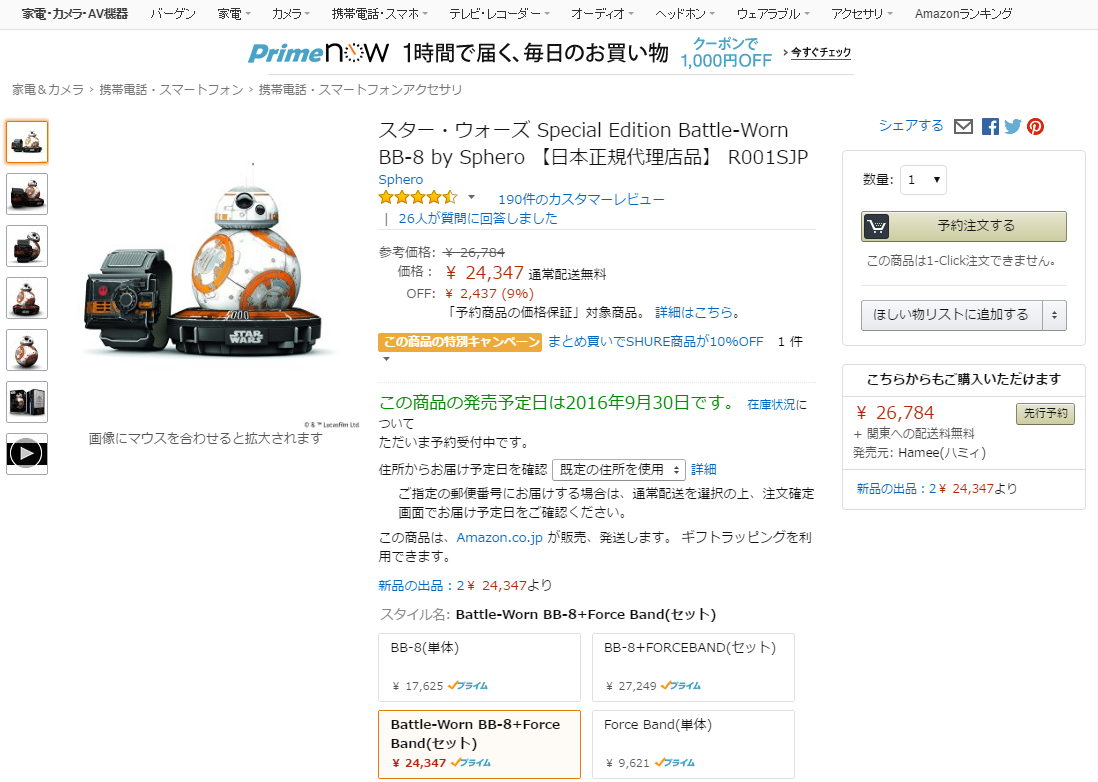
I got this BB-8 as the eye-catch item at the booth in the IBM Connect Japan 2016. Normally you download the designated smartphone application and manipulate BB-8 via the app.
When I searched BB-8 by Amazon.co.jp, the "Force Band" seems to be sold as BB-8 option item on 9/30/2016. "Force Band" and my technical approach is maybe totally different, but I am happy to blog this before people purchase the "Force Band".
Premise
- Node.js has been installed on Windows OS
- Bluemix account has been created.
- CF command line interface has been installed.
- Bluemix command line interface has been installed.
- Bluemix Tool has been installed to the IBM Domino Designer (For more detail Go this link)
- BB-8
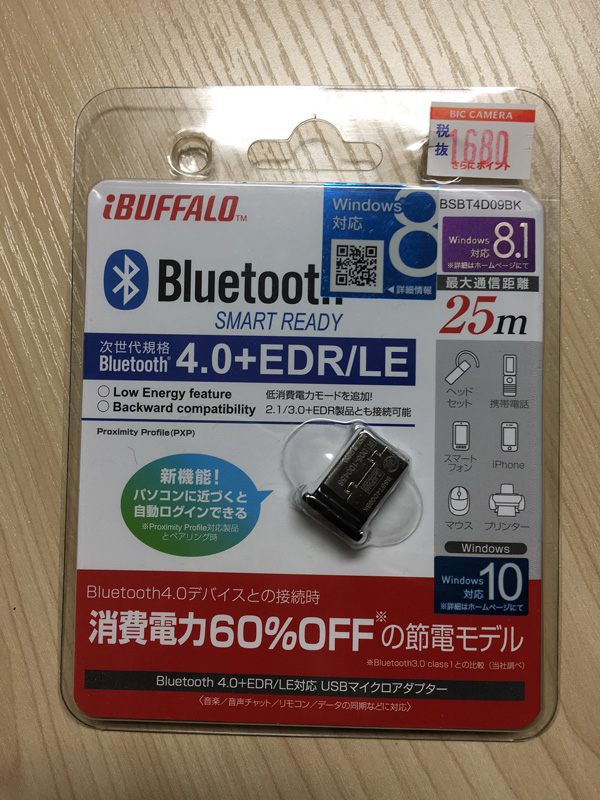
- Bluetooth 4.0 USB adapter
System Diagram
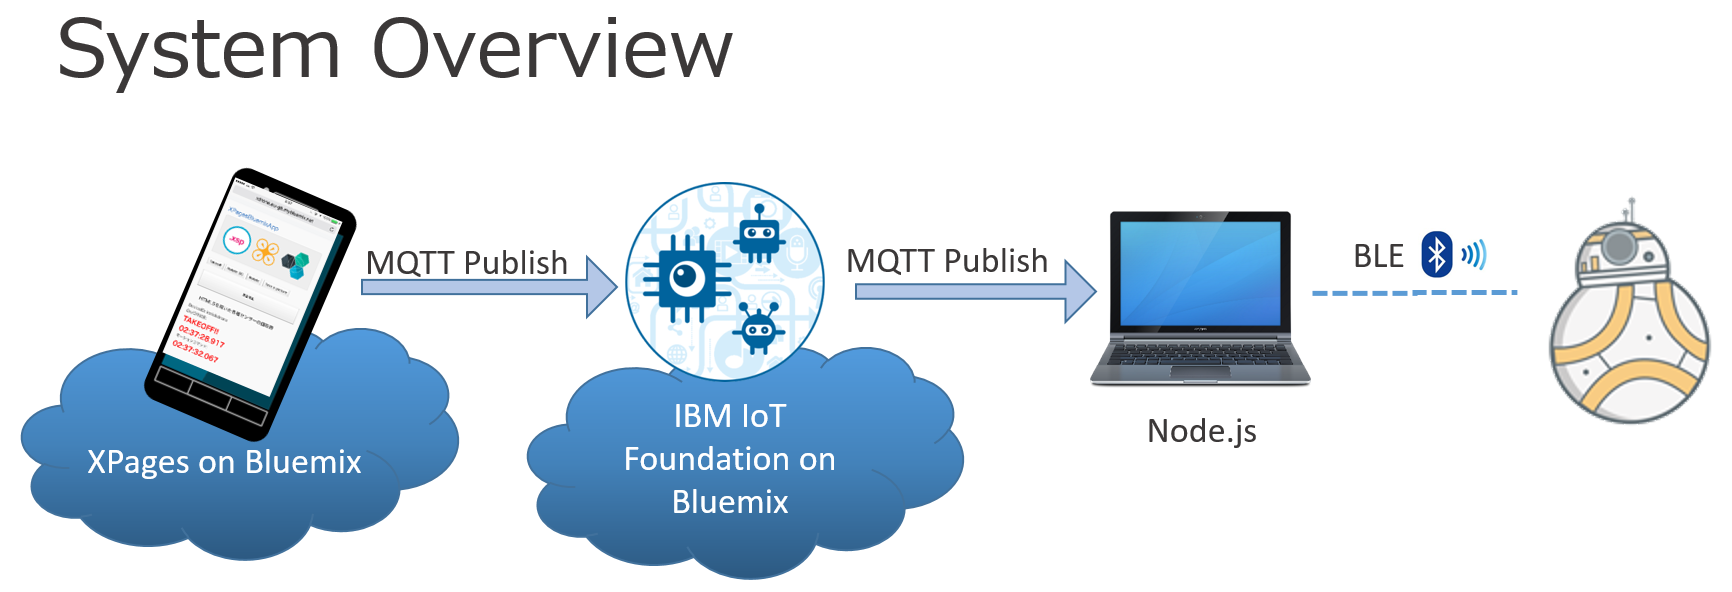
This BB-8 is simpler than Drone.
1. To control BLE on Windows
In my environment, the embedded Bluetooth device could not be used for BLE connection. So I purchased Bluetooth 4.0 USB adapter and then, I needed to setup the device to the WinUSB driver by using Zadig
Below is the Bluetooth 4.0 USB adapter I purchased.
Below is the instruction to setup WinUSB driver so that node.js can use your Bluetooth device.
https://github.com/sandeepmistry/noble
*If you are using Mac OS, your are lucky since you don't need to worry about this step. This step requires installation of Visual Studio, Python etc.
2. Get UUID of Bluetooth
After complete the step above, install(global install) "cylon-ble" package by npm.
npm i -g cylon-ble
A the next step, install "cylon-sphero-ble".
npm i cylon-sphero-ble
Finally you can use "cylon-ble-scan" command to refer the Bluetooth UUID of you BB-8.
Below is a example of my Windows command prompt, please find the line that Name start from BB-, then get the corresponding UUID.
[code highlight="5,6"]
bb8-bluemix>cylon-ble-scan
noble warning: unknown handle 70 disconnected!
Starting scan.
Peripheral discovered!
Name: BB-B4XX
UUID: cXXX89XXXXXX
rssi: -39
Peripheral discovered!
Name: ed3XXX-bt
UUID: cXXXa2934XXX
rssi: -71
[/code]
Go to part 2
I divided the blog to part 1 and 2 since it became longer.
Please jump to Control BB-8 by XPages on bluemix and IBM IoT Foundation (2/2)


On-Premise Domino Data Access from XPages on Bluemix
Hybrid XPages appplication on Bluemix
XPages on Bluemix has been released as GA on May,2016, and developers can get the environment to develop XPages application easily on the cloud.
XPages code are compiled by "XPages runtime" for XPages on Bluemix. ![]()
This "XPages runtime" is just for runtime environment and should not store any data like Notes Document. Therefore XPages developer usually bind the service called "XPages No SQL Database" as the data store.
In fact, this "XPages No SQL Database" is just NSF file and you can store the data and create the view, form, etc.
However this "XPages No SQL Database" service is part of "Bluemix Labs Catalog" so far and according to IBM Japan, this service should not been used as the production environment.
By this blog post, I tried to use on-premise Domino as the data store for XPages on Bluemix.
Of cause it does not need to be on-premise domino, for example domino on SoftLayer is same meaning. This approach just try to access to outside of bluemix as the data store. It seams to be called as Hybrid XPages Application on bluemix.
BluemixのXPagesSet up the domino server to be used from runtime
![]() To run Hybrid XPages application, you need to configure your on-premise domino.
To run Hybrid XPages application, you need to configure your on-premise domino.
If you've already used "XPages No SQL Database" service, you maybe can ealiry imagine this, "/O=Bluemix" is used as Organization on bluemix. so xpages on bluemix cannot access to the on-premise domino without cross-certificate.
So as the first step, you need to create the new server id and then, when you deploy the application to the XPages runtime container of bluemix, you also attach the server id so that XPages on bluemix can communicate the on-premise servers through uploaded server id information.
Premise
- Installed Domino Designer, Administrator
- Installed Domino Designer 9.0.1FP6 or OpenNTF.org XPages Extension Library verson 15 or above
- Bluemix settings are configured by Domino Designer preference
- Already created XPages runtime application on Bluemix, and downloaded nsf and manifest file on your local
*Sorry, the screenshot are all in Japanese. I hope you still can understand where and what I explain.
Step 1: Create Server ID for Bluemix
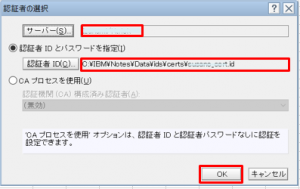
- Launch Domino Administrator, then click "Configuration" tab
- From Tools pane, click "Registration" -> "Server".
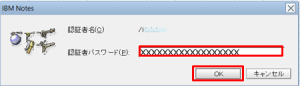
- In the dialog, specify cert id and click [OK]
- Enter password for Cert ID[OK]
- If you don't need to change, then just Click Continue.
- Enter server information for bluemix. Click [Register All] to complete the process.
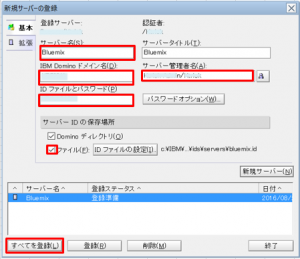 Server password is optional and usually you might not put password for server. but I added password since I give this server id to the bluemix. Also I recommend to output the server id as file by checking the checkbox.

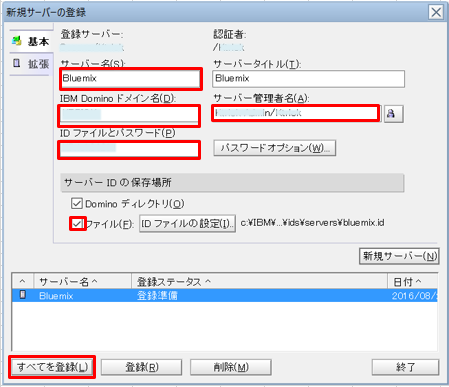
OK, nothing special, just server id has been registered. the Different thing is you don't need to install domino server by this server id since you only have to pass this server id to the bluemix Xpages runtime.
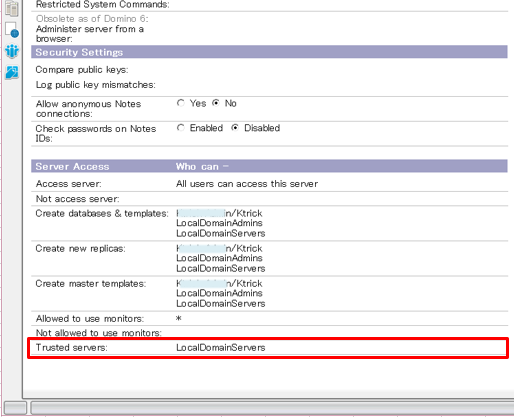
*Warning 1: Please confirm the server name is contained in "LocalDomainServers" group.
*Warning 2: Please confirm the server which has the access from Bluemix XPages runtime should contains the LocalDomainServers or created server name in Trusted servers field under the server document -> "Security" tab.
Step2: Configure IBM Bluemix Manifest
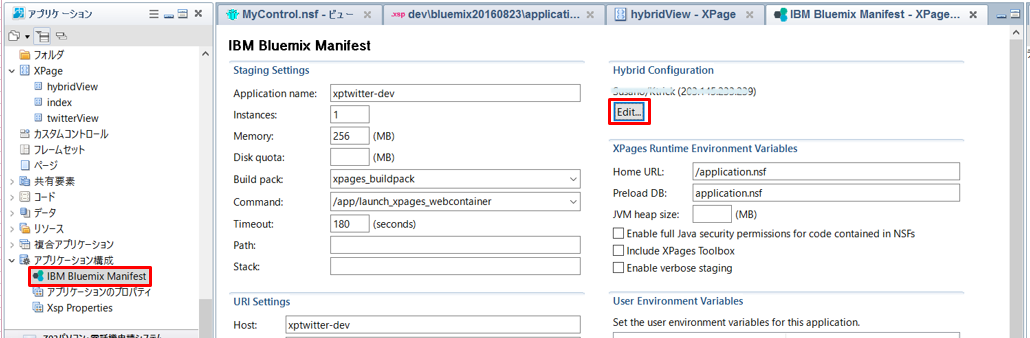
- Open Domino Designer and then open Xpages application NSF which is created from Bluemix and downloaded.
- Open "Application property" -> "IBM Bluemix Manifest"
- On the right-top corner, Click Edit button in "Hybrid Configuration" section.

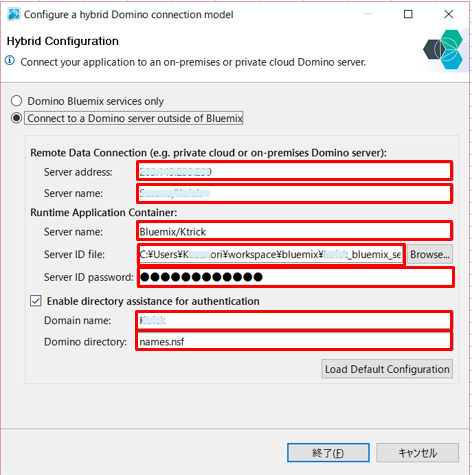
- Enter Hybrid configuration
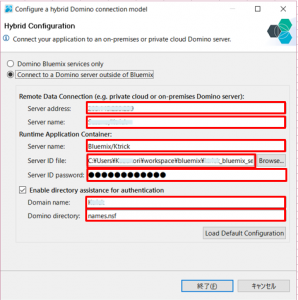
- Remote Server Address ( APP_REMOTE_DATA_SERVER_ADDRESS)
: on-premise Domino IP addressのIP. - Remote Server Name (APP_REMOTE_DATA_SERVER_NAME)
: on-premise Domino server name(i.e. App01/ZetaDataBank)。 - Runtime Server Name (APP_RUNTIME_SERVER_NAME)
: Server name created above(i.e. bluemix/ZetaDataBank)。 - Runtime Server ID File (APP_RUNTIME_SERVER_IDFILE)
: Server id file created above - Runtime Server ID Password (APP_RUNTIME_SERVER_PASSWORD)
: Server id password if you specified. - Directory Assistance Enabled (APP_DA_ENABLED)
: Specify directory assistance enabled or not - Directory Assistance Domain (APP_DA_DOMAIN)
: domain name(i.e. ZetaDataBank)。 - Directory Assistance Address Book (APP_DA_ADDRESS_BOOK)
: Directory NSF which is necessary for authentication of hybrid environment (i.e. “names.nsf”)。
- Remote Server Address ( APP_REMOTE_DATA_SERVER_ADDRESS)
That's all.
I created one sample xpage below:
[xml highlight="5"]
<?xml version="1.0" encoding="UTF-8"?>
<xp:view xmlns:xp="http://www.ibm.com/xsp/core">
<xp:this.data>
<xp:dominoView var="view1"
databaseName="App01/ZetaDataBank!!MyControl.nsf"
viewName="AllContacts">
</xp:dominoView>
</xp:this.data>
<xp:viewPanel value="#{view1}" id="viewPanel1">
<xp:this.facets>
<xp:pager partialRefresh="true" layout="Previous Group Next"
xp:key="headerPager" id="pager1">
</xp:pager>
</xp:this.facets>
<xp:viewColumn columnName="Id" id="viewColumn1">
<xp:this.facets>
<xp:viewColumnHeader value="Id" xp:key="header"
id="viewColumnHeader1">
</xp:viewColumnHeader>
</xp:this.facets>
</xp:viewColumn>
<xp:viewColumn columnName="FirstName" id="viewColumn2">
<xp:this.facets>
<xp:viewColumnHeader value="First name" xp:key="header"
id="viewColumnHeader2">
</xp:viewColumnHeader>
</xp:this.facets>
</xp:viewColumn>
<xp:viewColumn columnName="LastName" id="viewColumn3">
<xp:this.facets>
<xp:viewColumnHeader value="Last name" xp:key="header"
id="viewColumnHeader3">
</xp:viewColumnHeader>
</xp:this.facets>
</xp:viewColumn>
<xp:viewColumn columnName="EMail" id="viewColumn4">
<xp:this.facets>
<xp:viewColumnHeader value="E mail" xp:key="header"
id="viewColumnHeader4">
</xp:viewColumnHeader>
</xp:this.facets>
</xp:viewColumn>
<xp:viewColumn columnName="City" id="viewColumn5">
<xp:this.facets>
<xp:viewColumnHeader value="City" xp:key="header"
id="viewColumnHeader5">
</xp:viewColumnHeader>
</xp:this.facets>
</xp:viewColumn>
<xp:viewColumn columnName="State" id="viewColumn6">
<xp:this.facets>
<xp:viewColumnHeader value="State" xp:key="header"
id="viewColumnHeader6">
</xp:viewColumnHeader>
</xp:this.facets>
</xp:viewColumn>
<xp:viewColumn columnName="Created" id="viewColumn7">
<xp:this.facets>
<xp:viewColumnHeader value="Created" xp:key="header"
id="viewColumnHeader7">
</xp:viewColumnHeader>
</xp:this.facets>
</xp:viewColumn>
<xp:viewColumn columnName="$10" id="viewColumn8">
<xp:this.facets>
<xp:viewColumnHeader value="Name" xp:key="header"
id="viewColumnHeader8">
</xp:viewColumnHeader>
</xp:this.facets>
</xp:viewColumn>
</xp:viewPanel>
</xp:view>
[/xml]
I specified on-premise domino view in this sample. (Line 5)
Deploy to the bluemix through Domino designer.
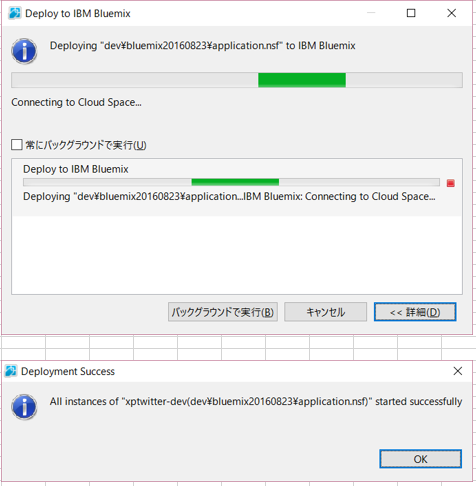
Bluemix service is going to reboot automatically. After wait for a while, access to the Xpage URL you created, and then if you get the on-premise data in the view, Success!