


XPagesリッチテキストコントロールのカスタマイズ
XPagesのリッチテキストコントロール カスタマイズ
Notes/Dominoエンジニア XPages担当の米原です。
まだまだ現役でXpagesの開発を行っています!
最近行き詰まったところがありましたで備忘としてブログに残すことにしました。
リッチテキストの入力高さを固定(縦スクロール付き)方法
リッチテキストを画面に配置したのですが、文字を入力して改行していくと、
自動で入力枠が縦に広がり結構縦に長くなり1画面の領域を結構占領してしまいます。
どうにか縦の幅を狭くしたいと思いました。
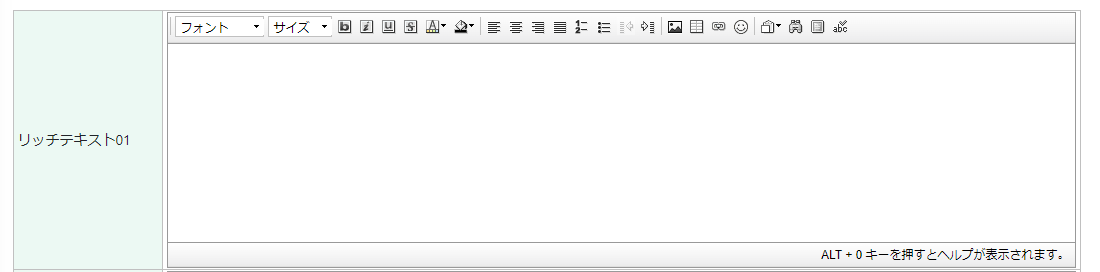
入力をするとどんどん広がって他の項目が見えなくなったりします。
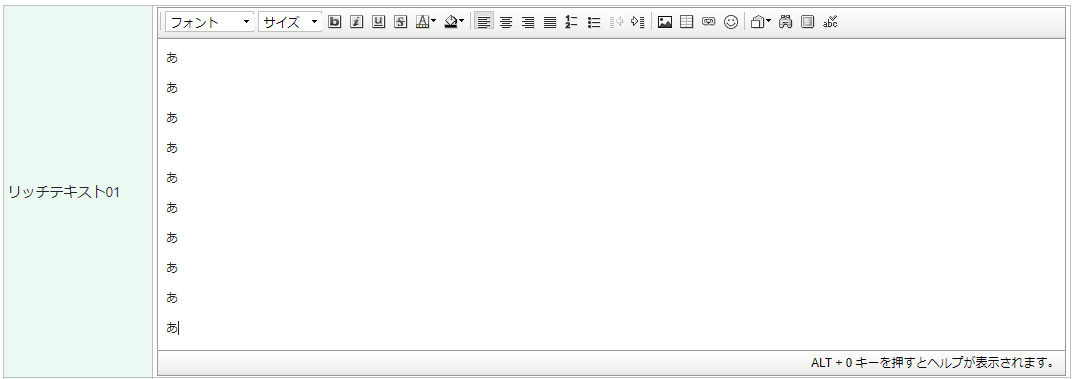

Dojo属性を追加することによりCKEditorのConfig値を変更しました。
autoGrow_maxHeight:縦幅の広がった際の最大値
こんな感じで最大枠を指定できます。長くなる場合は縦のスクロールバーが機能します。
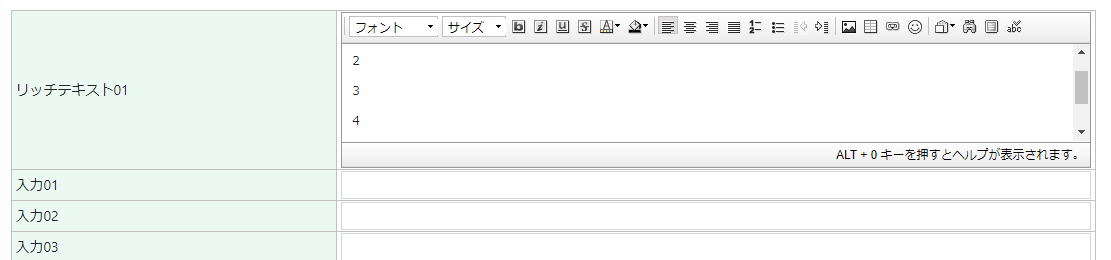
ツールバーを消す方法
今回の場合上のツールバーも不要なので消したいと思います。

同じように、今度は nameに toolbar 、valueに [[]] これで上のツールバーは消えます。

この様にしてすっきりしました!
ここで「tootbar」 の「value」 に表示したいアイコンを選択することも可能です。
詳しくはこちらを参照してください↓
https://www.ktrick.com/xpages-richtext-ckeditor-toolbar-customize/
設定値などは、こちらを参考にしました。
https://docs-old.ckeditor.com/ckeditor_api/symbols/CKEDITOR.config.html
また色々と試したいと思います!
DominoV9→DominoV12 バージョンアップでXpagesエラーが発生した件
こんにちは。Xpages担当の米原です。
本日はXpagesでDominoV9からDominoV12にバージョンアップした際にハマったエラーの回避方法についてのお話です。
V9のサポート期日が迫っていまして、V12に更新されるお客さんが増えてきています。
そう、NotesDominoはどんどん進化してその都度便利な機能が追加されています!
V9で終わりではないですよ!!!
安心してNotes Domino 使い続けましょう。
さてさて本題に戻りまして
今回発生した問題はこちらの機能です。
- ボタン押下でダイアログを表示
- ダイアログ内で処理を実行(入力フィールドの値などセット)
- ダイアログ内で更新したものをダイアログを閉じるときのイベント(onHide)で部分更新
OKボタンで更新するのは、OKボタンのイベントに処理を追加で可能なのですが、
「x」ボタンが押された時にも反映したい場合があり、そのためにonHideイベントに部分更新のIDをセットしそのエリアを更新するように使用していました。
ここで、最後の「×」やOKでダイアログを閉じる際に、onHideが機能するのですが、
何とエラーになってしまってます。。
V9では大丈夫だったのに、V12ではこの使い方はダメなようです。
簡単なサンプルで確認したらこのようなものになります。
ダイアログ起動ボタン押下でダイアログ起動
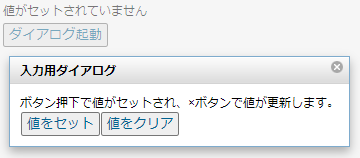
「×」ボタン押下

エラー発生となります。
設計はこのようなものです
	<xe:dialog id="dlgTest" title="入力用ダイアログ">
		<xp:panel>
			ボタン押下で値がセットされ、×ボタンで値が更新します。<br/>
			<xp:button value="値をセット" id="button5">
				<xp:eventHandler event="onclick" submit="true">
					<xp:this.action><![CDATA[#{javascript:getComponent("testText").setValue("値がセットされました。")}]]></xp:this.action>
				</xp:eventHandler>
			</xp:button>
			<xp:button value="値をクリア" id="button1">
				<xp:eventHandler event="onclick" submit="true">
					<xp:this.action><![CDATA[#{javascript:getComponent("testText").setValue("値がクリアされました")}]]></xp:this.action>
				</xp:eventHandler>
			</xp:button>
		</xp:panel>
		<xp:eventHandler event="onHide" submit="true" refreshMode="partial" refreshId="testPan" disableValidators="true">
		</xp:eventHandler>
	</xe:dialog>
色々と調べた所、、、
どうも部分更新のエラー処理がV10から変更されているようでその影響の様です。
こちらに情報がありました 参考URL
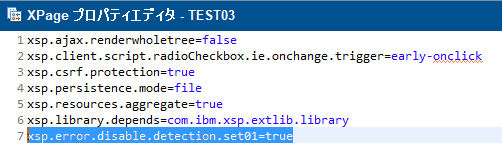
回避策として、
Xspプロパティに「xsp.error.disable.detection.set01=true」をセットすることで
V9.0.1でのエラー処理に戻すことが可能です。
それでは、Xspプロパティを更新した状態でもう一度実行すると
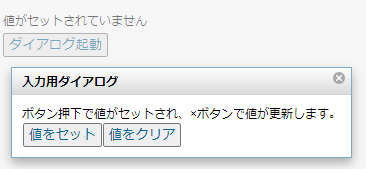
「値をセット」ボタン押下後に、「×」ボタン押下すると
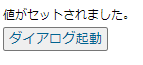
「値がセットされました。」と文言が更新されました。期待通りの動作です。
似た様な現象が発生した場合は参考になればと思います。
それでは本日はここまでで。
XPagesで同じカスタムコントールを使用する場合のID被りへの対処法
Notes/Dominoエンジニア XPages担当の米原です。
今回もXPagesのお話です!
共通して使用しているカスタムコントロールを同ページで複数使用する必要がある場合、
例えばこんなパターン
<xp:panel>
	<xc:ccFormSample02>
		<xc:this.rendered><![CDATA[#{javascript:param.get("paramTEST") == "01"}]]></xc:this.rendered>
	</xc:ccFormSample02>
	<xc:ccFormSample02>
		<xc:this.rendered><![CDATA[#{javascript:param.get("paramTEST") == "02"}]]></xc:this.rendered>
	</xc:ccFormSample02>
</xp:panel>
「ccFormSample02 」カスタムコントロールをURLパラメータの値で表示/非表示の切り替えを行っています。

今回は設計が複雑ではない簡単なカスタムコントロールを用意しましたが、実際運用される場合はもっと複雑
で複数配置を目的としたカスタムコントロールがあるかと思います。
例えばこのようなときが想像できます。
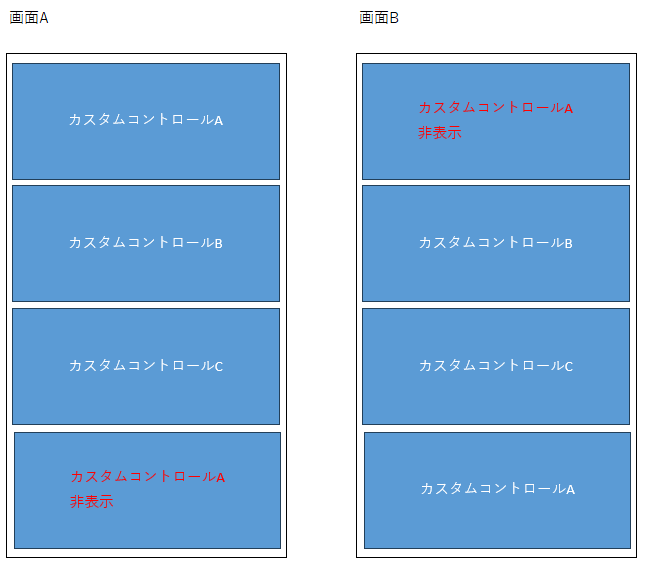
カスタムコントロールA(共通して使用したい。)
画面の表示をURLパラメータで切り替えている場合
画面Aでは「カスタムコントロールA」情報が重要になるので一番上に表示させたい。
画面Bでは「カスタムコントロースA」情報はあまり重要ではないので一番下に表示させたい。
そのような場合に同じカスタムコントロールを同画面に配置してURLパラメータで切り替えることで実装したりします。
表示・非表示切り替えで対応する場合に問題になるのが、IDの問題です!
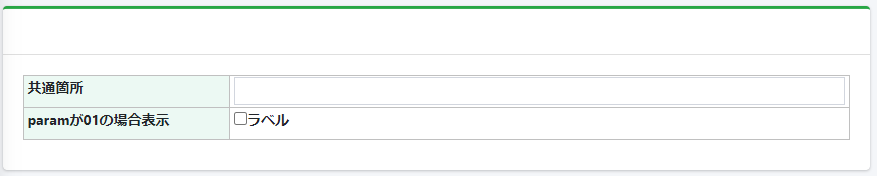
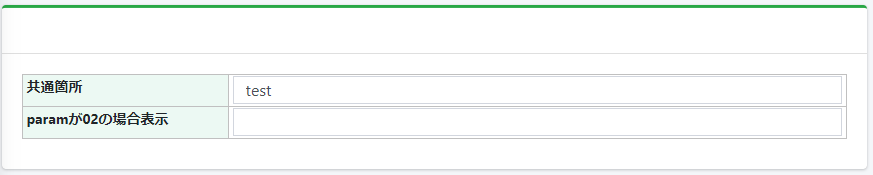
今回は共有箇所のInputTestフィールドにIDを付与していてそのIDを元に値をセットしている場合があります。
<xp:tr>
	<xp:td styleClass="tblHead">
		<xp:label id="label2"
			for="orderNumber1">
			<xp:this.value><![CDATA[#{javascript:
var ret = "";
ret = "共通箇所"
return ret;}]]></xp:this.value>
		</xp:label>
	</xp:td>
	<xp:td>
		<xp:inputText id="test001"></xp:inputText>
	</xp:td>
</xp:tr>id="test001" 箇所ですね。
例えば初期値に値をセットさせたい場合でこのように値をセットしている場合
	<xp:this.afterPageLoad><![CDATA[#{javascript:
getComponent("test001").setValue("test");
}]]></xp:this.afterPageLoad>
「 getComponent("test001").setValue("test"); 」このような方法で表示の値をセットすると、
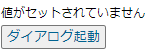
結果的には


paramTEST=01 の場合 は初期値に 「test」がセットされていますが、 paramTEST=02 の場合 は値がセットされていません。
これはIDが被っているので最初に見つけた所のIDにセットされるようになります。
もう少し詳しく説明しますと、 getComponent("test001") .setValue("test") とすると、最初の id="test001"が取得されて、そちらに値がセットされてしまいます。
非表示の方法としてrenderをfalse にしたり、 style に display:none をして非表示にしたりしますが、 getComponent では非表示にしても取得されていまうので、そのような現象になってしまいます。
さてさて、どうしたものかな~と。。。。
そこで活躍するのが「loaded」です!
<xp:panel>
	<xc:ccFormSample02>
		<xc:this.loaded><![CDATA[${javascript:param.get("paramTEST") == "01"}]]></xc:this.loaded>
	</xc:ccFormSample02>
	<xc:ccFormSample02>
		<xc:this.loaded><![CDATA[${javascript:param.get("paramTEST") == "02"}]]></xc:this.loaded>
	</xc:ccFormSample02>
</xp:panel>
loaded は ページ作成時にコントロールを作成するかどうかですので、どちらかのカスタムコントールしか作成されなくなり、IDが被ることが無く期待した動作になるということになります。
無事期待する動作となりました。
今回のパターンでは 「rendered」では都合が悪く、「loaded」を使用しましたが、「loaded」は一度「false」にしてしまうと、ページ全体をロードしなおさないと表示の切り替えができません。「rendered」に関しましては、部分更新で表示/非表示の切り替えが可能となります。
両方使える場合では「 loaded 」が「false」の場合はカスタムコントロールを一切読み込まないので、余分にメモリを消費しないことや処理速度も 「rendered」 に比べて早いのではないかと考えられます。
用途に合わせて使うのがよろしいかと思います。
似た様なことでお困りの際はお試ししてください。
ではでは本日はこの辺で失礼いたします。
Domino DesignerでXPageを開いた際に開くのが遅い時の対応
Xpagesの設計をDesignerで開いた際に遅い件
Notes/Dominoエンジニア XPages担当の米原です
設計をDesigerで開いた際におそい~と思ったことはないでしょうか??
設計が少ない場合はそうでもないのですが、
より複雑になった場合、カスタムコントロールの数が多くなっていきだんだん遅くなりますよね。
回避策としまして
- 冗長な処理をなくす
- DBを分ける
- PCのスペックを上げる。メモリ増幅 ^^;
などが考えられます。
ここでは取り上げる方法は、Desigerで設計を開いた際により早く開くことができるのと、
やりようによっては設計が見やすくもそうでなくもなります。
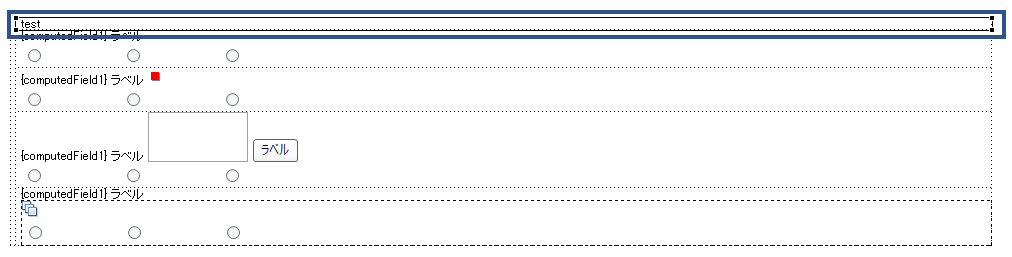
今回は1つのカスタムコントロールに5個のカスタムコントロールをセットしているもので試してみます。
これくらいなら特に遅くもならないのですが、実運用しているものでしたら、カスタムコントールの中に
カスタムコントロールはいっぱい入っているケースがあり、特にリピートコントロールは遅く成る要員の一つです
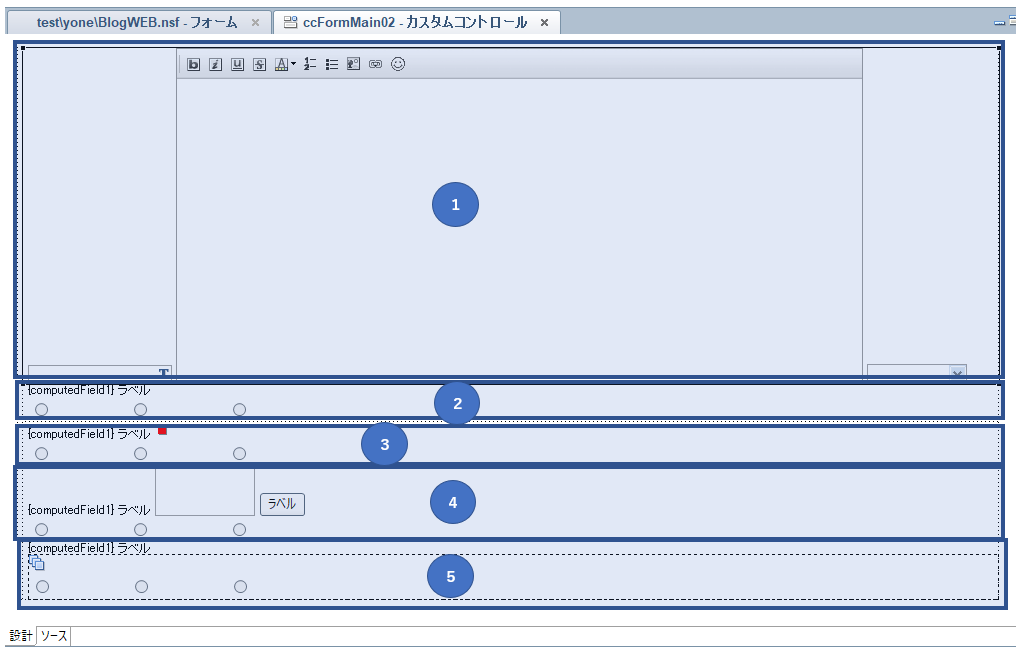
上図ではどのようなコントロールが配置されているとかがすぐわかるのでいいのはいいのですが
①のカスタムコントロールを開きまして、プロパティの設計定義を開きます。
そこに、XSPの形式で入力します。テスト的に下図のように設定します。
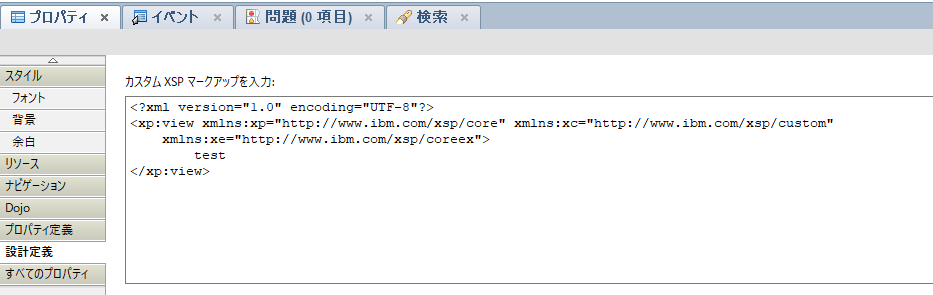
設定後に再度ccFormMain02を確認すると
test と表示されます。
ん、、、、見にくい
コメントは少し装飾しました。うんいい感じです
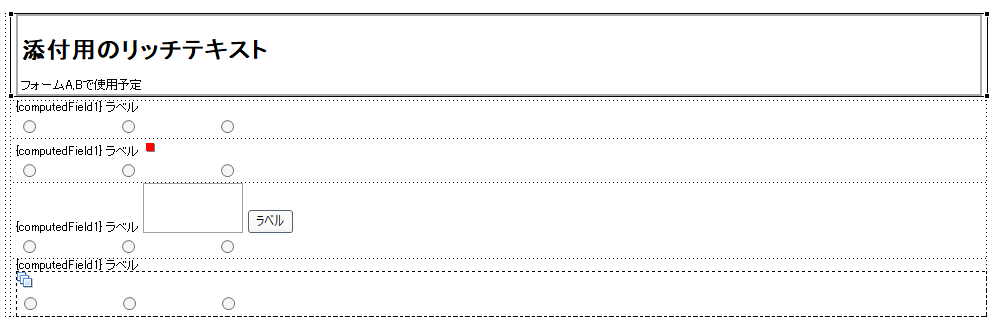
マークアップ式はこんな感じです↓
<?xml version="1.0" encoding="UTF-8"?>
<xp:view xmlns:xp="http://www.ibm.com/xsp/core" xmlns:xc="http://www.ibm.com/xsp/custom"
    xmlns:xe="http://www.ibm.com/xsp/coreex">
	<div style="border: 2px solid #A9A9A9; padding: 3px; margin: 5px;">
		<h1>添付用のリッチテキスト</h1>
		<div>
			フォームA,Bで使用予定
		</div>
	</div>
</xp:view>
こんなふうに全て記入すると。。。
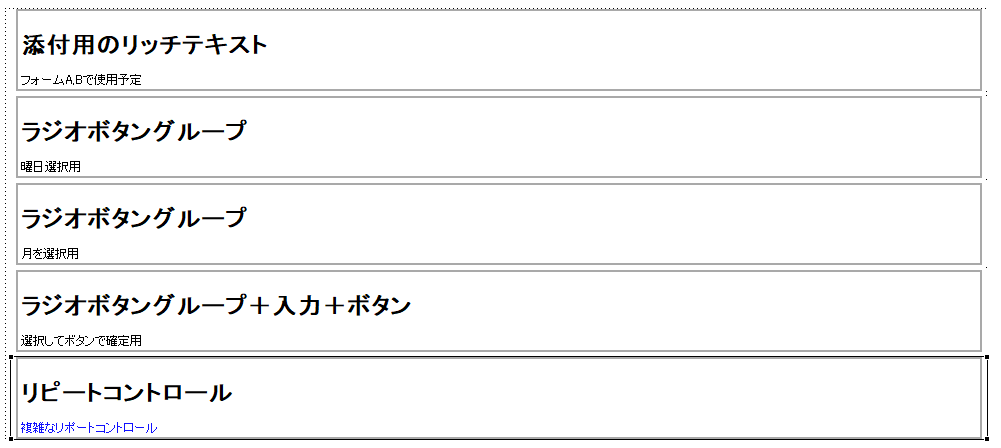
見やすくなりましたね、マークアップ箇所は基本のHTMLで記入するだけなのでお好みいに合わせて
カスタマイズできます。
ということで、見やすくなりました。めでたしめでたし!
あれれちょっと待った~表示が変わっただけなのでは、、、、
と思いきや、これで設計を開くときには今回のマークアップの設計定義を読み込むので
設計は格段に速く開くことが可能になります。
さすがに今回のサンプル的なのでは速さは体感できませんが、カスタムコントロールが増えて
複雑化してきたら結構ストレスがたまる位に起動が遅く成りますのでその際には体感できるかと思います。
それでは今回はここまでとします。
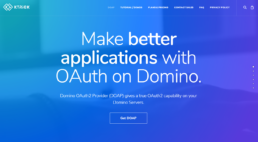
Domino OAuth2 Provider Beta Release by KTrick
I would like to introduce our new solution called "Domino OAuth2 Provider (DOAP)".
We developed OAuth2 provider that can run on IBM Domino server.
Our Domino OAuth2 Provider (DOAP) brings true OAuth2 capability to your IBM Domino Servers.
Since we decided to provide DOAP community edition for Non-Commercial Use Only, everyone can download and use it.
Please visit our DOAP website and get the DOAP installer and free license
Once after you download our DOAP, please follow the tutorial about how to install DOAP: https://doap.ktrick.com/portfolio/tutorial/
Please try our "Domino OAuth2 Provider (DOAP)". Any feedback is really appreciated.
For more detail, you might want to check our FAQ page: https://doap.ktrick.com/faq/
Open Source Project "DOAP Sample Chat app with Domino"
To feel the power of OAuth2 capability with IBM Domino, we open-sourced node.js application called "DOAP Sample Chat app with Domino".
Please download/clone the code and check the instruction of how to run app from here: https://doap.ktrick.com/portfolio/domino-nodejs-chat/
This sample chat application is written by Node.js, web-socket and OAuth module to communicate with DOAP.
After the user login to Domino via Domino OAuth2, they can start chatting immediately on the web based node.js page. The chat comments are also synchronized with discussion nsf in the background. To pull/push the comments from/to the document of discussion nsf, we access to URL of Domino Data Service(aka Domino REST service) with Domino OAuth accessToken in the request body so that the token authorize the each requests seamlessly.
Below is the demo movie, please turn on the caption of the movie to understand what's going on.
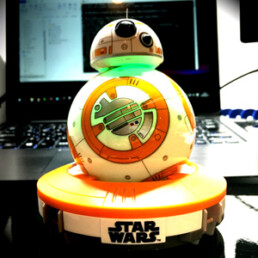
Control BB-8 by XPages on bluemix and IBM IoT Foundation (2/2)
Continue from previous post
This blog is the part 2 of Control BB-8 by XPages on bluemix and IBM IoT Foundation (1/2).
In the previous post, I explained how to configure Bluetooth device to use by node.js on windows.
- 1. To control BLE on Windows
- 2. Get UUID of Bluetooth
3. Get BB8-Bluemix project from GitHub
Surprisingly there is the project named BB8-Bluemix on the GitHub to manipulate the BB-8 via MQTT(IoT). So please get the project code from following URL.
https://github.com/shamimshossain/bb8-bluemix
As the next step, open command prompt and change directory to project folder, then install by issuing "npm install".I got some dependencies warning messages, but it didn't interfere the BB-8 manipulation, so I just leave it as it is.
![]()
After install is completed, open the spheroDemo.js file and replace the parameter of sphero() function on line 3 by Bluetooth UUID which you got from the previous step. The UUID seems to be more than 20 characters on MAC OS, but it was 12 characters on my windows OS.
[code highlight="3" lang="javascript"]
var mqtt = require('./mqtt-wrapper.js')();
var sphero = require('sphero'),
bb8 = sphero('cxxxxxxxxxx3'); // change BLE address accordingly
bb8.connect(function() {
console.log('**** Start debug info *****');
console.log('Connected to BB-8');
.................
... truncated ...
.................
[/code]
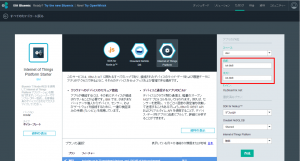
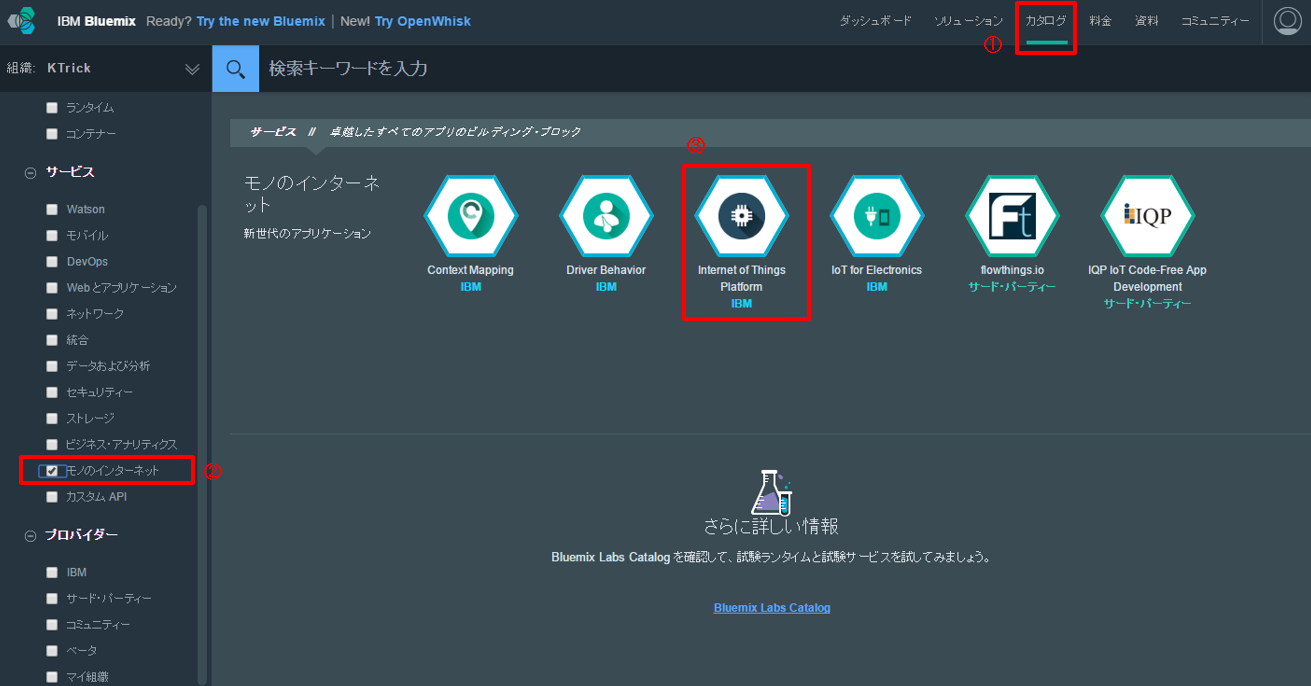
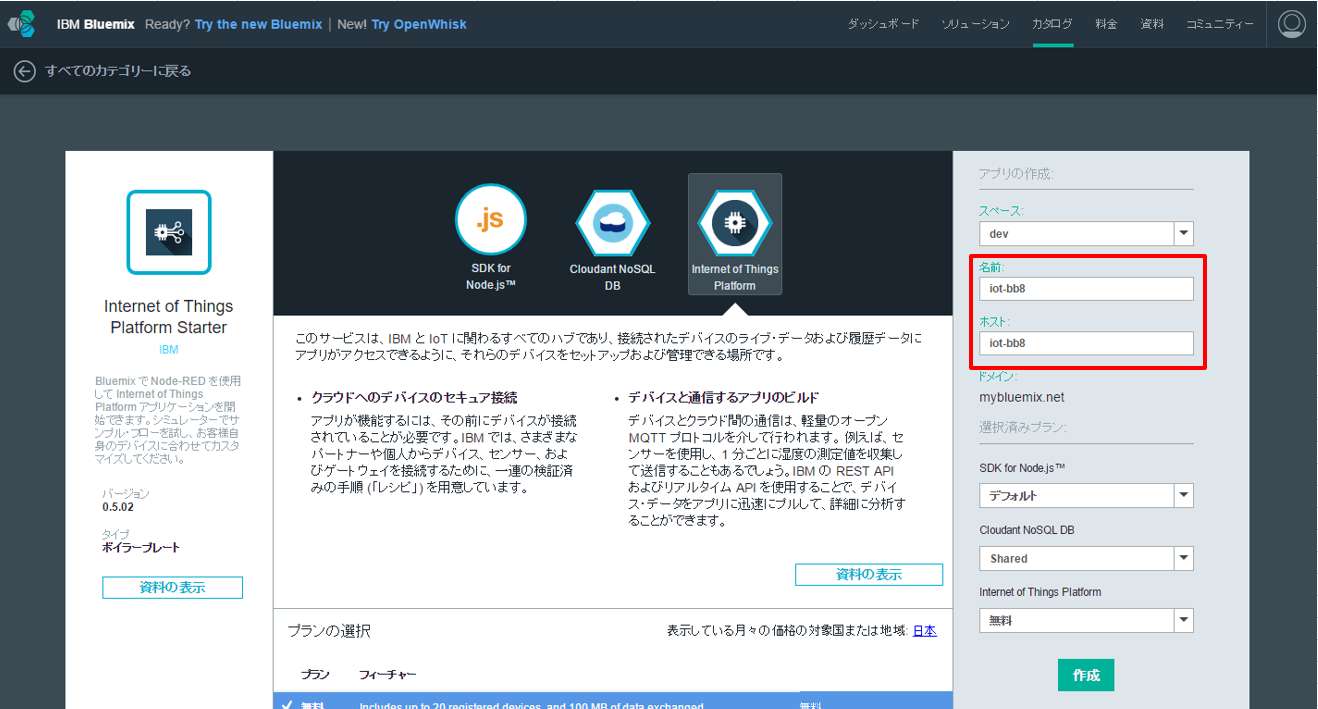
4. Create "Internet of Things Platform Starter" application on Bluemix
- Login to bluemix.net
- Select "Internet of Things Platform Starter" from Catalog.

- Specify your preffered value to the name and host, then click Create button
5. Add device on IoT Foundation
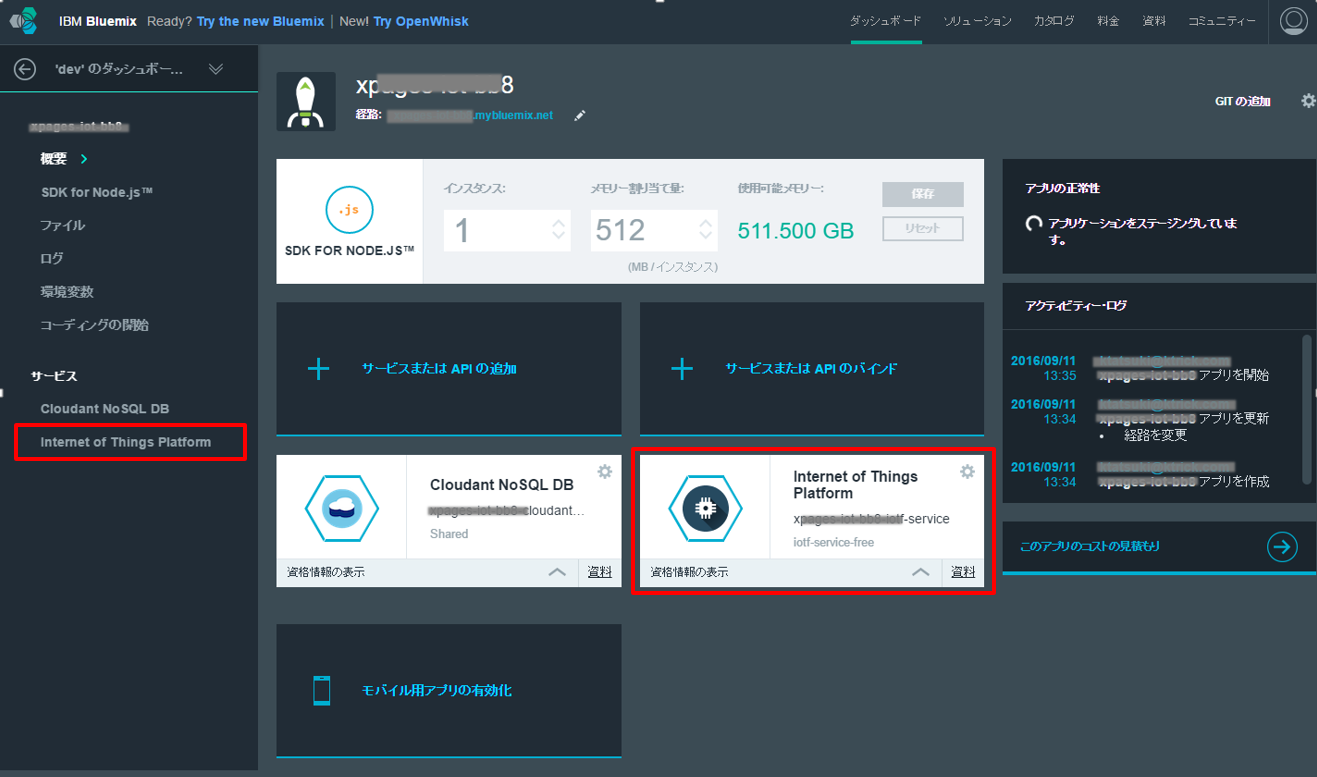
- After staging the application, select "Internet of Things Platform" from the left navigation.
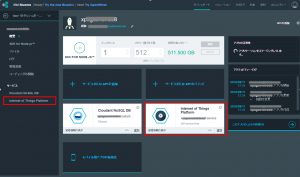
- Click "Launch Dashboard" from device connection.
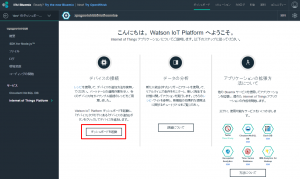
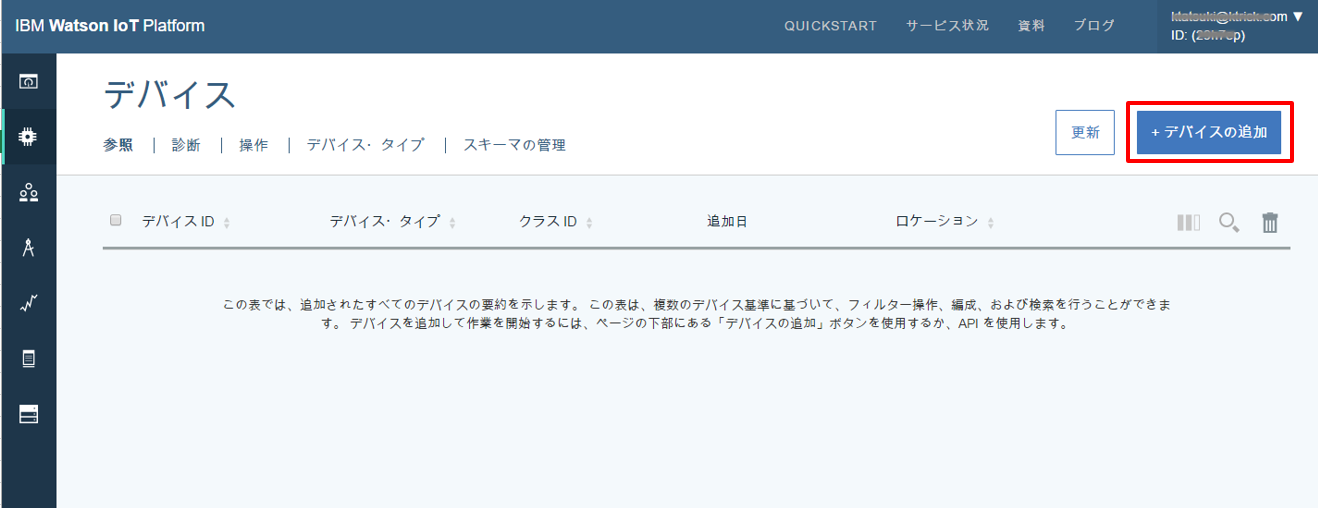
- Click "Add device" after "IBM Watson IoT Platform" page is opened.

- After popup the wizard, select "Create Device Type", then next./li>
- "Create Device Type" ‐ In "general information" Type "sphero" for the device name, then next.
- "Create Device Type" ‐ In "Template definition" just click next.
- "Create Device Type" ‐ In "Send information" just click next.
- "Create Device Type" ‐ In "Metadata(Option)"just click create.
- Select the device type you created above for the "Select Device Type" field, then next.
- In "Device Information" Specify preferred value for "Device ID", then next.
- In "Metadata" just click next.
- In "Security" just click next.
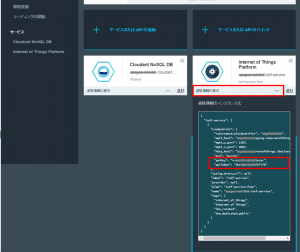
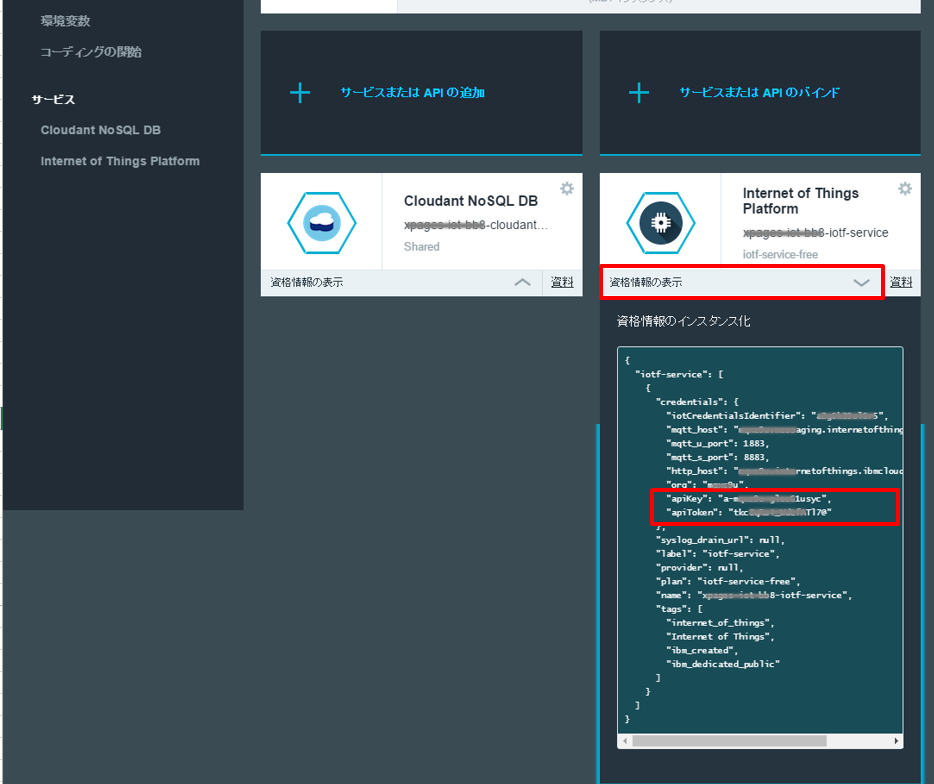
- In "Overview" just click add button.
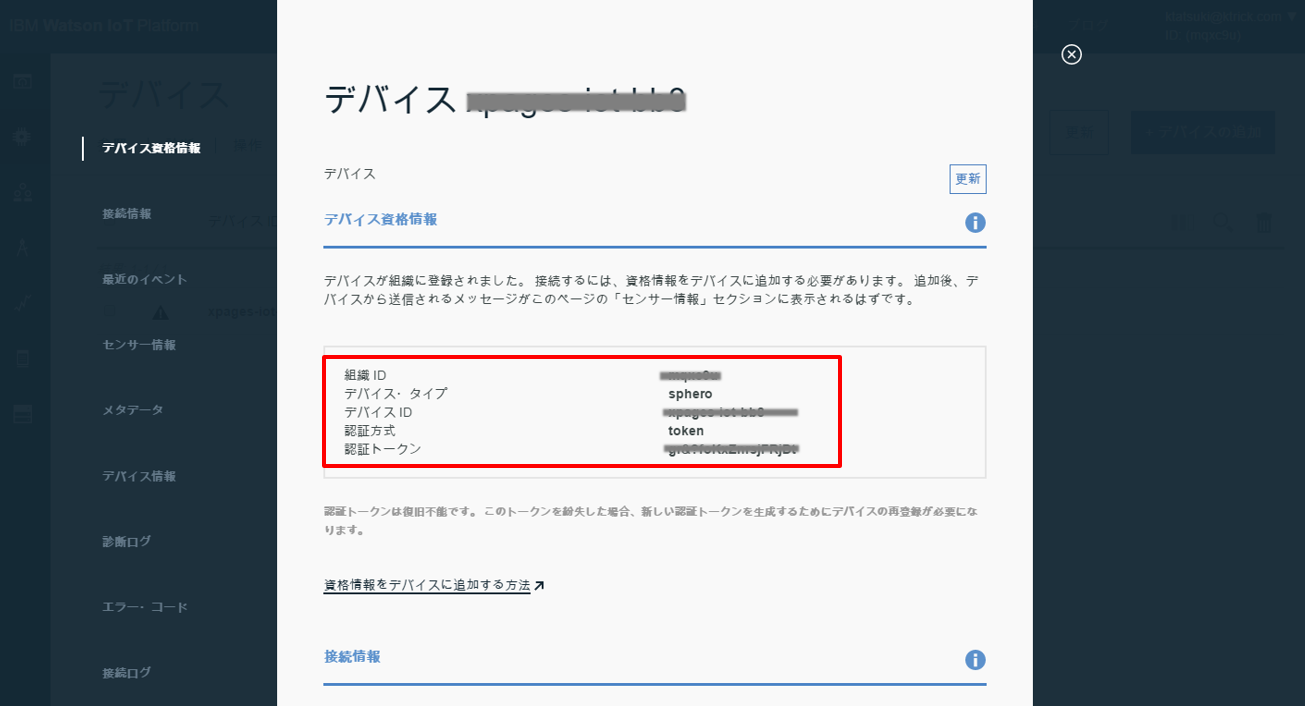
- After displaying the device qualification information, Please copy and keep the values in the red color rectangle.
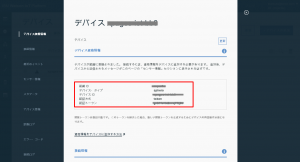
- After all done the above steps, back to dashboard of "Internet of Things Platform Starter" then check apiKey and apiToken by clicking "display
qualification info"

6. Configure properties file of BB8-Bluemix project
Go to BB8-Bluemix project folder and open sphero-config.properties.
Please edit the following lines:
[code highlight="2,4,6,7"]
#Device ID you use when you register with the IoT foundation
deviceid=xxxxxxxxx-xxx
#For controller (device)
authtoken=grxxxxxxxxxxxjDt
#For the app (publisher)
apikey=a-mxxxxu-gloxxxxxxc
apitoken=tkxxxxx4_Wxxxxxxx@
[/code]
- deviceid: Specify the Device ID that you used when registering BB-8 on IBM Watson IoT Platform
- authtoken: Specify the authentication token that you got when registering the BB-8 on IBM Watson IoT Platform
- apikey, apitoken: Specify apikey and apiToken written in "IBM Watson IoT Platform" qualification info
7. Test via Node-Red
Find the Node-Red sample flow form the bottom of the link page bb8-bluemix.
- bb8-bluemix Copy the Node-Red json code.(below is the same sample flow)
[code lang="javascript"]
[{"id":"180c60f4.e7f39f","type":"ibmiot out","z":"5fa8453c.a057bc","authentication":"boundService","apiKey":"","outputType":"cmd","deviceId":"spheroownedbyshamim","deviceType":"sphero","eventCommandType":"run","format":"json","data":"___","name":"IBM IoT App Out","service":"registered","x":756,"y":361,"wires":[]},{"id":"b7792b22.4886d8","type":"inject","z":"5fa8453c.a057bc","name":"Run command","topic":"","payload":"","payloadType":"none","repeat":"","crontab":"","once":false,"x":206,"y":444,"wires":[["f29b07a3.0d64f8"]]},{"id":"f29b07a3.0d64f8","type":"function","z":"5fa8453c.a057bc","name":"Construct RUN command","func":"msg.payload = JSON.stringify({\n d: {\n action : \"#spherorun\"\n }\n});\nreturn msg;","outputs":1,"noerr":0,"x":468,"y":449,"wires":[["180c60f4.e7f39f","d1c575b9.2e3a88"]]},{"id":"d313ea30.2cec18","type":"inject","z":"5fa8453c.a057bc","name":"Change color to RED","topic":"","payload":"","payloadType":"none","repeat":"","crontab":"","once":false,"x":205,"y":297,"wires":[["26e811fe.d917ee"]]},{"id":"26e811fe.d917ee","type":"function","z":"5fa8453c.a057bc","name":"Construct RED command","func":"msg.payload = JSON.stringify({\n d: {\n action : \"#red\"\n }\n});\nreturn msg;","outputs":1,"noerr":0,"x":473,"y":287,"wires":[["180c60f4.e7f39f","d1c575b9.2e3a88"]]},{"id":"61c2c549.9e3d3c","type":"inject","z":"5fa8453c.a057bc","name":"Change color to BLUE","topic":"","payload":"","payloadType":"none","repeat":"","crontab":"","once":false,"x":193,"y":369,"wires":[["18100517.e7effb"]]},{"id":"18100517.e7effb","type":"function","z":"5fa8453c.a057bc","name":"Construct BLUE command","func":"msg.payload = JSON.stringify({\n d: {\n action : \"#blue\"\n }\n});\nreturn msg;","outputs":1,"noerr":0,"x":485,"y":363,"wires":[["180c60f4.e7f39f","d1c575b9.2e3a88"]]},{"id":"d1c575b9.2e3a88","type":"debug","z":"5fa8453c.a057bc","name":"","active":true,"console":"false","complete":"false","x":777,"y":286,"wires":[]}]
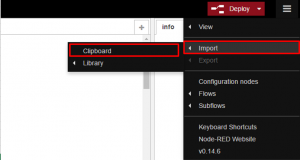
[/code] - Launch Node-Red from the application URL of "Internet of Things Platform Starter" that you created in step 4.
- Paste the Node-Red flow by following the steps in the screenshot.
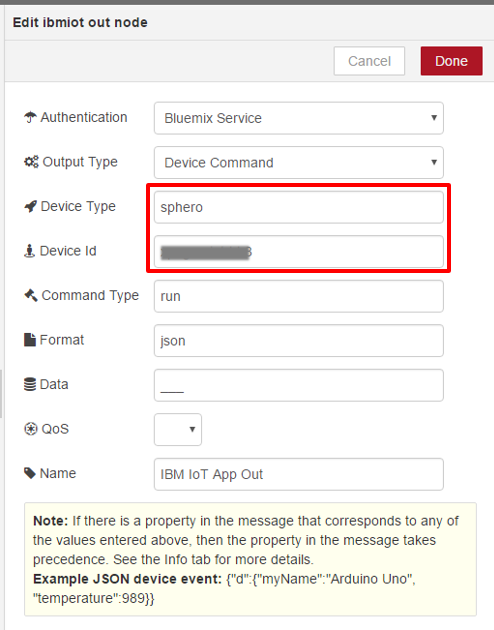
- Configure the "IBM IoT App Out" node by double-click

- Specify Device Type "sphero" which you used in IoT Foundation.
- Specify device Id that you used when registering the device on IoT Foundation - Save Node-Red flow by clicking "Deploy" button.
As the final step, execute spheroDemo.js from command prompt and establish IoT on bluemix connection, then click "Change color to Red/Blue" on Node-Red. If you succeed, you can see BB-8 color is changed.
8. Create XPages on Bluemix application
Finally I can write something about XPages! Please follow the steps to create the BB-8 xpages app.
- Select XPages runtime from Bluemix catalog.
- Specify preferred name and host and then create the new XPages application.
- After staging XPages application, please download starter code. You will be able to find application.nsf
9.Deploy BB-8 Xpages app
Please download the BB-8 xpages application template from the following link:

Download Link: http://ktrick.com/download/xpages-bb8-tpl.zip
Please simply replace the design against your bluemix-xpages application (application.nsf), or copy the design of XPages, scriptLibrary, resources(file), stylesheets from the template.
As the last step, please replace the red rectangle lines of sp_mqtt_bb8.js by your IoT information.
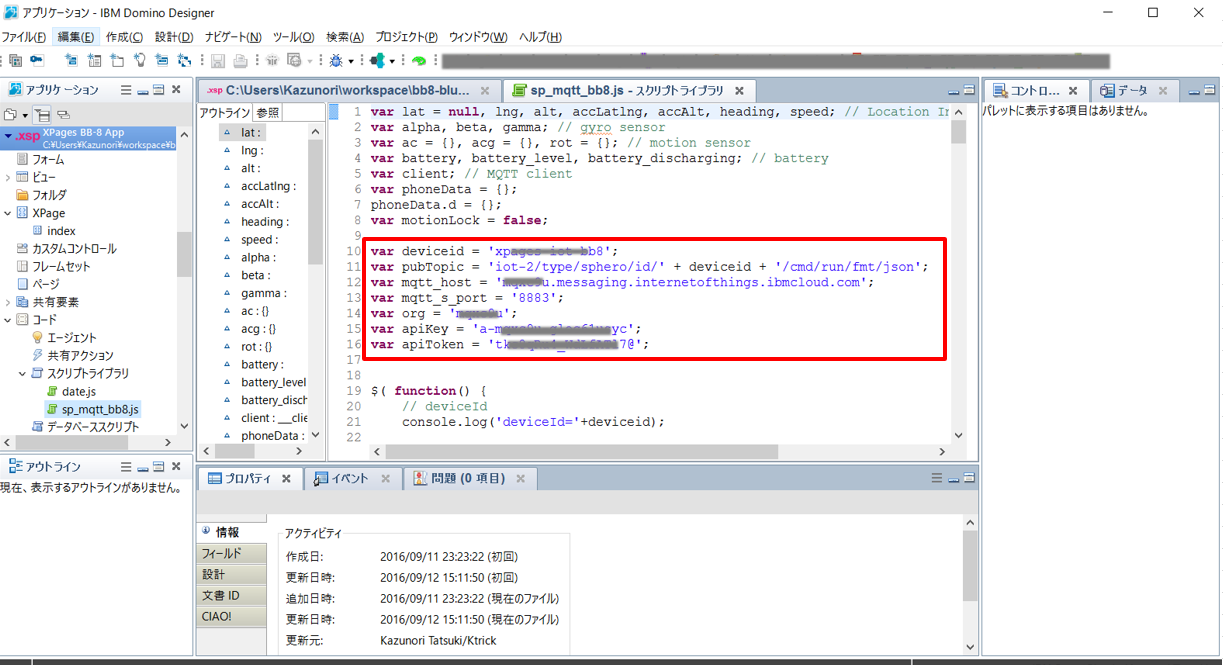
Information is also written in "IBM Watson IoT Platform" qualification info
- deviceid: Device ID
- pubTopic: If device type is not sphero, then replace as you need
- mqtt_host: Specify "mqtt_host" of qualification info
- mqtt_s_port: Specify "mqtt_s_port" of qualification info
- org: Specify "org" of qualification info
- apiKey: Specify "apiKey" of qualification info
- apiToken: Specify "apiToken" of qualification info
After replacing the design and deploy to the Bluemix, you will be able to see the following top page.
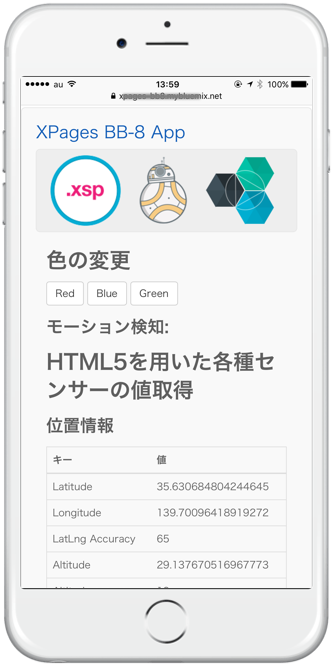
10. Test by XPage app
Step1, Execute spheroDemo.js to establish the connection between BB-8 and IoT Foundation.
Step2, Open the xpages app by your smartphone device.
In this XPAGES app, you can manipulate BB-8 by moving your smartphone like back-forward-right-left. Technically this app is using HTML5+Javascript for motion sensor and paho javascript client to publish MQTT to IoT Foundation.
You can manipulate BB-8 like this movie:
I hope I can explain the inside technology of xpage app in my next blog, and maybe using Paho Java client as further more step. In fact this app does not need to be xpages since client side Javascript does everything. But I hope this helps some other imagination of using XPages, IoT, Bluemix other services.