
Control BB-8 by XPages on bluemix and IBM IoT Foundation (1/2)
Control BB-8 by XPages on bluemix and IBM IoT Foundation
I've had the session to contorl the drone by IoT and XPages on 11/18/2015 at the Notes Consortium Partner Solution Seminar event in Japan
This time I succeeded to control the BB-8 droid of Star Wars instead of Drone by XPages and IoT. So I would like to share how I made.
By the way, below is the system diagram of drone(AR-Drone)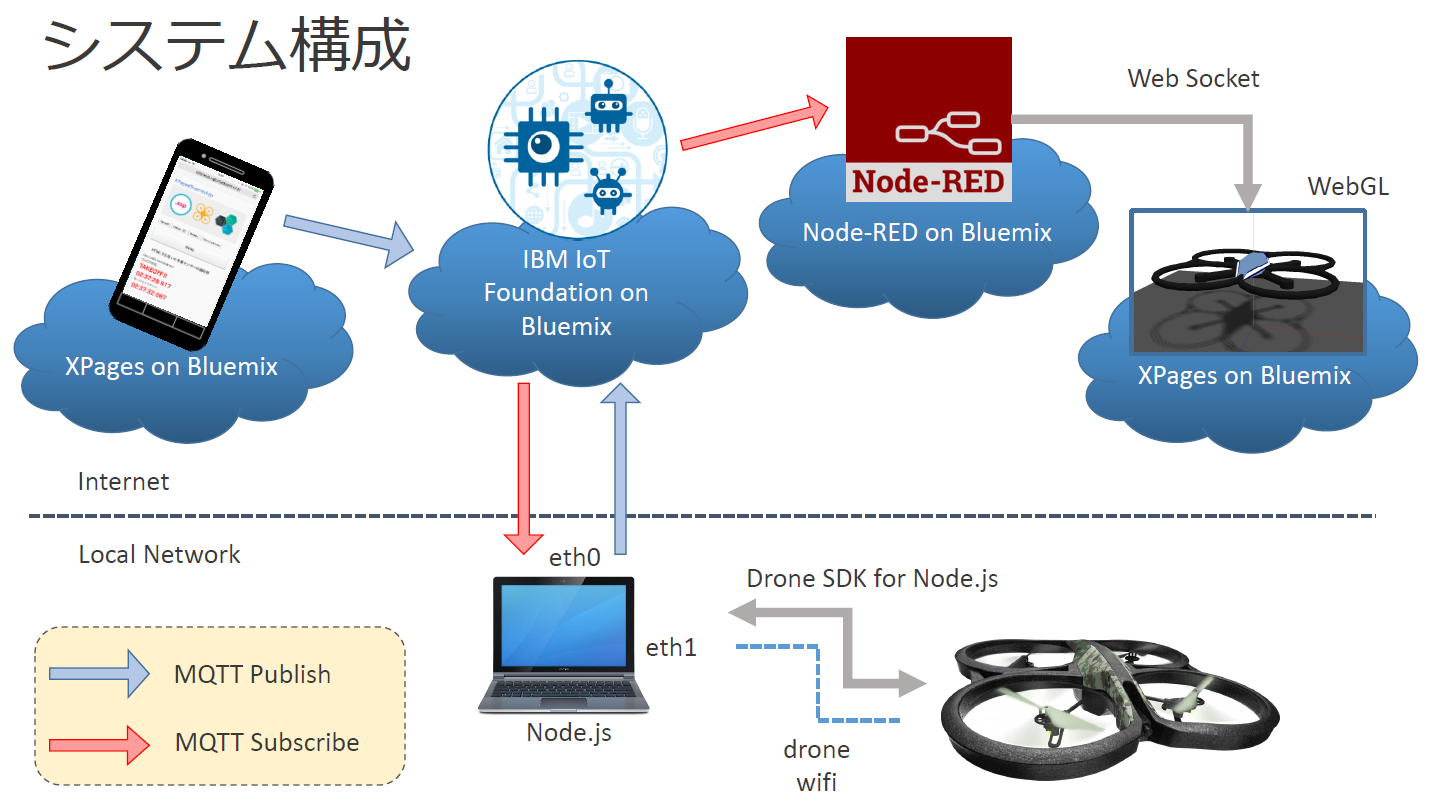
Presentaion slide is below:
Difference between Drone and BB-8
In the drone project, the central device(PC) connected to the drone by the drone Wifi connection so that the device can receive the drone data and publish to IoT on bluemix or vise versa. In the BB-8 project, the most different thing is BB-8 and PC are connected by bluetooth.
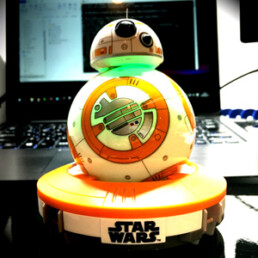
Get BB-8!
I got this BB-8 as the eye-catch item at the booth in the IBM Connect Japan 2016. Normally you download the designated smartphone application and manipulate BB-8 via the app.
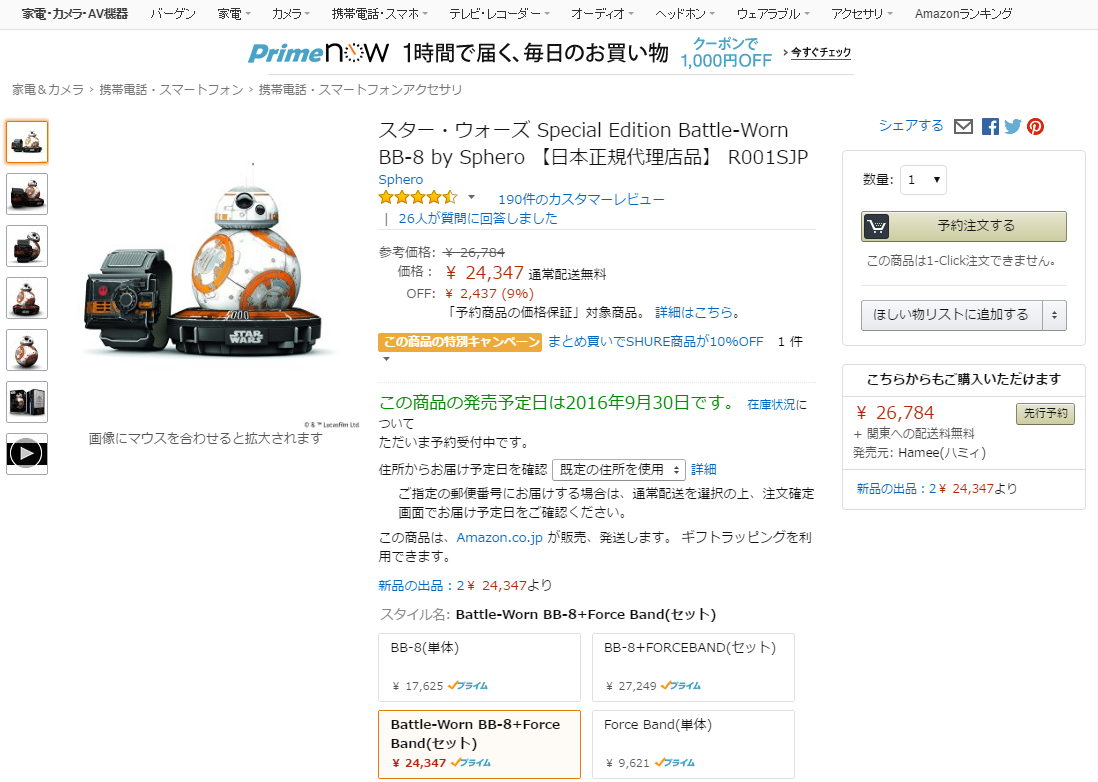
When I searched BB-8 by Amazon.co.jp, the "Force Band" seems to be sold as BB-8 option item on 9/30/2016. "Force Band" and my technical approach is maybe totally different, but I am happy to blog this before people purchase the "Force Band".
Premise
- Node.js has been installed on Windows OS
- Bluemix account has been created.
- CF command line interface has been installed.
- Bluemix command line interface has been installed.
- Bluemix Tool has been installed to the IBM Domino Designer (For more detail Go this link)
- BB-8
- Bluetooth 4.0 USB adapter
System Diagram
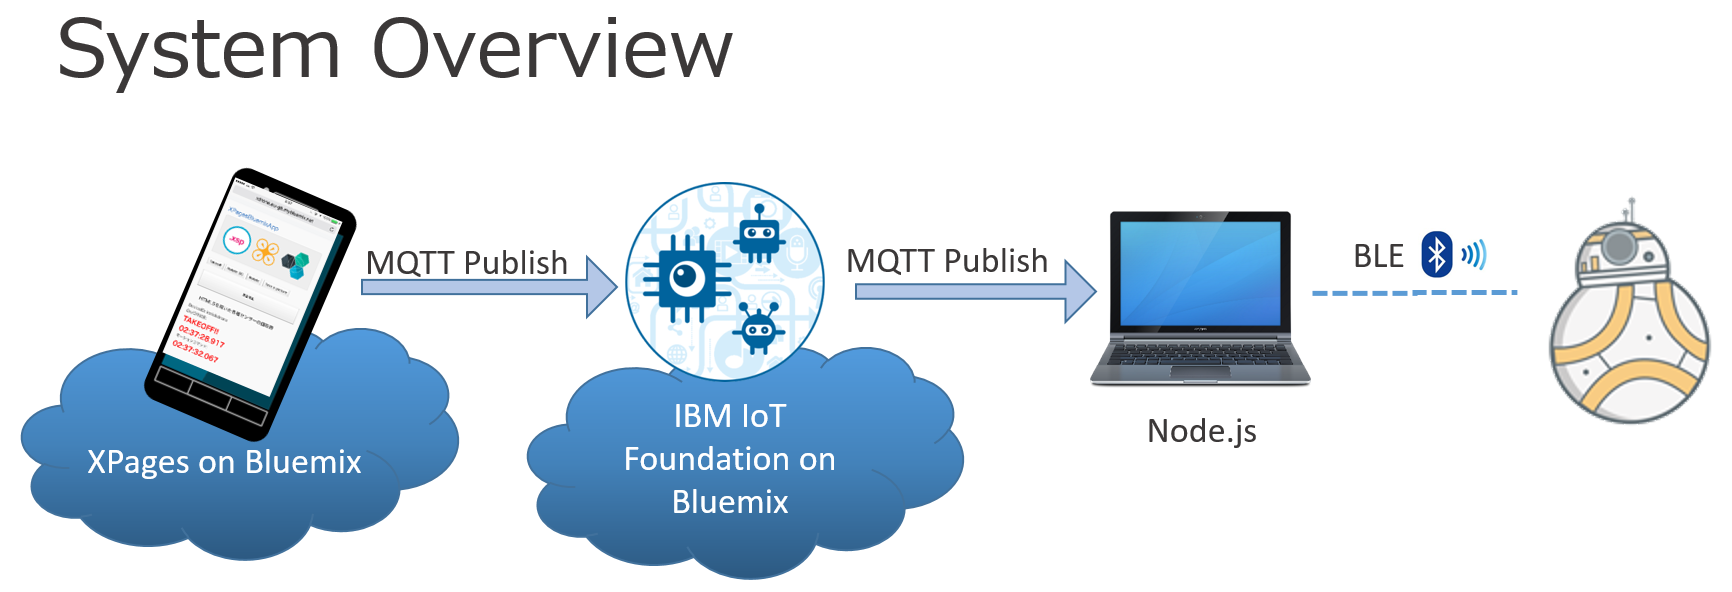
This BB-8 is simpler than Drone.
1. To control BLE on Windows
In my environment, the embedded Bluetooth device could not be used for BLE connection. So I purchased Bluetooth 4.0 USB adapter and then, I needed to setup the device to the WinUSB driver by using Zadig
Below is the Bluetooth 4.0 USB adapter I purchased.
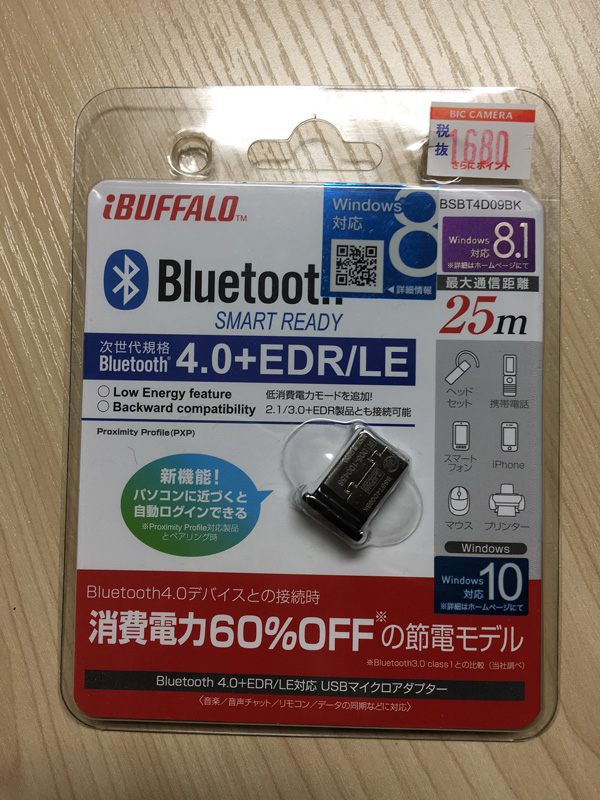
Below is the instruction to setup WinUSB driver so that node.js can use your Bluetooth device.
https://github.com/sandeepmistry/noble
*If you are using Mac OS, your are lucky since you don't need to worry about this step. This step requires installation of Visual Studio, Python etc.
2. Get UUID of Bluetooth
After complete the step above, install(global install) "cylon-ble" package by npm.
npm i -g cylon-ble
A the next step, install "cylon-sphero-ble".
npm i cylon-sphero-ble
Finally you can use "cylon-ble-scan" command to refer the Bluetooth UUID of you BB-8.
Below is a example of my Windows command prompt, please find the line that Name start from BB-, then get the corresponding UUID.
Go to part 2
I divided the blog to part 1 and 2 since it became longer.
Please jump to Control BB-8 by XPages on bluemix and IBM IoT Foundation (2/2)
On-Premise Domino Data Access from XPages on Bluemix
Hybrid XPages appplication on Bluemix
XPages on Bluemix has been released as GA on May,2016, and developers can get the environment to develop XPages application easily on the cloud.
XPages code are compiled by "XPages runtime" for XPages on Bluemix. ![]()
This "XPages runtime" is just for runtime environment and should not store any data like Notes Document. Therefore XPages developer usually bind the service called "XPages No SQL Database" as the data store.
In fact, this "XPages No SQL Database" is just NSF file and you can store the data and create the view, form, etc.
However this "XPages No SQL Database" service is part of "Bluemix Labs Catalog" so far and according to IBM Japan, this service should not been used as the production environment.
By this blog post, I tried to use on-premise Domino as the data store for XPages on Bluemix.
Of cause it does not need to be on-premise domino, for example domino on SoftLayer is same meaning. This approach just try to access to outside of bluemix as the data store. It seams to be called as Hybrid XPages Application on bluemix.
BluemixのXPagesSet up the domino server to be used from runtime
![]() To run Hybrid XPages application, you need to configure your on-premise domino.
To run Hybrid XPages application, you need to configure your on-premise domino.
If you've already used "XPages No SQL Database" service, you maybe can ealiry imagine this, "/O=Bluemix" is used as Organization on bluemix. so xpages on bluemix cannot access to the on-premise domino without cross-certificate.
So as the first step, you need to create the new server id and then, when you deploy the application to the XPages runtime container of bluemix, you also attach the server id so that XPages on bluemix can communicate the on-premise servers through uploaded server id information.
Premise
- Installed Domino Designer, Administrator
- Installed Domino Designer 9.0.1FP6 or OpenNTF.org XPages Extension Library verson 15 or above
- Bluemix settings are configured by Domino Designer preference
- Already created XPages runtime application on Bluemix, and downloaded nsf and manifest file on your local
*Sorry, the screenshot are all in Japanese. I hope you still can understand where and what I explain.
Step 1: Create Server ID for Bluemix
- Launch Domino Administrator, then click "Configuration" tab
- From Tools pane, click "Registration" -> "Server".
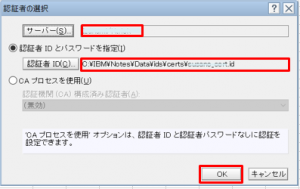
- In the dialog, specify cert id and click [OK]

- Enter password for Cert ID[OK]
- If you don't need to change, then just Click Continue.
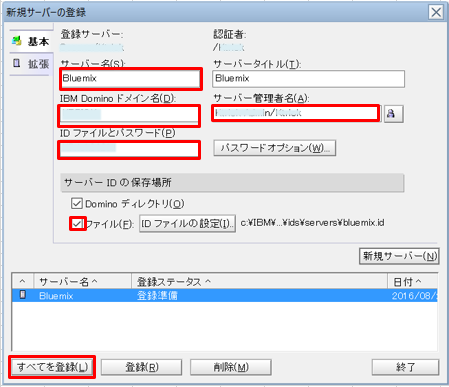
- Enter server information for bluemix. Click [Register All] to complete the process.
Server password is optional and usually you might not put password for server. but I added password since I give this server id to the bluemix. Also I recommend to output the server id as file by checking the checkbox.

OK, nothing special, just server id has been registered. the Different thing is you don't need to install domino server by this server id since you only have to pass this server id to the bluemix Xpages runtime.
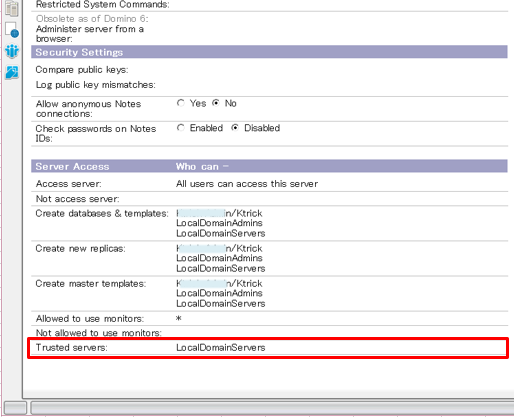
*Warning 1: Please confirm the server name is contained in "LocalDomainServers" group.
*Warning 2: Please confirm the server which has the access from Bluemix XPages runtime should contains the LocalDomainServers or created server name in Trusted servers field under the server document -> "Security" tab.
Step2: Configure IBM Bluemix Manifest
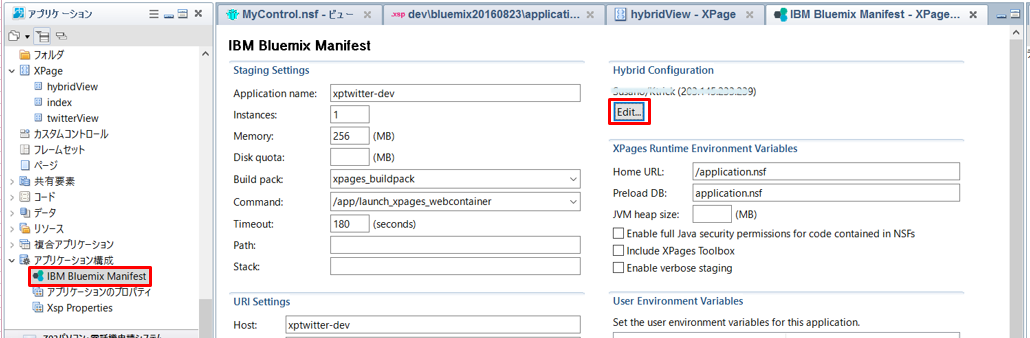
- Open Domino Designer and then open Xpages application NSF which is created from Bluemix and downloaded.
- Open "Application property" -> "IBM Bluemix Manifest"
- On the right-top corner, Click Edit button in "Hybrid Configuration" section.
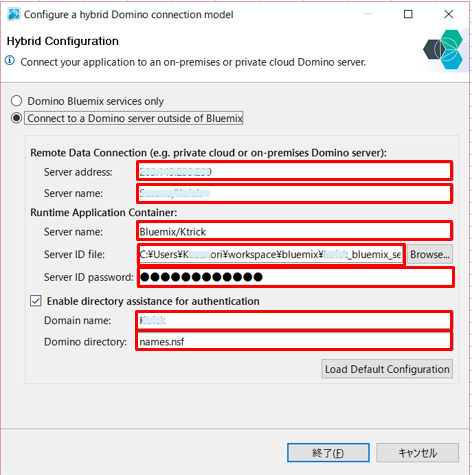
- Enter Hybrid configuration
- Remote Server Address ( APP_REMOTE_DATA_SERVER_ADDRESS)
: on-premise Domino IP addressのIP. - Remote Server Name (APP_REMOTE_DATA_SERVER_NAME)
: on-premise Domino server name(i.e. App01/ZetaDataBank)。 - Runtime Server Name (APP_RUNTIME_SERVER_NAME)
: Server name created above(i.e. bluemix/ZetaDataBank)。 - Runtime Server ID File (APP_RUNTIME_SERVER_IDFILE)
: Server id file created above - Runtime Server ID Password (APP_RUNTIME_SERVER_PASSWORD)
: Server id password if you specified. - Directory Assistance Enabled (APP_DA_ENABLED)
: Specify directory assistance enabled or not - Directory Assistance Domain (APP_DA_DOMAIN)
: domain name(i.e. ZetaDataBank)。 - Directory Assistance Address Book (APP_DA_ADDRESS_BOOK)
: Directory NSF which is necessary for authentication of hybrid environment (i.e. “names.nsf”)。
- Remote Server Address ( APP_REMOTE_DATA_SERVER_ADDRESS)
That's all.
I created one sample xpage below:
I specified on-premise domino view in this sample. (Line 5)
Deploy to the bluemix through Domino designer.
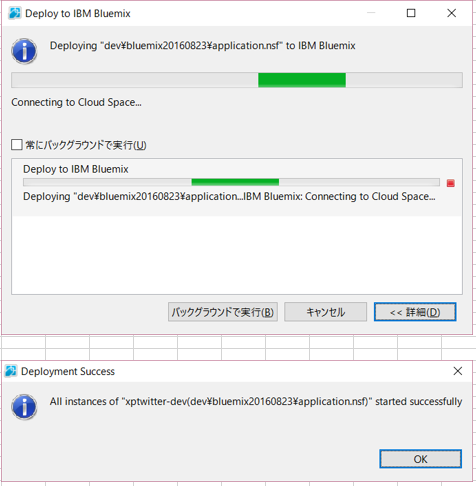
Bluemix service is going to reboot automatically. After wait for a while, access to the Xpage URL you created, and then if you get the on-premise data in the view, Success!
How to invoke function from string by XPages SSJS
What's the case you want to invoke the function from string?
There are many situations you want to invoke the function from string of function name. One of case is for example, you might want to switch the functions from the parameter value of HTML Get/Post method.
The example below is client-side javascript(CSJS) when it's triggered from the URL like "http://mydomain.com/ApplyFuncXAgent.xsp?func=callMe". Then switch the flow by the query parameter value of "func".
If you want to simplify the code above, you can write the code like below:
In this case, window object is used to retrieve the function object, then call the target function. However Server-side Javascript(SSJS) does not have the window object like CSJS. Therefore you need to tweak this code a little.
(1) Use "this" instead of "window"
(2) Use eval()
Both (1),(2) can get the same result.
To pass the parameters, Use call() or apply()
Now we could call the function from string of function name. Then if you want to pass the parameters as well when call the funcion, you can use call() or apply() functions. Actually this way is pretty same as CSJS.
For example, when I call the HTTP Get request like "http://mydomain.com/ApplyFuncXAgent.xsp?func=callMe&args=aa,bb". (I added [args=aa,bb] as the function argument's values.) , the SSJS code becomes like below:
The code above is the example of using call(). If you want to use apply(), then instead of passing the arguments separated by comma, pass the Array to the second argument of apply(). Below is the sample code:
Sample code of using XAgent
In my situation, I needed to get the JSON data from the many notes views as the asynchronous connection. (Passing the JSON data for Kendo UI Grid data.) So I decided to use the XAgent to return the JSON data, however I didn't want to create XAgent XPages as many as notes views. So the sample code below calls the function from the Get parameter value of function name and returns the JSON data by the specified function.
HTTP request is like this -> "http://mydomain.com/hoge.nsf/ApplyFuncXAgent.xsp?func=testFunc&args=aa,bb"
Below is the sample code of xpCommon.jss which contains the callFuncByString() above.
The advantage of this logic is avoiding to create many XAgent for notes views. But please remember that dynamically calling the functions from string value sometimes lose the serviceability of code. For example debugging purpose.
*This XAgent is just for example and for the real coding, please pay attention to the security when you use this concept since any SSJS standard functions can be called remotely if you don't add any restriction and it is very dangerous.

2015.11.18 XPagesDay 2015 Session for controlling Drone by XPages, WebGL, Gyro and Motion sensor
XPagesDay is held on 11/18/2015 in Japan
XPagesDay 2015 is held on Nov 17,18 as online and onsite sessions.
Controlling a drone by Xpage on bluemix and IoT Foundation
Kazunori Tatsuki@KTrick has the onsite session on 11/18/2015 for demonstration of controlling drone by XPages on bluemix with Mr Takeshi Yoshida@SOLXYZ. We are going to explain the following technologies to control the drone in the session
- XPages on Bluemix
- IoT Foundations on Bluemix
- MQTT on Javascript
- Node.js
- Node RED
- WebGL
- Gyro and Motion sensor on smartphone
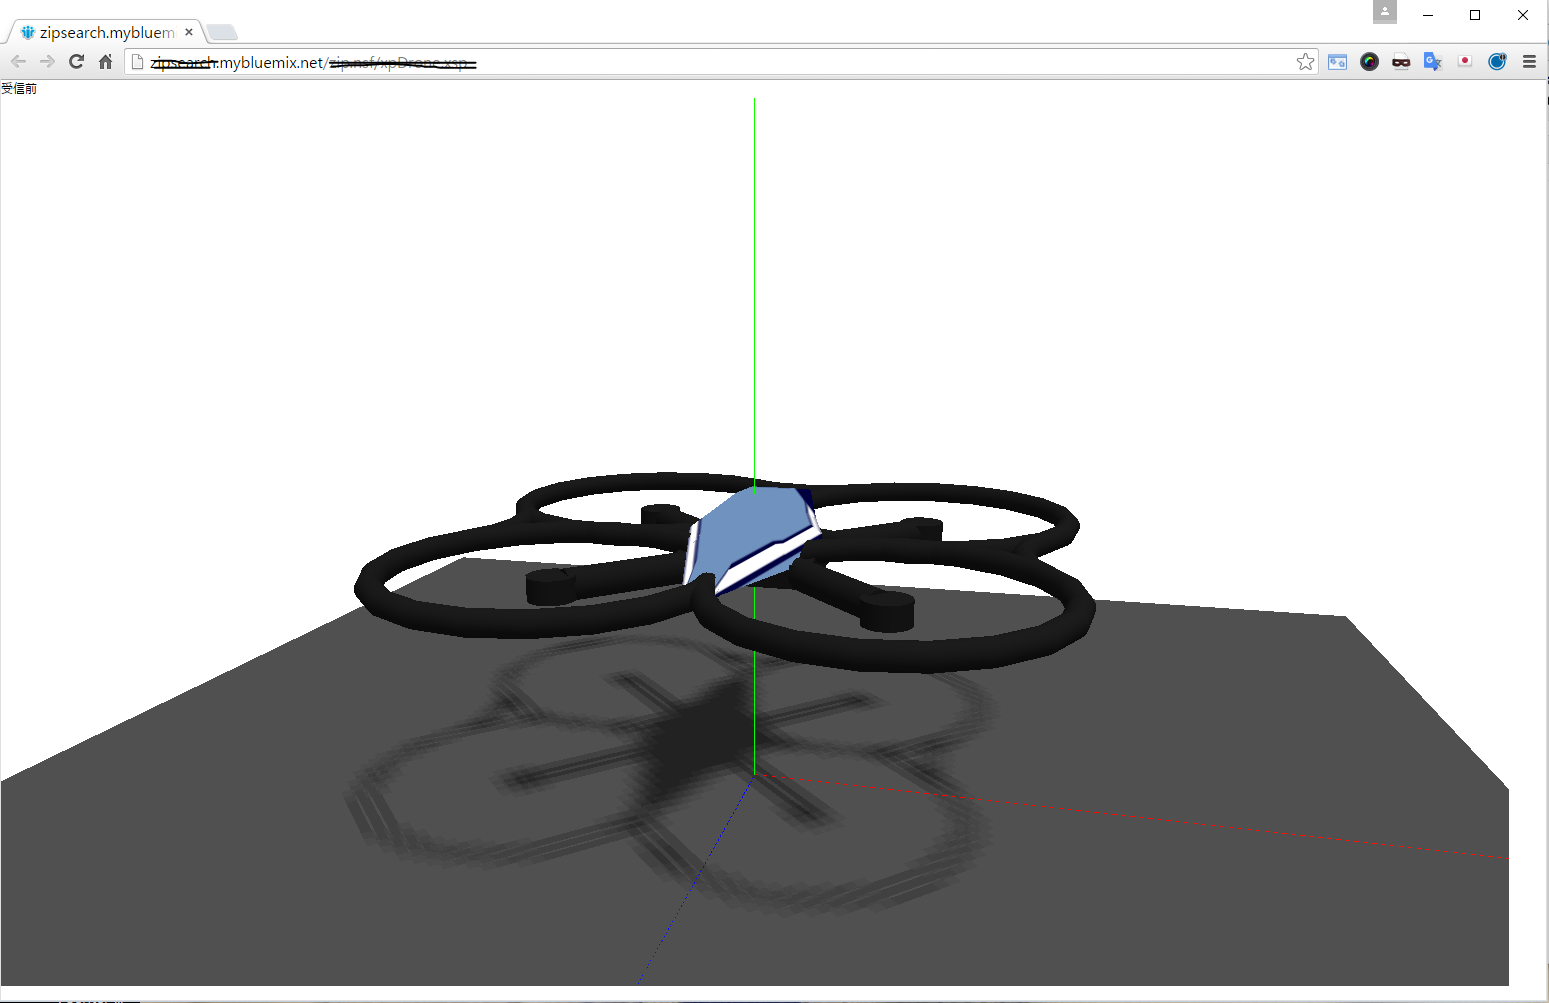
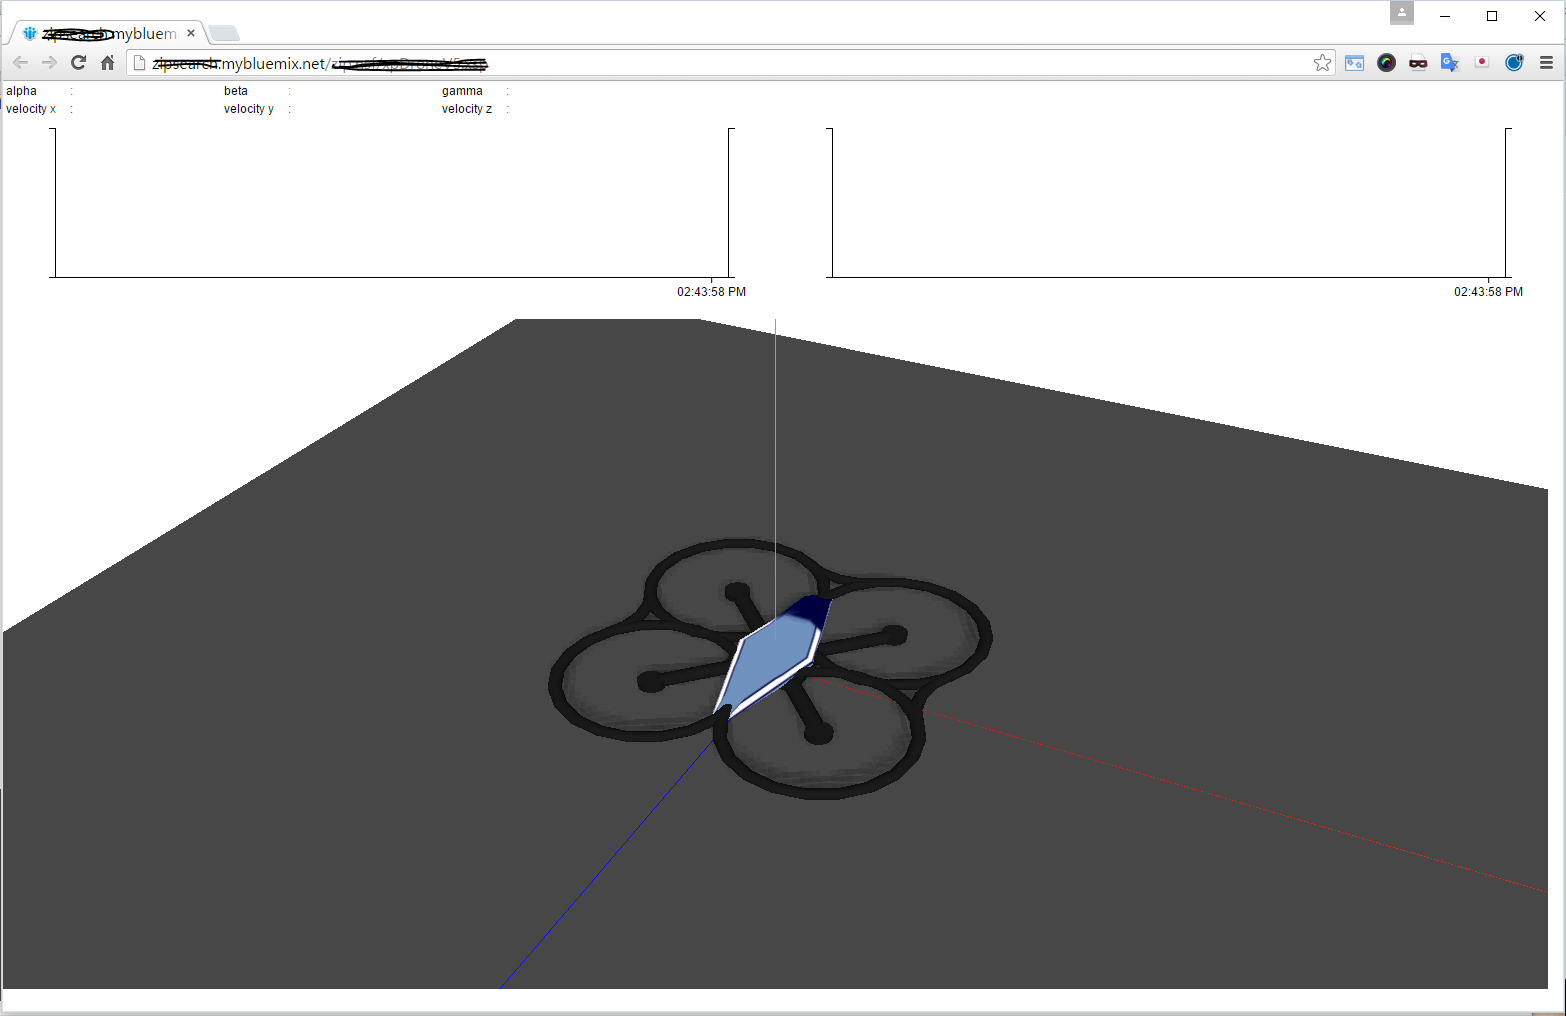
This project is still under development, but we've already finished the WebGL part to synchronize the drone on the browser like below.
Since this is onsite session, please apply the session by following url.
http://partner.cons20.info/portal.nsf/pages/pub
XPAGESDAY 2015 details
Date:11/17/2015 (Tue), 11/18/2015 (Wed)
Place:11/17/2015 (Tue) - online session, 11/18/2015 (Wed) - online and onsite sessions at IBM Hakozaki Office, Japan
XPagesDay official site: http://xpagesday.com/xpagesday.nsf/home.xsp

KTRICK interview about IBM Verse has been posted in WIRED Japan online


KTRICK interview has been posted in WIRED Japan online
9/14/2015、KTrick president, Kazunori Tatsuki's interview about IBM Verse has been posted in WIRED.JP.
⇒ http://wired.jp/innovationinsights/post/social/i/verse/ (Japanese only)
This interview was posted in IBM special site in WIRED.JP called "INNOVATION INSIGHTS"(http://wired.jp/innovationinsights/).
Please check out our post regarding IBM Verse which was written for IBM event called IBM XCITE 2015 Spring.
https://www.ktrick.com/ibm-verse/
Special Thanks to all Wired.JP interviewer and IBMer who are dedicated to publish this post.

How to change the XPages radio button design by CSS
How to apply the CSS design to the radio button in general
If you want to change the radio button or checkbox design by css, usually you need to prepare the HTML source code like below:
The most important point in above HTML is having the "input" and "label" tag as sibling hierarchy. Based on this html, CSS should be specified as following:
First of all, hiding the original radio design by setting opacity 0.
In the next step, you can design the button as you like by using label tag like below.
The css above is the one example of customizing the radio button. The HTML and CSS would be like the image below:
![]()
The imporatnt point of this CSS is the selector of ”input[type="radio"]+label:before”.
The "+label" means to specify the label tag which is sibling of selected input tag (type is radio). By doing this, customizing the design of selected button.
You might wonder why you need to use label tag instead of using input tag directly. The reason why doing this is because input tag cannot use ":before" and input tag itself needs to be hidden. Therefore label tag is needed to customize the design for radio butto/checkbox.
Actually the explanation above is nothing related with XPages. So you will be able to find many design example if you google for the radio button design.
Now I would like to write the article for how to change the XPages radio button design by using only CSS.
Understand the HTML hierarchy of XPages radio button (radio button group)
To apply the similar design to the XPages radio button, first of all, we need to understand the HTML source code which XPages generates for radio button or radio button group control.
Below example is for radio button group control.
Then, HTML source code is like below. (Domino 9.0.1)
As you can see, label tag has the input tag as a child. In fact, this html structure makes much harder to customize the design for radio button / checkbox.
No way to inform the checked status of radio button to the label tag
In the first example of CSS above, there is selector of "input[type="radio"]:checked+label:before". This means "when radio button has been checked, change the sibling label design!". However as the XPages' HTML structure, you cannot use the selector like first example because generally CSS cannot specify the PARENT element by CHILD element status. ( in this case, input:checked cannot inform the status to the label tag)
(It is actually possible if you use the Javascript like jQuery though...)
Never give up! Applying the design only by CSS!
As I explained, XPages cannot use the example CSS above. So I needed to find the other way to apply the custom design.
Using "box-shadow"
After spending a lot of try and error, the CSS for XPages radio button control became like below:
In this CSS, "label:before" specifies the outline of radio button, and "label:after" specifies the checked radio design. The point of this CSS is masking the checked radio design by using "box-shadow" for checked and unchecked status.
I know this CSS is more complicated. However you don't need to apply any javascript or any other html attribute value, and control 100% by just using CSS.
By the way, this CSS does not work on IE8 or less since "box-shadow" is part of CSS3 and IE8 does not support it.
Deep dive more
For more advanced CSS style, for example, you can use the image for radio button design.
The XPages source code below applies the three different type of images and express checked status by using opacity.
The image below is the result. When you click the icon image, the image color is displayed clearly and unchecked radio image turns to subtle color.

How to set 'date only' or 'time only' values in fields through XPages
XPages always save date and time in a field
When a form has the fields with "date only" or "time only", then the stored data format are different between Notes Client and XPages.
For example, I prepared the field with "date only" named "Date" as following (sorry, screenshots are all Japanese) :
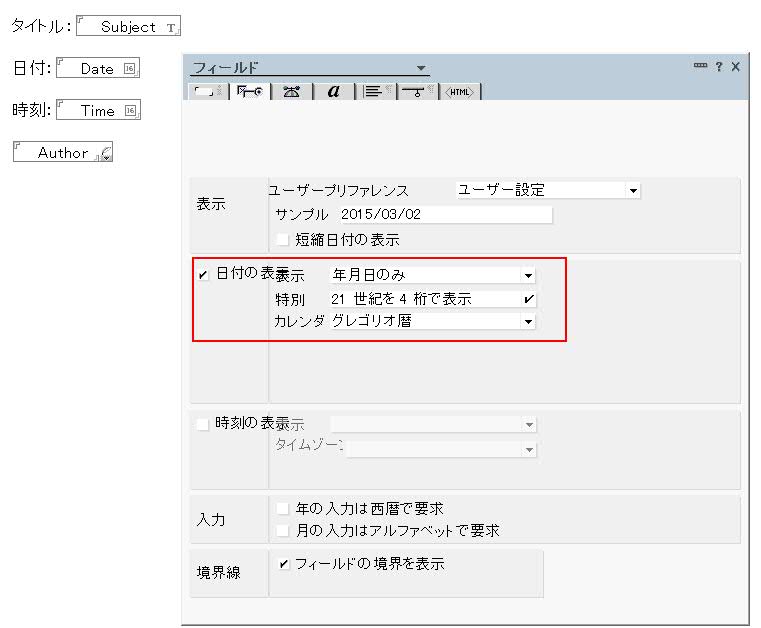
And also field with "time only" named "Time":
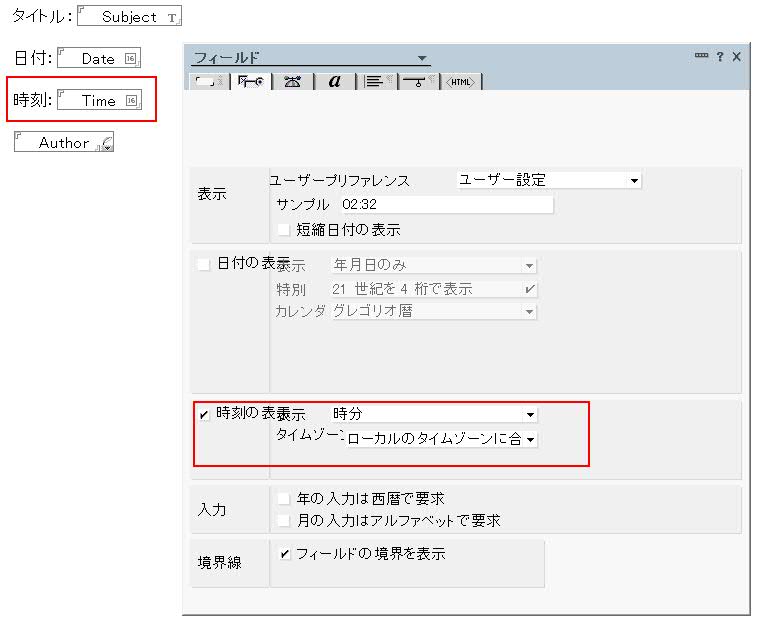
Now I saved a new document with this form from Notes Client (9.0.1 FP3), then I got following fields' data.
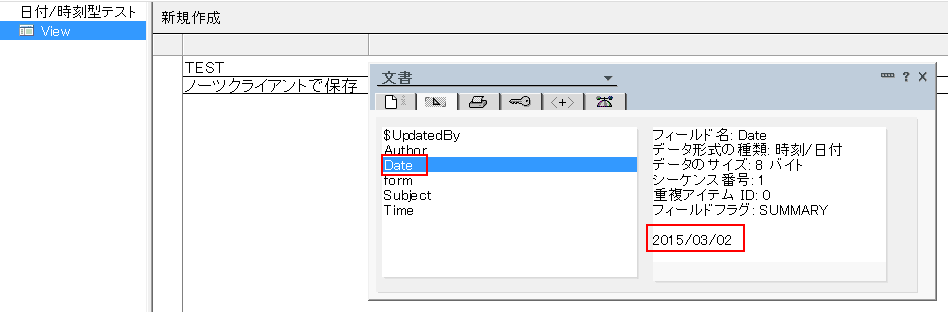
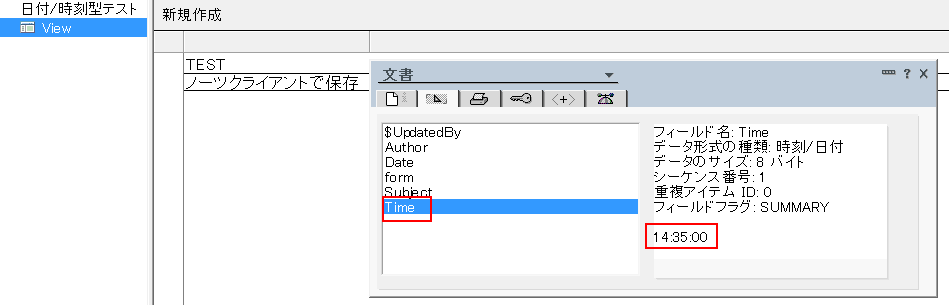
As you see, "Date" field has "2015/03/02", and Time field has"14:35:00"
As the next, I created the simple XPage to save a new document with same form and fields so that I can compare the data between Notes Client and XPages.
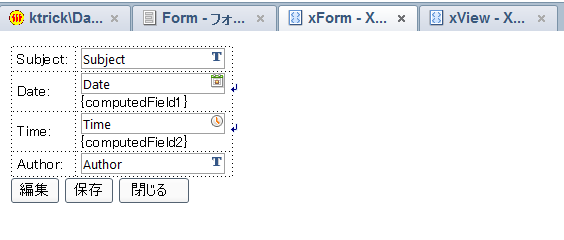
Below is the source code for Date field and Time field in XPages.
Date Field
Time Field
Each inputText specify date, time to the Type attribute of convertDateTime.
After saving a new document from this XPage, below is the screenshot of stored field data:
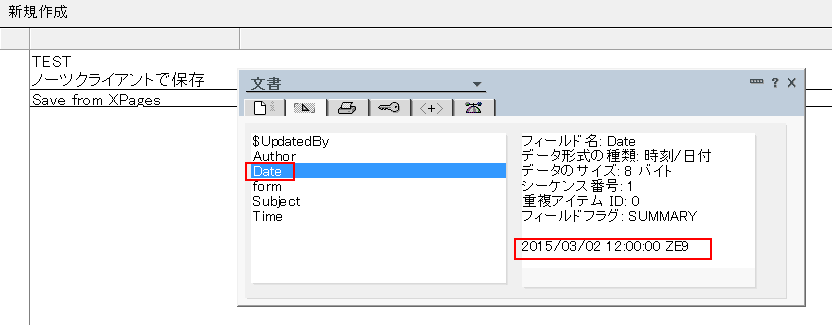
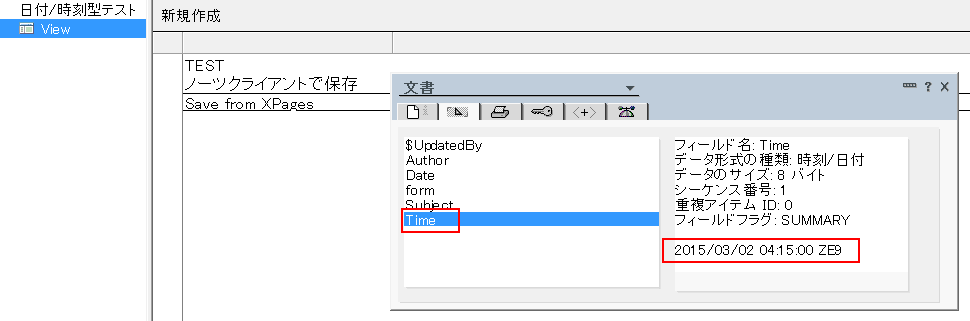
So both of fields have "yyyy/MM/dd hh:mm:dd ZZ" format.
Why you need to save "date only" or "time only" data from XPages?
I just don't post this blog to argue which format is proper way and why XPages behaves differently.
In the real world, I think you or your customers already have the NSF apps and you may want to improve them as the web application by XPages. In that case, especially you decide to keep using the NSF from both Notes Client and XPages, then I recommend to adjust the field format to Notes Client one instead of XPages one so that all existing documents are supported both Notes Client and XPages without changing data.
Use setAnyTime()、setAnyDate() of NotesDateTime class
Maybe there are a lot of way to achieve what I want below. But one of easy way is using NotesDateTime class of SSJS.
The SSJS above converts the DateTime field format by using setAnyTime()、setAnyDate() in PostSaveDocument event after saving the XSP document .

My Session Agenda for ConnectED 2015
This below is my session agenda I made for IBM ConnectED 2015.
For many of attendees, one of important session will be related about IBM Verse. My other buzzwords are bluemix integration, Domino API, Connections API, and of course XPages! like below:
- IBM Verse: Deep Dive and Futures - ID114
- IBM Domino Applications in Bluemix - AD201
- Be Open - Use WebServices And REST In XPages Applications - BP108
- There's an API for That! Why and How To Build on the IBM Connections Platform - BP205
This year also has a lot of great session as usual. I cannot wait! :-)
2015.01.25(Sun)
IBM Domino Applications on Cloud - MAS104
03:45 午後 - 04:45 午後 - Walt Disney World Swan, Swan 7-10
Pete Janzen (IBM), Christian Guedemann (WebGate Consulting AG)
2015.01.26(Mon)
IBM ConnectED - A New Way to Engage - OGS101
08:00 午前 - 09:30 午前 - Walt Disney World Swan, Swan 1-10
IBM Verse: Deep Dive and Futures (R1) - ID114
10:45 午前 - 11:45 午前 - Walt Disney World Swan, Swan 5-6
Andrew Davis (IBM)
IBM Domino - 2015 and Beyond (R1) - ID107
01:00 午後 - 02:00 午後 - Walt Disney World Swan, Swan 5-6
Scott Vrusho (IBM)
IBM Domino Applications in Bluemix - AD201
02:15 午後 - 03:15 午後 - Walt Disney World Dolphin, S. Hem 2
Martin Donnelly (IBM)
The Future of Web Development - Write Once, Run Everywhere with AngularJS and Domino - BTE102
03:45 午後 - 04:45 午後 - Walt Disney World Swan, Toucan 1-2
Mark Roden (PSC Group LLC)
IBM Verse AppDev and Extensibility - AD104
05:00 午後 - 06:00 午後 - Walt Disney World Swan, Swan 7-10
Andrew Davis (IBM)
2015.01.27(Tue)
ConnectED 2015 IBM Business Partner Kickoff Session - BPO101
08:00 午前 - 10:15 午前 - Walt Disney World Swan, Swan 5-6
Lou Sassano (IBM)
IBM Domino App Dev Futures - AD101
08:00 午前 - 09:00 午前 - Walt Disney World Swan, Swan 7-10
Eamon Muldoon (IBM)
There's an API for That! Why and How To Build on the IBM Connections Platform - BP205
09:15 午前 - 10:15 午前 - Walt Disney World Dolphin, S. Hem 2
Mikkel Flindt Heisterberg (OnTime by Intravision)
Take to the Cloud! Extend Your Applications with IBM Sametime APIs from IBM Connections Cloud - AD204
11:15 午前 - 12:15 午後 - Walt Disney World Swan, Swan 1-2
Brendan Arthurs (IBM)
IBM Notes Applications to the Web: IBM Notes Browser Plug-in - ID106
01:00 午後 - 02:00 午後 - Walt Disney World Dolphin, S. Hem 1
Rajesh Patil (IBM)
Adding Two Factor Authentication to IBM Connections Cloud - BTE202
02:30 午後 - 03:30 午後 - Walt Disney World Swan, Swan 7-10
Stephen McDonagh (AVX Limited)
Practical IBM Notes and Domino Internet Security - BP102
03:45 午後 - 04:45 午後 - Walt Disney World Swan, Swan 1-2
Daniel Nashed (Nash!Com)
Be Open - Use WebServices And REST In XPages Applications - BP108
05:00 午後 - 06:00 午後 - Walt Disney World Swan, Toucan 1-2
Bernd Hort (assono GmbH)
OpenNTF Domino API: The Community API - CHALK102
06:15 午後 - 07:00 午後 - Walt Disney World Swan, Swan 1-2
Paul Withers (Intec Systems Ltd)
2015.01.28(Wed)
XPages and Java: Share your Experience - CHALK405
07:15 午前 - 08:15 午前 - Walt Disney World Dolphin, S. Hem 2
Bernd Hort (assono GmbH)
From XPages Hero To OSGi Guru: Taking The Scary Out Of Building Extension Libraries - BP106
08:30 午前 - 09:30 午前 - Walt Disney World Swan, Swan 3-4
Paul Withers (Intec Systems Ltd), Christian Guedemann (Webgate)
Responsive Application Development for XPages - AD302
11:45 午前 - 12:45 午後 - Walt Disney World Swan, Mockingbird 1-2
Brian Gleeson
Build Your Own Apps in Minutes Leveraging IBM Bluemix and IBM Connections - AD202
01:30 午後 - 02:30 午後 - Walt Disney World Dolphin, S. Hem 2
Miguel Estrada (IBM)
ConnectED Closing Session: A New Way to Engage - CGS102
03:15 午後 - 04:00 午後 - Walt Disney World Swan, Swan 1-10